
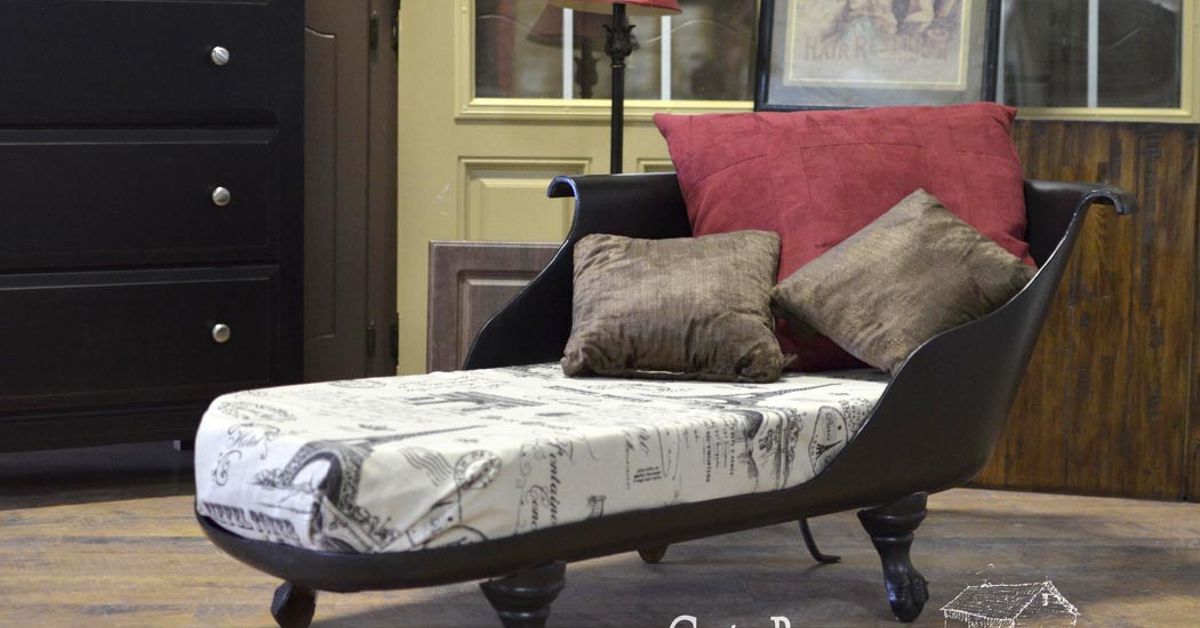
Some furniture whispers, “I came from a showroom.” A clawfoot tub chaise lounge announces, “I used to hold bathwater, bubbles, and possibly someone’s dramatic 1920s daydream.” Turning a vintage clawfoot tub into a DIY chaise lounge is one of those upcycling projects that instantly becomes the star of a porch, sunroom, garden corner, boutique lobby, or quirky reading nook.
The idea is simple: take an old clawfoot bathtub, clean it, refinish it, make it comfortable, and style it like a one-of-a-kind lounge chair. The reality is a little more involved. Clawfoot tubs are heavy, often made of cast iron, and many older pieces may have peeling paint, rust, fragile enamel, or mystery coatings from decades past. That means this project is part furniture design, part salvage rescue, and part “please measure twice before your living room becomes a plumbing museum.”
This guide explains how to transform a clawfoot tub into a DIY chaise lounge in a safe, stylish, and realistic way. It focuses on practical planning, design choices, cleaning, refinishing, cushion construction, placement, and lessons learned from real upcycling projects. For any cutting, grinding, structural metalwork, or suspected lead paint removal, hire a qualified adult professional. Your chaise should become a conversation piece, not a cautionary tale.
Why Turn a Clawfoot Tub into a Chaise Lounge?
A clawfoot tub already has the bones of a dramatic chaise: a long curved body, elegant feet, and a built-in silhouette that looks like it escaped from a vintage hotel. Instead of sending an old tub to the landfill, you can turn it into functional decor with personality.
For interior design, a clawfoot tub lounge adds instant character. It works especially well in eclectic, farmhouse, cottagecore, industrial, vintage, garden, and maximalist spaces. Outdoors, it can become a whimsical patio seat when finished with weather-friendly materials. Indoors, it can be dressed with velvet cushions, linen pillows, or leather-look upholstery for a more polished feel.
The project is also a smart example of architectural salvage. Old tubs are often available from renovation projects, salvage yards, estate sales, online marketplaces, or local reuse centers. A well-made cast iron tub can last for generations, even if it is no longer practical as a bathroom fixture.
Before You Begin: Safety, Weight, and Realistic Expectations
Before falling in love with the prettiest claw feet you have ever seen, think through the practical side. Cast iron clawfoot tubs can be extremely heavy. Moving one usually requires several capable adults, lifting straps, a dolly, and a clear route. If stairs are involved, call professionals. No chaise lounge is worth a sprained back and three ruined friendships.
Older tubs may also have lead-based paint on the exterior, especially if they have been repainted over the years. Disturbing old paint by sanding, grinding, scraping, or cutting can create hazardous dust. Test suspicious coatings before refinishing, and use lead-safe procedures or professional services when needed.
Another important point: many viral DIY tub sofas involve cutting away one side of the tub. That can look beautiful, but cutting cast iron or steel requires specialized tools, protective equipment, and experience. For a safer home project, consider a no-cut chaise design. In this version, the tub stays intact, and comfort is created with a raised cushion system, bolsters, pillows, and smart positioning.
Choosing the Right Clawfoot Tub
Look for a Stable Shape
The best tub for a chaise lounge has a comfortable length, sturdy feet, and no major cracks through the structure. Roll-top and slipper tubs are especially attractive because their curved ends naturally support lounging. A double-ended tub can also work well if you want a symmetrical sofa-style seat.
Inspect the Feet
Original claw feet are a major part of the charm, but they must be secure. Check whether the feet attach tightly and whether the tub rocks. Missing or mismatched feet can sometimes be replaced, but sourcing replacements may take time. A lounge must sit flat and stable before anyone uses it.
Check the Interior Enamel
For a chaise lounge, the enamel does not need to be bathtub-perfect, but it should be safe to touch. Avoid tubs with sharp chips, loose flakes, or severe rust around the interior edge. Small cosmetic marks can add character, but rough damaged areas should be repaired or covered.
Consider Size and Placement
Measure the tub, doorways, hallway turns, and the final space. A beautiful tub that cannot fit through the door is not furniture; it is an outdoor monument to optimism.
Tools and Materials You May Need
Your exact supply list depends on the condition of the tub and whether the chaise will live indoors or outdoors. For a no-cut DIY clawfoot tub chaise lounge, common materials include:
- Gentle dish soap, vinegar solution, non-abrasive sponges, and microfiber cloths
- Painter’s tape and drop cloths
- Rust-inhibiting primer and durable paint for the tub exterior
- Protective clear coat for painted surfaces
- Rubber pads or furniture glides for the claw feet
- Cardboard or craft paper for templates
- Plywood or a custom support board for the cushion base
- High-density upholstery foam
- Polyester batting for cushion softness
- Indoor or outdoor upholstery fabric
- Bolster pillows, lumbar pillows, and removable cushion covers
- Anti-slip pads or hook-and-loop strips to keep cushions in place
For safety, use gloves, eye protection, and a properly rated respirator whenever working around old coatings, dust, or strong finishes. Keep children and pets away from the work area.
Step 1: Plan the Chaise Design
Start with the design before you touch a brush. Decide whether your clawfoot tub chaise lounge will be used indoors, on a covered porch, or outdoors. Indoor designs can use softer fabrics such as velvet, chenille, cotton canvas, or linen blends. Outdoor designs need weather-resistant foam, quick-drying cushion construction, UV-resistant fabric, and a finish that can handle moisture.
Next, decide how people will sit in it. A true chaise needs a long seat cushion, a supportive back angle, and a comfortable place for the legs. Since the tub sides are high, the easiest approach is to build up the seating level with foam and pillows. The cushion should sit high enough that getting in and out feels natural, not like climbing into a decorative canoe.
If the tub has one raised slipper end, use that as the lounging back. If both ends are equal, choose the side with the best view or the most comfortable curve. Add a thick back cushion or bolster to soften the enamel surface.
Step 2: Clean the Tub Thoroughly
Begin with a deep clean. Remove dirt, soap scum, grease, loose paint chips, and debris. Use gentle dish soap and warm water first. For mineral haze or light stains, a diluted vinegar solution can help. Avoid harsh abrasive cleaners on enamel because they can dull the surface.
Pay attention to the rim, drain area, and foot attachments. These spots often collect grime. Dry the tub completely after cleaning so you can see what you are working with. Moisture trapped under cushions or paint can cause rust later.
Step 3: Repair Minor Cosmetic Issues
Small chips or rough enamel spots can often be smoothed or covered with a suitable repair product. Rust on the exterior should be treated before painting. If the tub has plumbing holes you do not want to see, they can be covered with decorative metal plates, wood accents, upholstered panels, or fitted trim.
For serious structural cracks, unstable legs, or extensive rust-through, do not use the tub as seating until it has been evaluated by a professional. A chaise lounge needs to support real weight safely.
Step 4: Refinish the Exterior
The exterior is where your design personality comes out. A glossy black tub with gold feet feels dramatic and boutique. Sage green with cream cushions says garden-party elegance. White enamel with navy ticking stripes goes full coastal cottage. Bright pink? That is not a chaise lounge; that is a lifestyle choice, and frankly, respect.
If the existing exterior paint is sound, you may only need cleaning, light preparation, primer, and paint. If paint is peeling or unknown, be cautious. Older paint may contain lead, and aggressive sanding or scraping can be dangerous. When in doubt, test first or hire a professional refinisher.
Use a primer designed for metal surfaces and a durable paint suitable for the location. For outdoor use, choose exterior-rated products and add a protective topcoat if recommended by the manufacturer. Paint the claw feet separately if possible, or tape carefully around them for a crisp finish.
Step 5: Protect the Floor and Stabilize the Feet
Clawfoot tubs have small contact points, so protect your flooring. Use rubber furniture pads, non-slip cups, or custom glides under the feet. On a porch or patio, place the chaise on a level surface. On wood floors, use pads that prevent scratches and help distribute weight.
Check for wobble before adding cushions. If the tub rocks, adjust the feet or use proper leveling pads. Do not rely on pillows to hide instability. Pillows are for comfort, not engineering.
Step 6: Make a Seat Template
The inside of a clawfoot tub is curved, so standard rectangular cushions rarely fit perfectly. Make a template using cardboard, craft paper, or thin foam board. Place it inside the tub and trim until it follows the shape of the base. Mark the front, back, and any drain openings or curves.
This template becomes your guide for the support board and cushion. A custom fit makes the finished chaise look intentional instead of “I dropped patio cushions into a bathtub and hoped for the best.”
Step 7: Build the Cushion Base
A support board helps create a level sitting surface. Plywood is commonly used for furniture seat bases, but it must be shaped correctly and sealed if moisture is possible. For outdoor or porch use, choose exterior-grade plywood or another moisture-resistant support material.
The board should rest securely inside the tub without damaging the enamel. Add felt, rubber strips, or foam padding underneath contact points. This reduces sliding and protects the tub surface.
For a deeper chaise feel, the support can be slightly raised using safe, stable blocking designed by someone experienced with furniture construction. Avoid wobbly stacks, loose blocks, or anything that shifts when weight is applied.
Step 8: Choose the Right Foam
Comfort depends heavily on foam quality. For a lounge seat, use high-density upholstery foam thick enough to soften the hard tub shell. A thin cushion may look cute in photos but feel like sitting on a well-dressed frying pan.
For indoor use, standard upholstery foam wrapped in batting can work well. For outdoor use, consider quick-dry foam or foam paired with water-resistant construction. Outdoor cushions should not trap water, or they can develop mildew and unpleasant smells.
Wrap the foam in polyester batting for a softer, rounded look. Then cover it with fabric that suits the room and expected wear. Removable covers with zippers are ideal because clawfoot tub lounges tend to attract attention, snacks, pets, and the occasional person who says, “Wait, can I sit in that?”
Step 9: Upholster the Cushion
Use your template to cut the foam and fabric. If sewing is not your favorite sport, you can hire a local upholsterer for a custom cushion. This is often worth the cost because the cushion is what turns the project from novelty to usable furniture.
Choose fabric based on location. For a sunny room, fade-resistant fabric is smart. For a covered porch, outdoor fabric helps resist moisture. For a dramatic indoor lounge, consider velvet, performance linen, or textured boucle.
Add anti-slip material beneath the cushion so it stays put. Hook-and-loop strips can work if attached in a way that does not permanently damage enamel. Removable solutions are best because they allow cleaning and seasonal updates.
Step 10: Add Back Support and Bolsters
The tub’s curved wall gives the chaise its shape, but it is not automatically comfortable. Use large bolster pillows along the back and one end. A wedge cushion can help create a better lounging angle. Smaller pillows can fill gaps and make the tub feel cozy.
For a slipper tub, place a thick back pillow against the raised end. For a flat-ended tub, use a long bolster across one side to create a sofa-like backrest. Mix cushion shapes so the lounge supports sitting, reclining, and dramatic reading poses.
Step 11: Style the Finished Chaise Lounge
Styling is where the clawfoot tub chaise really shines. Indoors, pair it with a small side table, a reading lamp, and a textured throw. Outdoors, surround it with potted plants, lanterns, and washable pillows. In a garden, place it under a pergola or near climbing vines for a storybook effect.
Color matters. A white tub with striped cushions feels classic. A matte black tub with jewel-tone pillows feels modern and moody. A pastel exterior with floral cushions leans playful and vintage. If the claw feet are ornate, highlight them with metallic paint or a contrasting color.
The goal is to make the tub look like furniture, not like a bathroom fixture that got lost on the way to renovation. Repeating colors from the surrounding decor helps it blend into the space.
Indoor vs. Outdoor Clawfoot Tub Chaise Lounge
Indoor Placement
Indoor tub lounges are easier to maintain. You can use plusher fabrics, softer foam, and decorative pillows. Place the chaise in a reading corner, large bathroom, bedroom, studio, or sunroom. Use floor protection under the feet, especially on hardwood.
Outdoor Placement
Outdoor placement requires more planning. Use exterior-grade paint, weather-resistant fabric, quick-drying cushion materials, and a covered location if possible. Drainage matters too. If water collects inside the tub, remove cushions during rain or create a safe moisture-management plan with professional guidance.
A covered porch is often the sweet spot: you get outdoor charm without exposing the chaise to constant rain and harsh sunlight.
Common Mistakes to Avoid
Using a Damaged Tub Without Reinforcement
Do not assume every old tub is safe for seating. Cracks, loose feet, deep rust, and unstable bases are serious issues.
Ignoring Lead Paint Risk
Vintage charm sometimes comes with vintage hazards. Test old coatings before disturbing them. Avoid dry sanding unknown paint.
Making the Seat Too Low
If the cushion sits too low, the high tub walls can make the chaise awkward to enter and exit. Raise the cushion level safely for better comfort.
Skipping Cushion Templates
A tub interior is not a rectangle. Templates save time, fabric, foam, and frustration.
Forgetting Maintenance
Painted surfaces, metal feet, and cushions all need occasional care. Clean gently, dry thoroughly, and store outdoor cushions during harsh weather.
Cost Considerations
The cost of a DIY clawfoot tub chaise lounge varies widely. A salvaged tub may cost very little if you find one locally, but moving it can cost more than expected. Paint, primer, cushion foam, fabric, and upholstery work can add up. If you hire a professional for refinishing, cutting, or custom cushions, the budget rises.
Still, compared with buying a designer statement chaise, a DIY version can offer more character and customization. The smartest approach is to spend where it matters: safe structure, durable finish, and comfortable cushions.
of Real-World Experience: What This Project Teaches You
Transforming a clawfoot tub into a DIY chaise lounge teaches one lesson almost immediately: old things have opinions. A modern flat-pack chair politely follows instructions. A vintage tub arrives with chipped paint, weird screw sizes, stubborn feet, and the confidence of an antique grandparent who has seen everything.
The first real experience is the weight. Even before the design begins, you learn to respect cast iron. Moving a clawfoot tub is not a casual “grab the other end” situation. Planning the route, protecting floors, and asking for proper help are part of the project. Many people underestimate this step, then discover that the tub is heavier than their enthusiasm. The smarter move is to treat transportation as its own project phase.
The second experience is learning that cleaning changes everything. A tub that looks hopeless in a garage can become surprisingly beautiful after a careful wash. Old grime hides details: the curve of the rim, the shape of the feet, the original enamel color, and the personality of the piece. Gentle cleaning also helps you decide whether the tub should look polished, rustic, or somewhere in between.
The third experience is patience with imperfections. A clawfoot tub chaise lounge does not need to look factory-made. In fact, it is better when it does not. Tiny marks, age lines, and worn edges tell the story. The trick is knowing the difference between character and damage. Character is a scuff that makes the piece charming. Damage is a sharp chip, unstable foot, or rusted area that affects safety.
The fourth experience is that cushions make or break the project. People notice the tub first, but they remember whether it was comfortable. A beautiful chaise with a thin cushion becomes a photo prop. A well-padded chaise becomes the seat everyone fights over. Taking time to create a proper template and choosing quality foam is worth it.
The fifth experience is that styling should support the tub, not compete with it. Because the chaise is already unusual, the surrounding decor can stay simple. A throw blanket, a few pillows, a plant, and a side table may be enough. Too many accessories can make the space feel like a theater set. Let the tub be the main character.
Finally, this project teaches that DIY does not mean doing every task yourself. Cleaning, painting, cushion planning, and styling can be approachable. Heavy lifting, lead-safe work, metal cutting, and structural repairs are better left to qualified adults or professionals. The best DIY projects are not about proving you can do everything alone. They are about knowing what you can do well, getting help where safety matters, and ending up with something useful, beautiful, and slightly ridiculous in the best possible way.
Conclusion
A clawfoot tub chaise lounge is more than a clever upcycling project. It is a way to save a piece of architectural history and turn it into furniture with humor, elegance, and serious personality. With careful planning, gentle cleaning, safe refinishing, a supportive cushion system, and thoughtful styling, an old bathtub can become the most memorable seat in the house.
The key is balance. Preserve the charm, but do not ignore safety. Celebrate the vintage shape, but make it comfortable. Use bold design, but let the tub’s curves do the talking. Whether it ends up in a sunroom, garden, porch, studio, or reading corner, a DIY clawfoot tub chaise lounge proves that great furniture does not always begin in a furniture store. Sometimes, it starts in a bathroom renovation and ends with someone saying, “I cannot believe I want to sit in a bathtub.”














