
Note: This guide is written for outdoor cooking with a Trangia-style alcohol/spirit burner. Always read your stove’s manual, cook in a well-ventilated area, and check local fire restrictions before lighting any flame.
Introduction: Meet the Little Stove That Refuses to Retire
A Trangia camping stove is one of those pieces of outdoor gear that looks almost too simple to be impressive. No blinking buttons. No dramatic whoosh. No tiny rocket-engine sound announcing that dinner is about to happen. Just a clever windscreen, a brass spirit burner, a pot, a pan, and a quiet flame that has been feeding hikers, paddlers, bikepackers, scouts, and gloriously overconfident instant-noodle chefs for decades.
If you are new to camping stoves, the Trangia can seem mysterious at first. Where does the burner go? Why are there two windshield pieces? What is the simmer ring for? And why is everyone on the trail acting like this small brass cup is a national treasure? The short answer: it is reliable, stable, easy to maintain, and wonderfully unfussy when used correctly.
This step-by-step tutorial explains how to use a Trangia camping stove safely and efficiently, from choosing fuel to lighting the burner, cooking a meal, simmering without scorching your pasta sauce, extinguishing the flame, and packing everything away. We will also cover common beginner mistakes, practical cooking tips, and real-world trail experience so your first Trangia meal does not become a smoky comedy special.
What Is a Trangia Camping Stove?
A Trangia camping stove is a compact outdoor cooking system built around a windshield, cookware, and a burner. The classic Trangia spirit burner uses alcohol-based fuel, often called methylated spirits, denatured alcohol, bioethanol, or alcohol stove fuel depending on where you buy it. The design is popular because it has very few moving parts. Fewer parts mean fewer things to break, which is excellent news when you are hungry, tired, and negotiating with a packet of dehydrated chili.
Most Trangia stove sets include a lower windshield, an upper windshield, one or two saucepans, a frying pan that can also work as a lid, a pot gripper, a strap, and a burner. Some versions use a gas burner instead of a spirit burner, but this article focuses mainly on the classic alcohol burner setup because that is what most people mean when they ask how to use a Trangia stove.
Before You Light It: Safety First, Soup Second
A Trangia is simple, but simple does not mean careless. Alcohol flames can be difficult to see in bright daylight, and liquid fuel can spill if handled poorly. Before you cook, choose a flat, stable, fire-safe surface away from dry grass, leaves, pine needles, tents, backpacks, and anything else that would rather not become part of the evening entertainment.
Use the stove outdoors whenever possible. If you must use it during an emergency in a sheltered place, make sure there is excellent ventilation and plenty of clear space above and around the stove. Never leave a lit camping stove unattended, even for “just a second.” In camping language, “just a second” is exactly when socks catch fire, raccoons investigate cookware, and noodles turn into archaeological material.
Check Fire Restrictions
Before using a Trangia camping stove in a campground, national forest, state park, or backcountry area, check current fire rules. In dry conditions, some land managers restrict or prohibit alcohol stoves because they use an open flame and liquid fuel. A canister stove with an on-off valve may be allowed where an alcohol stove is not. Regulations vary by location and season, so check before you pack.
Use the Right Fuel
For the spirit burner, use alcohol-based fuel only. Common options include denatured alcohol, methylated spirits, or clean-burning bioethanol. Do not use gasoline, white gas, kerosene, diesel, lighter fluid, or any mystery liquid from the back of the garage labeled “probably fine.” It is not fine. It is a bad idea wearing a fake mustache.
Trangia Stove Parts: Know Your Tiny Kitchen
Before lighting the stove, lay out the main parts so you understand how they fit together.
Lower Windshield
The lower windshield is the base of the stove. It holds the burner and protects the flame from wind. It has air holes that help feed the flame oxygen. When setting up the stove, position these air holes toward the wind for better airflow.
Spirit Burner
The brass spirit burner is where the alcohol fuel goes. It usually includes a screw cap for storage, a sealing washer, and a simmer ring. The burner should be filled no more than about two-thirds full. Overfilling wastes fuel and increases spill risk.
Upper Windshield
The upper windshield locks onto the lower windshield and supports the cookware. It also channels heat around the pot, making the system more efficient than placing a pot over a naked flame in the breeze.
Pot Supports
The small folding supports can be flipped down for saucepans and kettles or flipped up for the frying pan. This is one of those details that feels oddly satisfying once you get it right.
Simmer Ring
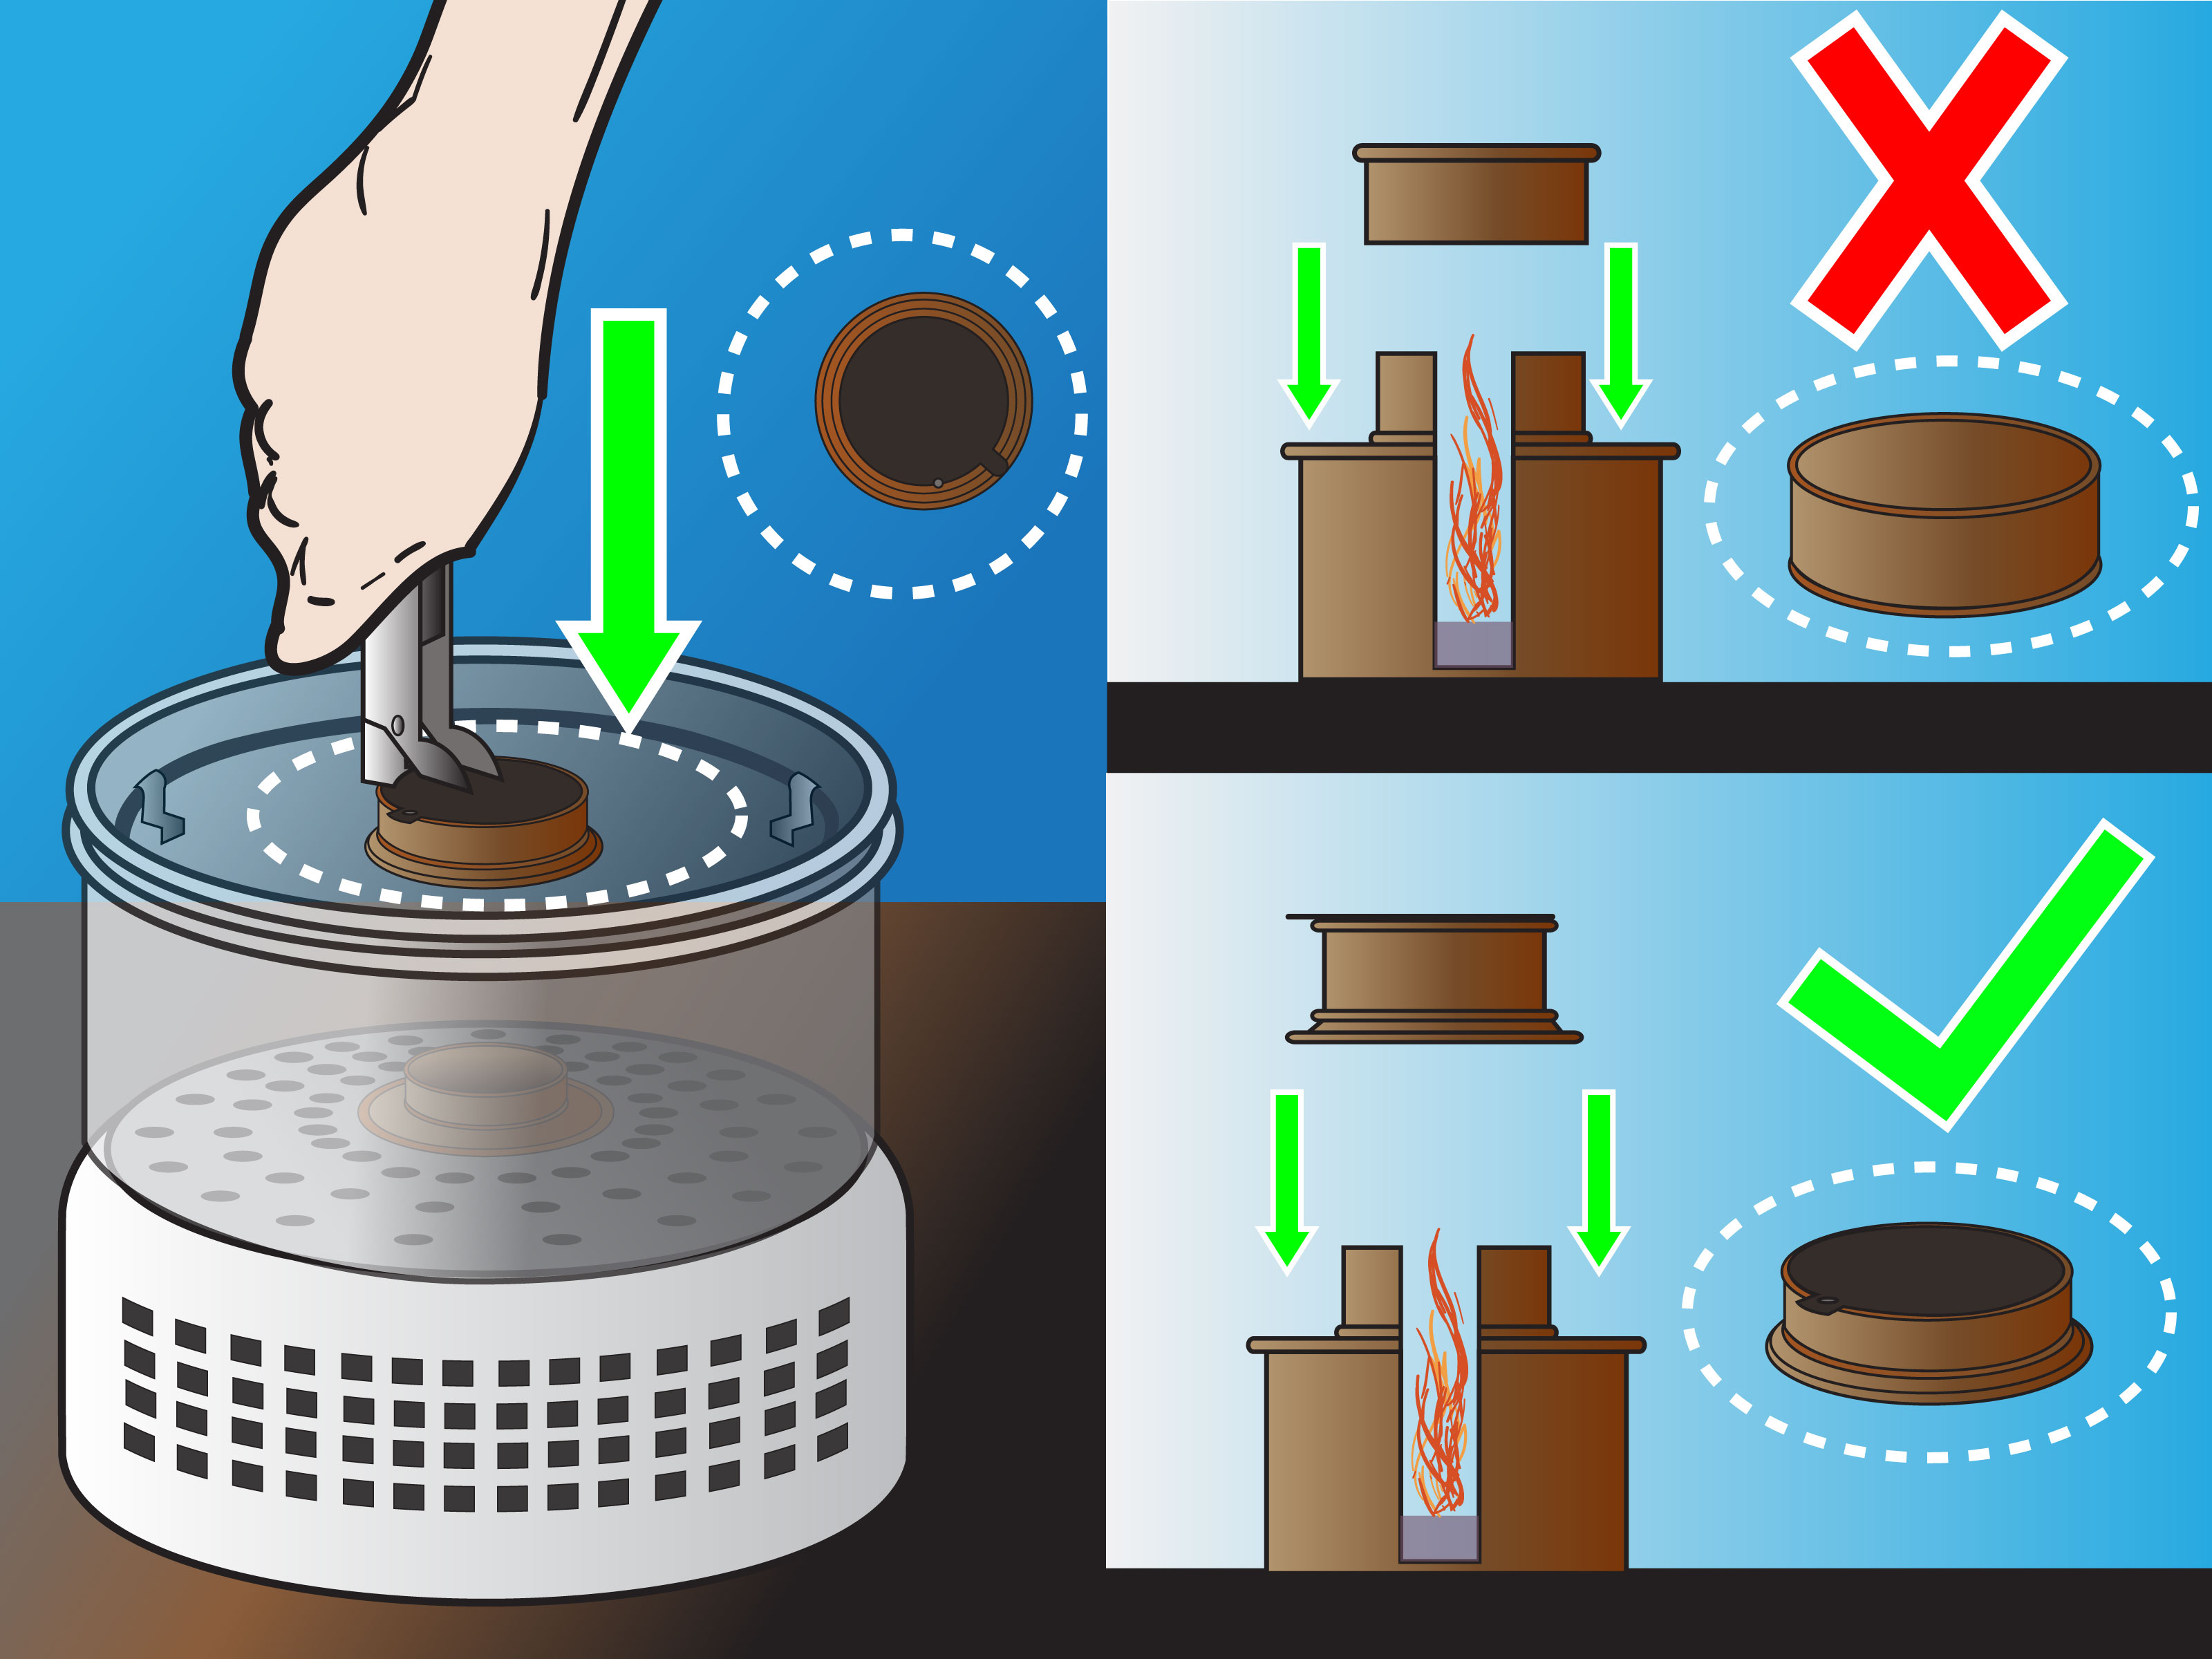
The simmer ring controls the flame. Open it wide for more heat, partially close it for simmering, and close it fully to extinguish the flame. Always use the pot gripper or another safe tool to handle it when hot.
How to Use a Trangia Camping Stove: Step-by-Step
Step 1: Choose a Safe Cooking Spot
Find level ground that is sheltered from strong wind but not enclosed. Clear away leaves, twigs, dry grass, paper wrappers, and loose gear. The surface should be stable enough that the stove will not tip if you stir a pot or bump it gently. A flat rock, packed dirt, picnic table, or designated cooking area works well. Avoid cooking inside a tent. Fabric plus flame equals a very expensive lesson.
Step 2: Set Up the Lower Windshield
Place the lower windshield on the ground with the air holes facing into the wind. This sounds backward, but those holes help the burner breathe. A Trangia’s windshield is one of its biggest strengths; it lets the stove perform steadily in conditions that would annoy many minimalist alcohol stoves.
Step 3: Fill the Spirit Burner
Remove the burner cap and pour in alcohol fuel. Do not fill it more than two-thirds full, which is roughly 100 milliliters on many standard Trangia burners. You do not need to fill it completely for a quick coffee or a simple boil. For short cooking sessions, add only the fuel you expect to use. This saves weight and reduces leftover fuel.
After filling, place the burner into the lower windshield. Wipe away any spilled fuel before lighting. Keep your fuel bottle capped and away from the stove. The fuel bottle does not need a front-row seat for dinner.
Step 4: Attach the Upper Windshield
Set the upper windshield onto the lower windshield and twist or seat it into place, depending on your model. Make sure it is stable before placing cookware on top. If the stove rocks, stop and fix the surface. Do not try to “balance it carefully” while boiling water. That is how dinner becomes a puddle.
Step 5: Adjust the Pot Supports
Flip the pot supports down if you are using a saucepan or kettle. Flip them up if you are using the frying pan. Check that your cookware sits securely. The Trangia system is more stable than many tiny backpacking stoves, but stability still depends on correct setup.
Step 6: Light the Burner
Use a match, lighter, or fire starter to light the fuel in the burner. A long lighter is convenient because it keeps your fingers farther from the flame. Alcohol flames may look small or nearly invisible at first, especially in daylight. Give it a moment. You may see the flame “bloom” as the burner warms and small jets around the burner begin to work.
Never lean your face directly over the burner to check whether it is lit. Use your hand cautiously above and to the side to feel for heat, keeping a safe distance. The old eyebrow test is not recommended, mostly because eyebrows are useful and slow to forgive.
Step 7: Place the Pot or Pan on the Stove
Once the flame is lit, place your pot, kettle, or pan on the supports. For boiling water, use a lid whenever possible. The Trangia frying pan can often serve as a lid for the saucepan. A lid traps heat, shortens boil time, and saves fuel. This matters on long trips, where fuel planning can be the difference between hot coffee and cold sadness.
Step 8: Cook at the Right Heat
For water, tea, coffee, oatmeal, rice, pasta, and freeze-dried meals, a full flame is usually fine. For delicate foods such as eggs, pancakes, fish, or sauces, use the simmer ring. Let the stove warm up, then place the simmer ring over the burner with the adjustable opening partially closed. This reduces heat and helps prevent scorching.
Trangia cooking rewards patience. It is not a drag-racing stove. It is more like a dependable trail friend who shows up on time, does the job, and never brags about BTUs.
Step 9: Stir, Rotate, and Watch the Wind
Stir food regularly, especially thicker meals. If the wind shifts, carefully rotate or reposition the stove so the airflow still works properly. Use the pot gripper when handling hot cookware. Trangia pots can heat quickly, and grabbing one barehanded is a fast way to invent new vocabulary.
Step 10: Extinguish the Flame Correctly
To turn off a Trangia spirit burner, use the simmer ring with the lid closed. Place it carefully over the burner to snuff out the flame. Do not blow on the burner. Blowing can spread vapor or disturb liquid fuel. Do not pour water into the burner unless there is an emergency. The normal method is to starve the flame of oxygen with the closed simmer ring.
Step 11: Let Everything Cool
After extinguishing the flame, let the burner and stove cool completely. Do not refill a hot burner. Do not assume it is out simply because you cannot see a flame. Alcohol flames can be sneaky in bright light. Wait until the burner is cool enough to hold comfortably before adding fuel or packing up.
Step 12: Empty, Clean, and Pack
When cooking is finished, empty leftover fuel safely according to your stove instructions and local rules. Many experienced users prefer not to store fuel inside the burner because it can leak and damage the washer in the cap. Clean pots and pans with mild soap, water, and a soft sponge. Avoid harsh scrubbing on nonstick surfaces. Dry every part before packing to reduce corrosion and camp-kitchen funk.
What Can You Cook on a Trangia Stove?
A Trangia camping stove is excellent for simple outdoor meals. Think oatmeal, ramen, couscous, rice packets, pasta, soup, tea, coffee, dehydrated meals, scrambled eggs, sautéed vegetables, and one-pot dinners. It can fry, boil, simmer, and reheat, though it does best when you plan meals around moderate heat rather than high-speed searing.
Easy Beginner Meal: Trail Pasta
Boil water in the saucepan, add quick-cooking pasta, stir often, and use the frying pan as a lid. When the pasta is nearly done, reduce the flame with the simmer ring and stir in sauce, olive oil, tuna, cheese, or dehydrated vegetables. Keep stirring to avoid sticking. The result is simple, filling, and dramatically better than eating crushed granola bars while staring into the distance.
Easy Breakfast: Oatmeal Without the Glue Texture
Bring water to a boil, add oats, then immediately reduce heat with the simmer ring. Stir constantly for a minute or two. Add nuts, dried fruit, peanut butter, or brown sugar. Remove from heat before it thickens too much. Oatmeal continues absorbing water after cooking, because oatmeal enjoys surprises.
Fuel Planning: How Much Alcohol Do You Need?
Fuel use depends on temperature, wind, altitude, pot size, lid use, food type, and how aggressively you cook. A full standard Trangia burner can burn for around 20 to 25 minutes in fair conditions, but boil times vary. For a weekend trip, many solo campers carry a small bottle and estimate fuel by meals rather than by days. A practical starting point is to test your stove at home outdoors: measure how much fuel it takes to boil your usual amount of water, then add a safety margin.
Use a clearly labeled fuel bottle with a secure cap. Keep fuel away from children, pets, flames, and food. Never carry alcohol fuel in a drink bottle without bold labeling. Nobody wants to discover “forbidden water” the hard way.
Common Beginner Mistakes
Overfilling the Burner
More fuel does not mean better cooking. It can increase spill risk and waste fuel. Fill only what you need, and never exceed the recommended maximum.
Refilling While Hot
This is one of the most important rules. Never refill the burner until it is completely out and cool. A nearly invisible flame can ignite fresh fuel unexpectedly.
Cooking on Flammable Ground
Dry leaves, pine needles, and grass are not a stove platform. Clear the area first. During dry seasons, be extra cautious or choose a different stove if alcohol stoves are restricted.
Expecting Jet-Boil Speed
A Trangia is steady, quiet, and efficient in its own way, but it is not the fastest stove on the trail. Build a few extra minutes into your cooking routine and enjoy the silence.
Forgetting the Pot Gripper
The pot gripper is not decorative. It is the difference between dinner in a bowl and dinner on your shoes.
Trangia Stove Maintenance and Care
After each trip, wash the cookware by hand and dry it thoroughly. Store the burner empty and clean. Check the cap washer occasionally; if it is cracked, flattened, or damaged, replace it. Keep soot away from the rest of your gear by packing the stove in its bag or wrapping sooty parts separately.
If you use nonstick Trangia cookware, choose wooden, silicone, or plastic utensils. Metal utensils can scratch the coating. If food burns onto the pot, soak it rather than attacking it like a raccoon with a vendetta.
Extra Field Experience: Real-World Lessons from Using a Trangia Camping Stove
The first thing most campers notice about a Trangia is not speed. It is calm. A canister stove often hisses like it has urgent gossip, but a Trangia spirit burner is nearly silent. That quiet changes the mood of camp. You can hear the creek, the wind in the trees, or your hiking partner explaining for the fifth time that the shortcut was “technically shorter on the map.”
In real use, the Trangia shines when you are cooking for one or two people and you are not in a hurry. It is especially pleasant for canoe camping, bike touring, car camping with a minimalist kit, and relaxed backpacking trips where reliability matters more than shaving every possible second from boil time. The wide base and integrated windshield make it feel secure compared with tiny upright stoves perched on fuel canisters.
One practical habit is to organize the cooking area before lighting the stove. Have water, food, spoon, pot gripper, lid, simmer ring, and fuel bottle exactly where they need to be. Once the burner is lit, you should not be digging through a backpack looking for noodles while your precious fuel burns away. Trangia cooking is simple, but it rewards preparation.
Another useful lesson: the simmer ring is your friend, but it takes practice. For meals that scorch easily, such as eggs or thick sauces, start with more heat to warm the pan, then reduce the flame early. Do not wait until the food is already sticking. Alcohol stoves respond more slowly than gas stoves, so think ahead. The goal is gentle heat, not a culinary reenactment of a volcano documentary.
Wind is also a teacher. The Trangia windshield is excellent, but strong gusts still affect cooking. A natural windbreak, such as a rock, log, or picnic-table side, can help as long as ventilation remains safe and the stove has clear space around it. Never wrap the stove in an unsafe homemade enclosure that traps too much heat. The built-in windscreen is designed to balance protection and airflow.
Cold weather requires patience. Alcohol fuel can be harder to light and slower to bloom when temperatures drop. Keep the fuel bottle warm in a jacket pocket before cooking, and consider a preheater if your model supports one. For deep winter snow melting, a Trangia spirit burner is usually not the fastest or most fuel-efficient choice, but for cool-weather meals it can still work well with planning.
Meal choice matters. Trangia cooking feels easiest when meals use short cook times: instant rice, couscous, ramen, quick pasta, dehydrated beans, instant mashed potatoes, soup mixes, and boil-in-bag meals. Long-simmer foods can be done, but they use more fuel. If you dream of slow-cooked wilderness stew, wonderfulbut bring enough fuel and maybe a patient friend.
Cleaning is easier if you prevent burning in the first place. Add a little extra water to sticky meals, stir often, and remove the pot from heat before the food becomes too thick. The pot continues to hold heat after you lift it off the stove. This “coast cooking” is perfect for oatmeal, noodles, and rice packets.
Finally, the best Trangia habit is to practice before the trip. Set it up in your backyard, driveway, or another safe outdoor area. Boil two cups of water. Make tea. Cook a basic meal. Learn how the flame looks, how the simmer ring behaves, and how long cooling takes. That small practice session can prevent confusion later when it is dark, windy, and your stomach has started making executive decisions.
Conclusion: A Simple Stove, Used the Smart Way
Learning how to use a Trangia camping stove is mostly about respecting a simple system. Set it on stable ground, use the correct alcohol fuel, fill the burner carefully, protect the flame with the windshield, cook with a lid when possible, control heat with the simmer ring, and let everything cool before refilling or packing. Do those things, and the Trangia becomes one of the most dependable little camp kitchens you can carry.
It may not be the fastest stove in the outdoor world, but it has charm, durability, and a quiet confidence that many campers love. It turns basic ingredients into warm meals without drama, which is exactly what you want after a long trail day. Use it safely, practice before your trip, and your Trangia may become the piece of gear you trust long after flashier gadgets have retired to the closet.














