
Drywall anchors are the tiny wall heroes nobody appreciates until a shelf crashes down at 2 a.m. and your favorite mug becomes modern art. If you have ever tried to hang a mirror, towel bar, floating shelf, curtain rod, picture frame, coat hook, or small cabinet on drywall, you already know the problem: drywall looks solid, but it does not grip screws the way wood studs do. A screw driven directly into drywall may hold a light photo for a while, but add weight, vibration, or one enthusiastic door slam, and gravity suddenly files a complaint.
The good news is that learning how to use drywall anchors is simple once you understand which anchor fits the job. This easy installation guide walks you through the main types of drywall anchors, when to use each one, how to drill the right pilot hole, how to avoid common mistakes, and how to hang items securely without turning your wall into Swiss cheese. Whether you are decorating an apartment, upgrading a bathroom, organizing a garage, or finally mounting that shelf you bought “just for quick storage” six months ago, the right wall anchor can make the project cleaner, safer, and much less dramatic.
What Are Drywall Anchors?
Drywall anchors are fasteners designed to help screws hold securely in hollow walls. Most interior drywall is made from gypsum pressed between paper layers. It is excellent for creating smooth walls, but it is not dense enough to hold heavy loads with a plain screw. A drywall anchor spreads the load across a wider area, expands behind the wall, clamps against the drywall, or creates a stronger grip inside the wall cavity.
Think of a drywall anchor as a support system for the screw. The screw does the holding, but the anchor gives it something stronger to bite into. Without an anchor, the screw can tear through the gypsum. With the right anchor, your wall-mounted item has a much better chance of staying where you put it instead of becoming a floor-mounted item.
When Should You Use Drywall Anchors?
You should use drywall anchors whenever you need to hang something on drywall and cannot screw directly into a wall stud. Studs are the vertical wooden or metal framing members behind the drywall. They are usually spaced about 16 or 24 inches apart, and they provide the strongest support. If your item lines up with a stud, use the stud. If it does not, drywall anchors are your next best option.
Drywall anchors are commonly used for picture frames, mirrors, small shelves, towel bars, curtain rods, wall hooks, bathroom accessories, smoke detectors, light decor, and some medium-duty storage items. For very heavy objects such as large cabinets, heavy TVs, pull-up bars, or anything that may support a person’s weight, studs or structural blocking are usually the safer choice. Anchors are useful, but they are not magic. Even the best anchor cannot turn half-inch drywall into a steel beam.
Common Types of Drywall Anchors
1. Plastic Expansion Anchors
Plastic expansion anchors are the classic little ribbed anchors that often come in hardware kits. You drill a pilot hole, tap the anchor into the wall, and drive a screw into it. As the screw enters, the anchor expands slightly and presses against the drywall.
These anchors are best for lightweight items such as small picture frames, lightweight decor, small signs, or simple wall accessories. They are affordable and easy to use, but they are not ideal for shelves, towel bars, or anything that will be pulled on regularly. In other words, they are fine for a framed quote, not for the coat rack that will carry six winter jackets and your emotional baggage.
2. Self-Drilling Drywall Anchors
Self-drilling anchors, also called threaded drywall anchors, have a sharp point and large threads that cut into drywall. Many can be installed with only a Phillips screwdriver or drill driver. You press the tip against the wall and twist until the anchor sits flush with the surface. Then you drive the screw into the anchor.
These are popular because they are fast, clean, and beginner-friendly. They are useful for medium-light items such as curtain brackets, small shelves, wall organizers, bathroom hardware, and decorative hooks. Plastic versions are common, while zinc or metal self-drilling anchors often provide a stronger hold. The key is to drive them straight and stop when the anchor is flush. Keep twisting after that, and you may strip the hole, which is the drywall version of digging yourself into a problem.
3. Molly Bolts or Hollow-Wall Anchors
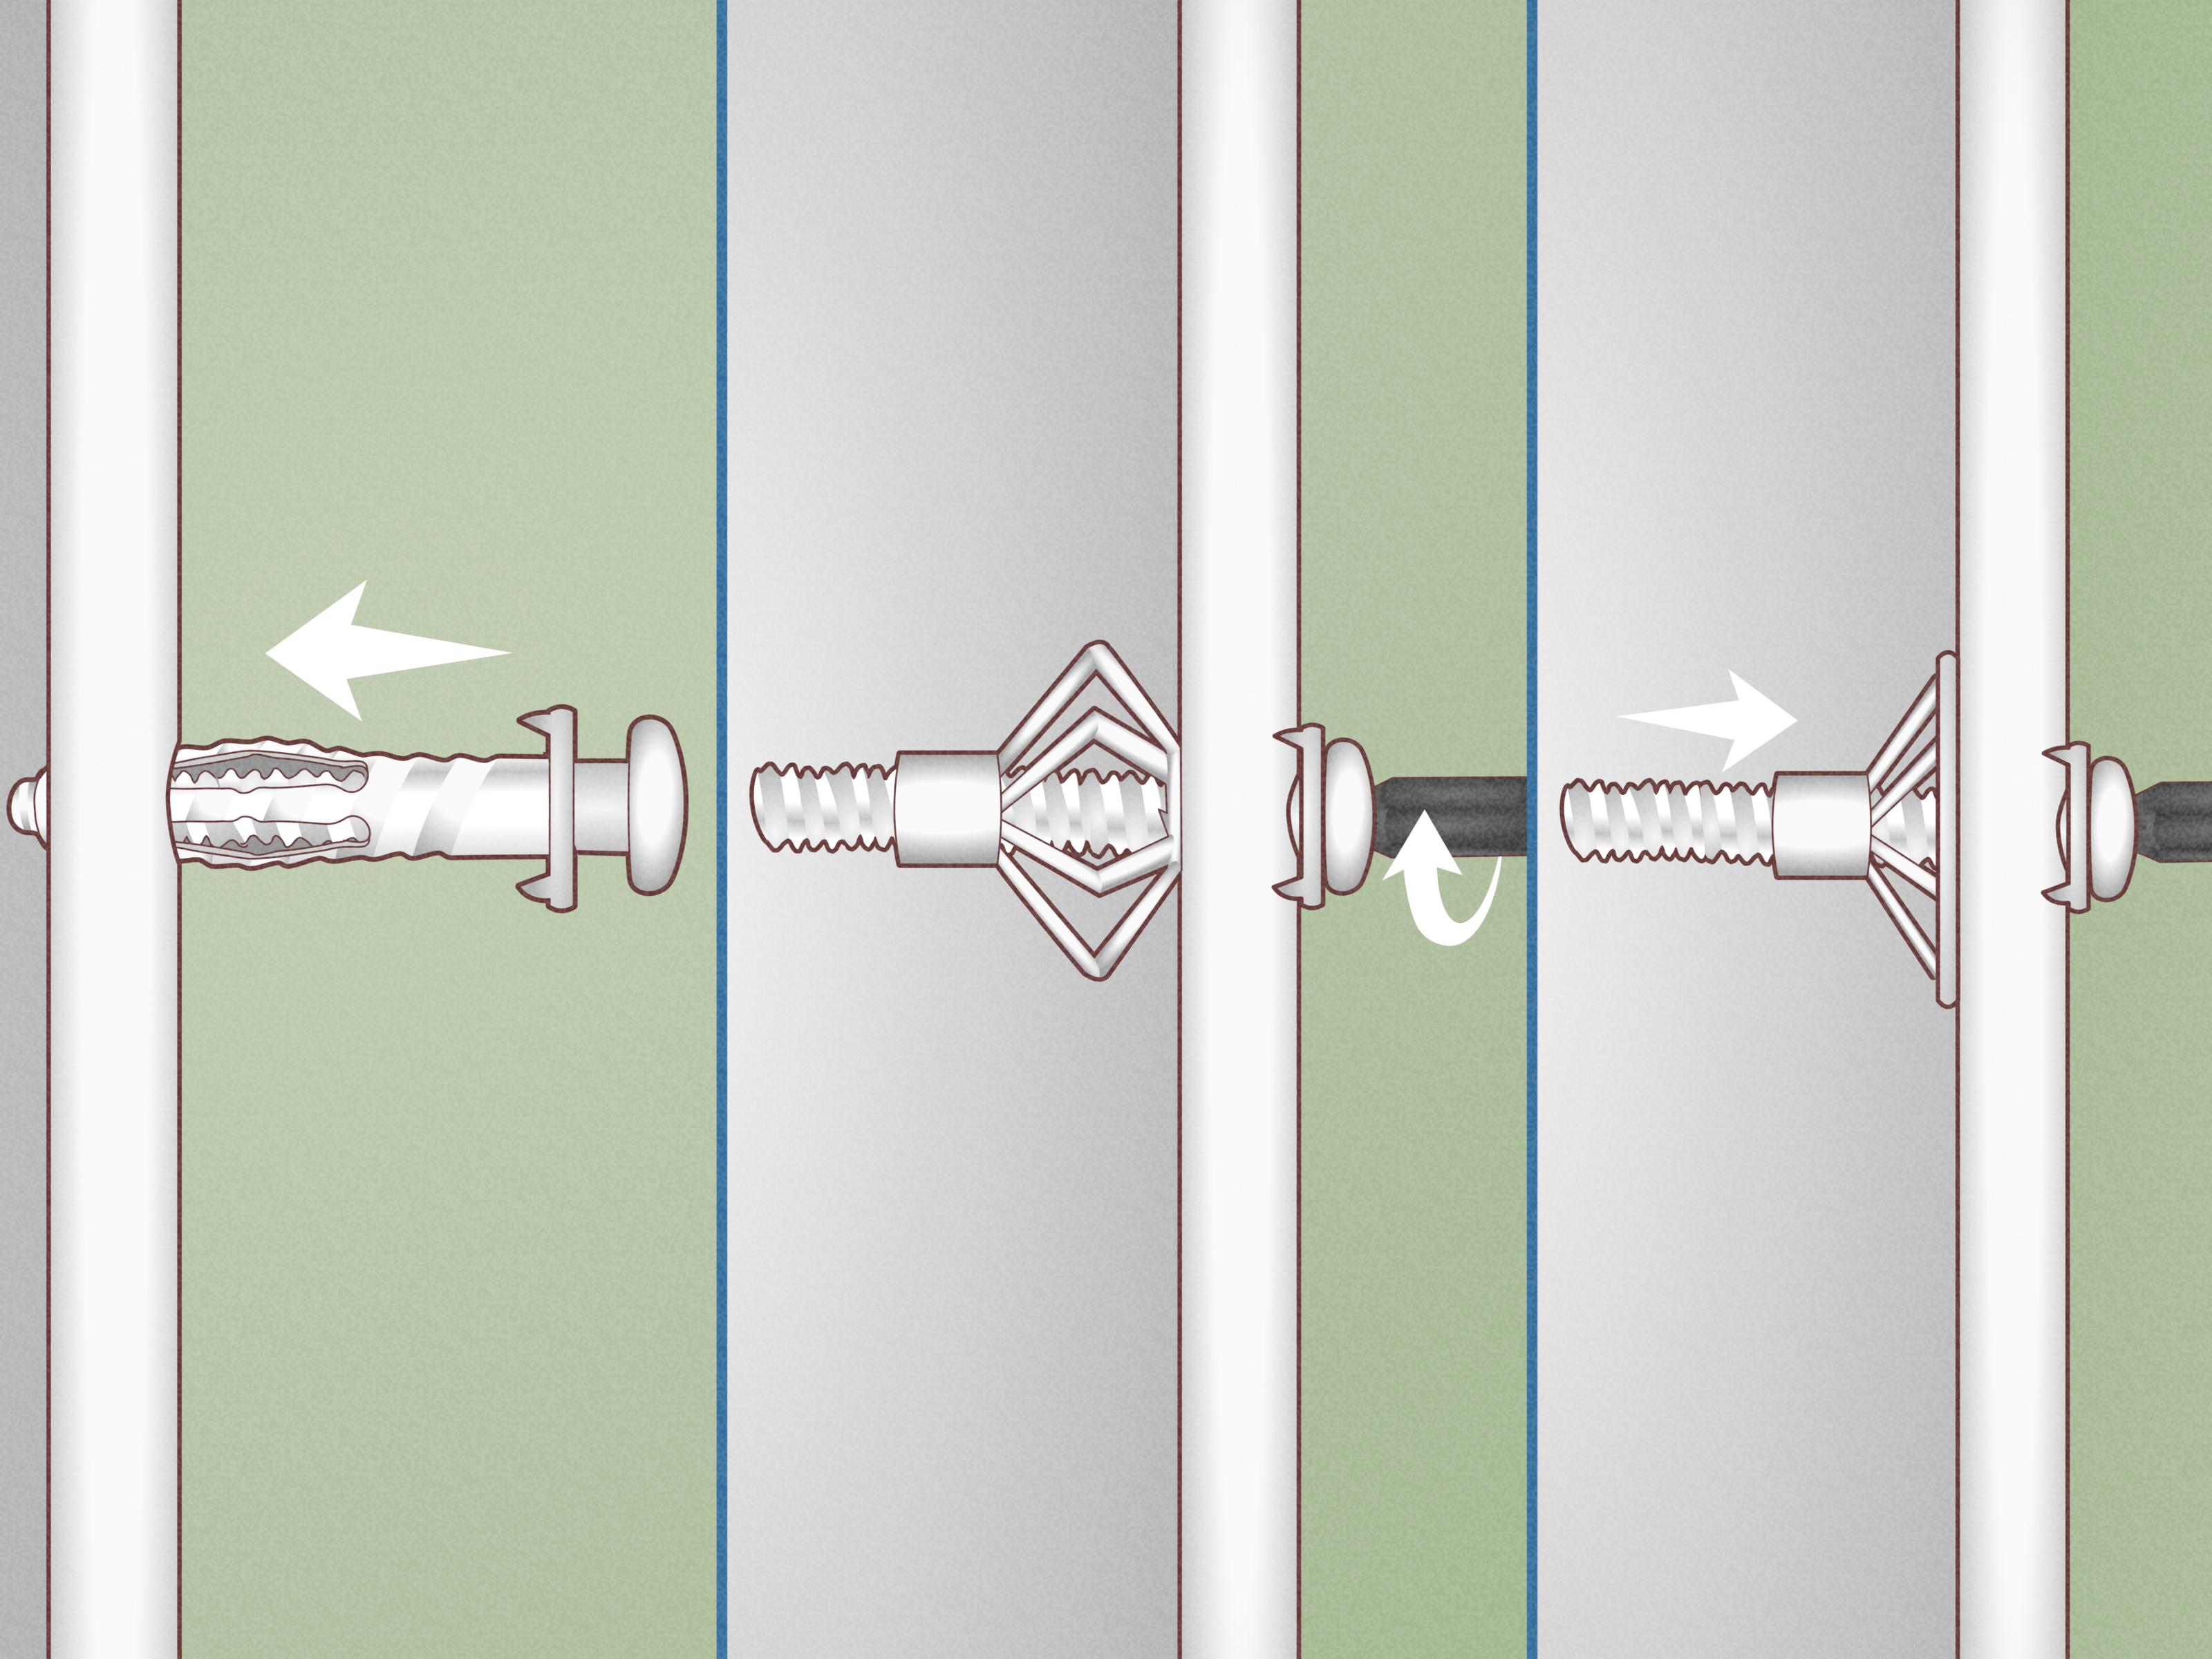
Molly bolts are metal anchors that expand behind the wall as the screw is tightened. They are often used for medium-duty applications because they create a stronger grip than basic plastic anchors. Some molly bolts have pointed tips and can be tapped into drywall, while others require a pilot hole.
Once installed, the metal sleeve compresses and forms legs behind the drywall. This gives the screw a firm hold and helps distribute weight. Molly bolts work well for towel bars, heavier picture frames, medium mirrors, and hardware that may experience occasional pulling. They can be a little more involved to install, but the extra strength is worth it when you are hanging something you do not want to hear falling in the next room.
4. Toggle Bolts
Toggle bolts are among the strongest common drywall anchors. A traditional toggle bolt has spring-loaded wings that fold to pass through a drilled hole, then open behind the wall. As you tighten the bolt, the wings clamp against the back of the drywall.
Toggle bolts are excellent for heavier mirrors, shelving brackets, curtain rods, and other items that need stronger support. The trade-off is that they require a larger hole, and once the bolt is removed, the wings usually fall into the wall cavity. That is not the end of the world, but it does mean you should measure carefully before drilling. Toggle bolts are strong, but they are not very forgiving if you treat your wall like a guessing game.
5. Strap Toggle Anchors
Strap toggles are a modern version of toggle bolts. They use a metal channel behind the wall and plastic straps to hold the channel in place while you install the screw or bolt. They are easier to position than traditional toggle bolts and are especially helpful when mounting fixtures that require multiple holes.
These anchors are often used for heavier shelves, handrails, TV mounts in specific cases, and sturdy wall-mounted hardware. However, for anything very heavy or expensive, always check the manufacturer’s instructions and use studs whenever possible.
Tools and Materials You May Need
- Drywall anchors rated for your item’s weight
- Screws that match the anchors
- Drill and drill bits
- Phillips screwdriver or driver bit
- Tape measure
- Pencil
- Level
- Stud finder
- Painter’s tape
- Hammer or rubber mallet
- Safety glasses
Before you start, read the anchor package. It usually tells you the required drill bit size, compatible screw size, drywall thickness, and weight rating. Do not skip this step. Anchor packaging may not be thrilling literature, but it is more useful than discovering your shelf has chosen freedom.
How to Choose the Right Drywall Anchor
Choosing the right drywall anchor depends on three main things: the weight of the item, how the item will be used, and the condition of the wall. A lightweight picture frame may only need a plastic expansion anchor. A towel bar needs something stronger because people pull on towels. A floating shelf needs even more support because weight extends outward from the wall, creating leverage.
Always choose an anchor rated above the actual weight of the item. If a mirror weighs 20 pounds, do not use an anchor rated for exactly 20 pounds and call it destiny. Give yourself a safety margin. Also remember that weight ratings can vary depending on drywall thickness, anchor brand, installation quality, and whether the load pulls straight down or outward.
Step-by-Step Guide: How to Use Drywall Anchors
Step 1: Find Out Whether There Is a Stud
Use a stud finder to check behind the wall. If a stud is located exactly where you need to install the item, you may not need a drywall anchor at all. A screw driven into a wood stud is stronger than most drywall anchor installations. If the stud is close but not exactly where you need it, consider whether you can adjust the placement slightly.
Step 2: Mark the Anchor Location
Hold the item or mounting bracket against the wall. Use a pencil to mark the screw holes. For shelves, mirrors, and brackets, use a level before marking. Painter’s tape can help you mark the wall without making messy pencil marks. Measure twice, drill once, and avoid the ancient DIY ritual of “covering the mistake with a bigger shelf.”
Step 3: Choose the Correct Drill Bit
If your anchor requires a pilot hole, select the drill bit size listed on the package. A hole that is too small can crush or bend the anchor. A hole that is too large will make the anchor loose and weak. If you are unsure, test on a scrap piece of drywall if available, or start slightly smaller and enlarge carefully.
Step 4: Drill the Pilot Hole
Put on safety glasses. Hold the drill perpendicular to the wall and drill slowly through the drywall. Do not force the drill. Once you pass through the drywall, stop. You do not need to explore the mysterious universe inside your wall. Be especially careful near outlets, switches, plumbing fixtures, and kitchens or bathrooms where wires and pipes may be present.
Step 5: Insert the Anchor
For plastic expansion anchors and some hollow-wall anchors, push the anchor into the hole and tap it gently until the collar is flush with the wall. Do not bury the collar below the surface. For self-drilling anchors, place the tip against your mark and turn clockwise with steady pressure until the anchor sits flush. For toggle bolts, fold the wings, push them through the hole, and let them open behind the wall.
Step 6: Attach the Item
Line up the item or bracket with the anchor. Insert the screw through the mounting hole and drive it into the anchor. Tighten until the item is secure, but do not overtighten. Overtightening can strip the anchor, crush the drywall, or make the fixture sit unevenly. Snug is good. “I shall defeat this screw with maximum torque” is not good.
Step 7: Test the Hold
Gently test the item after installation. For a shelf, press lightly downward and check for movement. For a towel bar, give it a cautious tug. For a mirror, make sure it sits flat and stable. If the anchor spins, feels loose, or pulls away from the wall, remove it and use a larger or stronger anchor in a fresh location.
How to Install Different Anchor Types
Installing Plastic Expansion Anchors
- Mark the location.
- Drill a pilot hole using the recommended bit size.
- Tap the anchor into the hole until flush.
- Insert the screw through the item and into the anchor.
- Tighten gently until secure.
Installing Self-Drilling Anchors
- Mark the location clearly.
- Place the anchor tip on the mark.
- Use a screwdriver or drill driver to turn the anchor clockwise.
- Stop when the anchor flange is flush with the wall.
- Drive the screw into the anchor to mount your item.
Installing Molly Bolts
- Drill the correct pilot hole.
- Insert the molly bolt sleeve into the wall.
- Tap it flush if needed.
- Tighten the screw so the sleeve expands behind the drywall.
- Remove the screw, place your fixture, then reinstall the screw through the fixture.
Installing Toggle Bolts
- Drill a hole large enough for the folded wings.
- Put the bolt through the item’s mounting hole.
- Thread the toggle wings onto the bolt.
- Fold the wings and push them through the wall.
- Pull back slightly so the wings press against the wall interior.
- Tighten the bolt until the fixture is secure.
Common Mistakes to Avoid
Using the Wrong Anchor for the Weight
The most common mistake is choosing an anchor that is too weak. A lightweight plastic anchor may be fine for small decor, but it is a bad choice for a shelf loaded with books. Match the anchor to the real-world load, not the optimistic version of the load where nobody ever places anything heavy on the shelf.
Drilling the Hole Too Large
A loose pilot hole is a weak pilot hole. If the anchor slides in with no resistance, it may not grip properly. Use the recommended drill bit and keep the drill straight.
Overtightening the Screw
Drywall anchors need to be snug, not tortured. Overtightening can strip the anchor or damage the drywall. Stop when the fixture is firm and flush.
Ignoring Studs
If a stud is available, use it. Drywall anchors are helpful, but wood framing is stronger. For heavy or high-value items, try to catch at least one stud whenever possible.
Mounting Heavy Items on Damaged Drywall
Cracked, damp, crumbling, or previously patched drywall may not hold anchors well. Repair the wall first or move the anchor to a stronger area.
Drywall Anchor Weight Ratings: What They Really Mean
Weight ratings are useful, but they are not guarantees in every situation. An anchor rated for 50 pounds may perform differently depending on drywall thickness, installation quality, wall condition, screw size, and whether the load pulls downward or outward. A shelf creates leverage because the weight sits away from the wall. A towel bar gets tugged repeatedly. A mirror may hang quietly for years, while a coat hook may take daily abuse.
For best results, choose anchors with a higher rating than your item requires. Use multiple anchors when the fixture is designed for them. Spread the load across two or more fasteners whenever possible. If the item is expensive, fragile, or dangerous if it falls, use studs, blocking, or professional help.
Can You Remove Drywall Anchors?
Yes, but removal depends on the anchor type. Plastic expansion anchors can often be pulled out with pliers or gently backed out after inserting a screw partway. Self-drilling anchors can usually be unscrewed counterclockwise. Toggle bolts are different: when you remove the bolt, the wings may fall into the wall cavity. Molly bolts can be harder to remove because they expand behind the wall. In many cases, the easiest option is to push the old anchor slightly into the wall, patch the hole with spackle, sand it smooth, and repaint.
Safety Tips Before You Drill
Before drilling, check the area around outlets, switches, plumbing fixtures, and appliances. Walls can hide electrical wires, water lines, drain pipes, and other surprises. Use a stud finder with wire-detection features if available, and avoid drilling directly above or below electrical boxes. Wear safety glasses, keep your hands away from the drill bit, and do not rush. A clean installation is great; keeping your wall and fingers intact is better.
Best Drywall Anchors for Common Projects
For Picture Frames
Use plastic expansion anchors, small self-drilling anchors, or picture-hanging hardware rated for the frame’s weight. For very light frames, a simple picture hook may be enough.
For Mirrors
Use self-drilling anchors, molly bolts, or toggle anchors depending on the mirror’s weight. Heavy mirrors should be mounted into studs whenever possible.
For Floating Shelves
Use studs first if you can. If studs are not available, use heavy-duty toggle anchors or strap toggles. Remember that shelves create outward force, especially when loaded with books, plants, or mysterious objects that somehow multiply over time.
For Towel Bars
Use molly bolts, toggle anchors, or strong self-drilling anchors. Towel bars are pulled, bumped, and leaned on more often than people admit, so avoid weak plastic anchors.
For Curtain Rods
Use self-drilling anchors or toggle anchors, especially for wide windows or heavy curtains. If possible, attach brackets to studs or framing around the window.
Real-World Experiences: Lessons From Using Drywall Anchors
After working with drywall anchors on real home projects, one lesson stands above the rest: the anchor is only as good as the planning before it. Most failed installations do not happen because the anchor is terrible. They happen because the anchor was chosen too quickly, the hole was drilled too large, the screw was overtightened, or the item was heavier than expected. Drywall anchors are small, but they reward patience.
For example, a small bathroom shelf may seem harmless when it is empty. The packaging says the anchors can hold enough weight, the shelf feels light, and the installation looks perfect. Then real life arrives. Someone adds a glass jar, a candle, two bottles of lotion, a ceramic plant pot, and a decorative object nobody can identify but everyone agrees looks “nice.” Suddenly the load is much heavier than the original shelf. This is why it is smart to plan for the loaded weight, not the empty weight.
Another useful experience is that self-drilling anchors are wonderful, but they need a steady hand. If you angle the anchor while driving it into the wall, the screw may sit crooked, and the fixture may not mount flat. The fix is simple: start slowly, keep pressure straight, and stop as soon as the flange touches the wall. A drill driver can make the job faster, but a hand screwdriver often gives better control for beginners. Drywall is soft enough that speed is not always your friend.
Toggle bolts are impressive for strength, but they require confidence in your measurements. Once the hole is drilled, it is larger than the hole for a plastic anchor. That is not a problem if your bracket covers it, but it can be annoying if the placement is wrong. A good trick is to use painter’s tape to create a marking template. Place tape across the back of the item, mark the screw holes on the tape, then transfer that tape to the wall. This helps keep holes level and properly spaced.
Molly bolts are helpful for towel bars and hardware that gets regular use. The first time you install one, the expanding action may feel strange because you are tightening a screw before mounting the final item. That expansion is the point. It creates a metal grip behind the wall. Once the molly is set, remove the screw, position the fixture, and reinstall the screw. Done correctly, it feels much sturdier than a basic plastic anchor.
One final piece of experience: do not ignore wall condition. Anchors installed in fresh, solid drywall feel tight and reliable. Anchors installed in old, crumbly, water-damaged, or repeatedly patched drywall can feel suspicious from the start. If the wall surface flakes, the anchor spins, or the hole widens too easily, move to a better spot or use a stronger mounting method. A successful drywall anchor installation should feel boring. No wobble, no cracking sounds, no dramatic suspense. Just a secure fixture sitting exactly where you wanted it, quietly doing its job.
Conclusion
Learning how to use drywall anchors is one of the most practical DIY skills for any homeowner, renter, or weekend fixer. The basic process is simple: choose the right anchor, mark carefully, drill the correct pilot hole if needed, install the anchor flush with the wall, tighten the screw without overdoing it, and test the hold before trusting it with weight. Plastic expansion anchors work for lightweight decor, self-drilling anchors are great for quick medium-light projects, molly bolts offer stronger hollow-wall support, and toggle anchors are the heavy-duty option when studs are not available.
The secret is not just installing the anchor; it is matching the anchor to the job. A small frame, a bathroom towel bar, and a floating shelf all place different demands on the wall. Choose wisely, measure patiently, and give the drywall the support it needs. Your wall will look better, your projects will last longer, and your shelves will stop auditioning for a role in a disaster movie.
Note: This article is written for general DIY education. Always follow the anchor manufacturer’s instructions, check weight ratings, and use wall studs or professional installation for heavy, valuable, or safety-critical items.













