
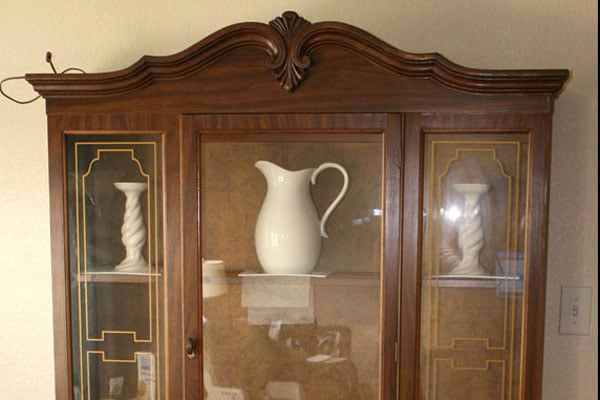
An old hutch has a special talent: it can look hopelessly dated in one room and suspiciously expensive on a designer’s Instagram feed three weekends later. The difference usually isn’t magic, a truckload of money, or a secret paint color available only to people who own linen aprons. It is preparation.
This first stage of a hutch makeover is all about turning a tired cabinet into a solid foundation for whatever comes next. Before opening a paint can, the smartest approach is to inspect the furniture, remove hardware, clean years of grime, repair damage, sand or degloss the finish, and decide whether the piece should be painted, stained, or partially stripped. Major U.S. DIY and paint resources consistently emphasize cleaning, repair, sanding, and appropriate priming as the foundation of a durable furniture finish.
So, for Hutch Makeover Part 1, the paintbrush stays mostly on the sidelines. Think of this as furniture boot camp. It is less glamorous than choosing a gorgeous sage green, but it prevents the future heartbreak of paint peeling off your hutch like a bad sunburn.
Start by Figuring Out What You Actually Have
Before sanding anything, inspect the hutch from top to bottom. A solid-wood antique, a veneered vintage cabinet, and a modern particleboard hutch may look similar from across the room, but they should not necessarily receive the same treatment.
Open every door and drawer. Look underneath shelves and along the back panel. Check for manufacturer labels, veneer edges, loose joints, water damage, cracks, missing trim, warped shelves, and previous repairs. Wiggle the doors gently and test every drawer.
Create a Quick Condition Checklist
- Are the legs or base stable?
- Do cabinet doors close squarely?
- Are any shelves sagging?
- Is the veneer lifting?
- Are there deep scratches or missing chunks?
- Does the furniture smell musty or smoky?
- Is the existing finish glossy, flaking, or sticky?
- Are knobs, pulls, hinges, or magnetic catches missing?
Structural problems should come before cosmetic problems. Filling a tiny scratch is pointless if the entire upper cabinet rocks whenever someone walks past it.
Be Careful With Very Old Painted Furniture
If you are dealing with an older painted hutch and do not know the history of the finish, avoid immediately attacking it with a power sander. Lead-based paint can be a concern with older painted surfaces. The EPA notes that disturbing old lead-based coatings through sanding, scraping, cutting, and similar work can generate hazardous dust and recommends lead-safe practices when such coatings may be present.
When the age or paint history is uncertain, determine an appropriate testing or professional evaluation strategy before creating dust. This is one DIY project where curiosity should come before horsepower.
Choose the Direction of the Hutch Makeover
You do not need the final decorative details yet, but you should decide what kind of transformation you want before removing the existing finish.
Option 1: Fully Painted Hutch
This approach works particularly well when the original finish is badly damaged, the wood tones clash with the room, or several repaired areas would be difficult to disguise with transparent stain.
Option 2: Natural or Restained Wood
If the underlying wood is attractive, stripping or carefully sanding the old finish may reveal grain worth keeping. This requires more attention because stain does not hide filler, mismatched repairs, and sanding mistakes nearly as politely as opaque paint.
Option 3: Two-Tone Hutch
A popular compromise is to paint the frame while preserving natural wood on the shelves, top, doors, or interior. This can keep some vintage character without allowing the entire room to become a museum dedicated to dark brown furniture.
Your intended finish determines how aggressively you should sand and repair, so make the broad decision now.
Remove Hardware, Doors, Drawers, and Shelves
Taking a hutch apart makes cleaning and refinishing dramatically easier. Remove knobs, handles, adjustable shelves, drawers, and doors when practical. Furniture-painting guides from Lowe’s, Martha Stewart, Apartment Therapy, and Rust-Oleum all recommend removing hardware during surface preparation.
Do yourself one enormous favor: label everything.
Put the screws from each door in a small labeled bag. Mark doors with painter’s tape in an inconspicuous location: “upper left,” “lower right,” and so on. Older furniture may not be perfectly symmetrical, which means a door that fits beautifully on the left side can suddenly become a stubborn wooden puzzle when installed somewhere else.
Deep-Clean Before You Sand
One of the easiest furniture refinishing mistakes is sanding a dirty surface. A hutch that has lived in a dining room or kitchen may carry years of cooking residue, furniture polish, fingerprints, dust, wax, and mysterious sticky patches best left unidentified.
Clean the surfaces thoroughly using a cleaner appropriate for the existing finish and the coating system you plan to use. Avoid soaking wood or allowing excess liquid to remain around veneer edges and joints.
Sherwin-Williams, This Old House, Rust-Oleum, and other furniture refinishing guides all place cleaning ahead of sanding and coating because dirt and oils can interfere with adhesion.
Do Not Forget the Hidden Areas
Clean drawer boxes, shelf corners, door edges, the underside of the top, and areas around handles. These are often much dirtier than the big flat surfaces.
After cleaning, allow the furniture to dry completely. Refinishing damp wood is an excellent way to turn a Saturday project into next weekend’s repair project.
Repair the Hutch Before Making It Pretty
Now address the dents, cracks, loose trim, screw holes, and unstable joints discovered during inspection.
Tighten loose hardware and fasteners where appropriate. Re-glue detached decorative pieces. Use suitable wood filler for cosmetic defects that will eventually be painted. More significant cracks may require structural repair rather than simply smearing filler over the surface. Woodworking guidance emphasizes building a sound repair first and then leveling the repaired area before finishing.
With veneer, restraint matters. Thin veneer can be sanded through surprisingly quickly, exposing the substrate underneath. That little mistake can transform “I’ll lightly sand this door” into “Apparently I’m learning advanced veneer repair today.”
Sand for Adhesion, Not Revenge
Furniture does not always need to be stripped to naked wood before painting. Often the goal is simply to remove failing material, smooth damaged areas, and dull a slick existing finish enough for the new system to adhere.
HGTV recommends careful hand sanding or a small handheld sander for furniture, while Lowe’s suggests finer sanding on smooth existing finishes and somewhat more aggressive preparation on rougher surfaces. Rust-Oleum likewise recommends progressing toward finer grits as the surface becomes smooth.
A Practical Sanding Strategy
Begin with the least aggressive method capable of solving the problem. A relatively sound glossy finish may only need scuff sanding. Rough, peeling coatings require more work. Repaired areas should be feathered into the surrounding surface so that you cannot feel a sharp transition with your fingertips.
Sand with the wood grain whenever exposed wood is involved. Use a sanding sponge for profiles, molding, and curved surfaces rather than flattening decorative details with a power sander.
Most importantly, remove every trace of sanding dust afterward. Vacuum corners and crevices, then wipe surfaces using a method compatible with your finishing products. Dust left behind becomes permanent texture once trapped under paint.
Know When Stripping Makes More Sense
There is a difference between sanding a finish for adhesion and removing a finish entirely.
If you plan to stain the hutch, expose beautiful natural wood, or remove multiple layers of failing paint, stripping may be more appropriate than endless sanding. Lowe’s notes that chemical stripping can be useful for multiple paint layers and detailed furniture, while sanding is well suited to thinner coatings on relatively flat surfaces.
Detailed carvings are especially easy to damage through aggressive sanding. Sometimes chemistry is the better tool; sometimes abrasives are. The correct answer depends on the coating, furniture construction, safety considerations, and desired result.
Plan Your Primer Before Buying Paint
Primer should solve a specific problem rather than simply being something white you automatically apply because a tutorial said so.
A stained wood hutch that will become cream or white may need stain-blocking capability. Bare wood may need sealing. A very glossy surface may benefit from a bonding primer. Dark colors being converted to light colors may need a high-hiding base.
Lowe’s recommends choosing primer according to the substrate and existing finish, while This Old House notes that different primers solve different adhesion and stain-blocking problems. Real Simple similarly emphasizes primer for challenging substrates and major finish or color changes.
This is why determining what the hutch is made from during the inspection stage was not pointless DIY detective work. The answer guides nearly everything that follows.
Set Up a Cleaner Workspace Than You Think You Need
Good furniture finishing and airborne dust are terrible roommates.
Set up the hutch in a well-ventilated area appropriate for the products being used. Protect floors. Arrange doors and shelves so you can reach edges without touching freshly prepared surfaces. Keep sanding activities separated from final coating whenever possible.
Gather containers for screws, painter’s tape, clean cloths, sanding supplies, a vacuum, repair materials, gloves, and the protective equipment appropriate for the products and processes involved.
Planning the workspace now makes the painting stage faster because you will not be wandering around the garage holding a wet cabinet door while searching for somewhereanywhereto put it.
Where Hutch Makeover Part 1 Should End
At the end of this first phase, the hutch should look strangely unfinished but feel wonderfully prepared. Hardware should be removed and organized. The furniture should be clean, structurally sound, repaired, appropriately sanded or stripped, dust-free, and ready for the coating system selected for Part 2.
That may not produce a dramatic social-media reveal yet, but this is the stage that determines whether the final finish survives ordinary life.
Common Hutch Makeover Mistakes to Avoid
Painting Over Grease or Furniture Polish
Even premium paint cannot perform well when separated from the furniture by a microscopic layer of grime.
Sanding Veneer Like Solid Wood
Veneer may be thin. Once you sand through it, there is no magical button marked “Undo Enthusiasm.”
Using Filler for Structural Repairs
Cosmetic filler hides defects; it is not automatically a substitute for proper joinery or glue repairs.
Forgetting to Label Hardware
Five nearly identical hinges can consume an astonishing amount of your afternoon if you mix them together.
Rushing From Cleaning to Coating
Allow surfaces, repair compounds, primers, and later coatings to dry for the times specified by their manufacturers. A finish that feels dry to the touch may not yet be ready for another process.
Conclusion: Great Furniture Makeovers Start With Boring Work
A successful old hutch makeover is less about finding one miracle furniture paint and more about building a reliable sequence of small decisions. Inspect first. Decide what should remain and what should change. Disassemble carefully. Clean thoroughly. Repair the structure. Sand only as aggressively as necessary. Remove the dust. Then select primers and finishes according to the actual surface rather than whichever can has the prettiest label.
Done correctly, Hutch Makeover Part 1 leaves you with something that may still look unfinished but is finally ready to become beautiful. And unlike impulse painting, good preparation rarely produces the sentence, “Well, I guess we’re stripping the whole thing again.”
Experience Notes: What a Hutch Makeover Process Really Teaches You
The most useful lesson from furniture makeover projects is that the condition of the original piece matters more than the inspiration photo. Two hutches can receive the same color and hardware yet demand completely different preparation. One may have an intact factory finish that only needs careful cleaning and scuff sanding. Another may contain cracked lacquer, loose veneer, smoke odor, old wax, and three generations of enthusiastic paint.
A common experience is beginning the project convinced that sanding will take an hour, only to discover that cleaning is the real adventure. Areas around cabinet pulls can carry stubborn residue that ordinary dusting never touched. Corners may contain a mixture of grease and household dust impressive enough to qualify as a new building material. Cleaning these areas completely before sanding makes the later work noticeably easier.
Disassembly also tends to expose problems that were invisible while the furniture was assembled. A door that appeared slightly crooked may actually have a loose hinge screw. A drawer that seemed sticky may have accumulated debris along its runners. Decorative trim may be held on by one heroic nail that has apparently been doing all the work since 1987.
Another lesson is to stop judging progress by appearance. During preparation, furniture frequently looks worse before it looks better. Filled holes are visible. Sanded areas become cloudy. The old glossy finish disappears unevenly. Hardware is missing. Doors are leaning against the wall. To anyone walking into the workspace, it can resemble a furniture crime scene.
That stage is normal. The better measure of progress is touch. Run a clean hand across the surface. Do repaired spots feel level? Are edges smooth? Has the gloss been uniformly dulled where needed? Are loose components finally solid? Good surface preparation can often be felt before it can be appreciated visually.
Patience around veneer deserves special attention. It is tempting to keep sanding until every stain and dark mark disappears, but veneer sets a hard limit on ambition. When the surface is thin, preserving the material is more important than achieving theoretically perfect raw wood. A painted or partially painted design can sometimes be the smarter solution.
Hardware organization seems trivial until reassembly day. The habit of putting screws from each door into labeled bags can save surprising amounts of frustration. The same applies to photographing hinges before removal. Smartphones are excellent DIY tools even when they never touch a power outlet.
Finally, makeover projects reward knowing when to stop for the day. Fatigue encourages aggressive sanding, rushed cleaning, lost screws, and mysterious fingerprints on surfaces that were perfectly clean five minutes earlier. A hutch is not going anywhere. Ending Part 1 with a clean, stable, prepared piece is much more valuable than forcing the project toward paint simply because the sun has not set yet.
That may be the biggest practical experience behind successful furniture transformations: preparation does not feel exciting while you are doing it, but almost every beautiful finishing step becomes easier because of it. The glamorous portion of the makeover begins later. The quality of that glamour is decided here.










