
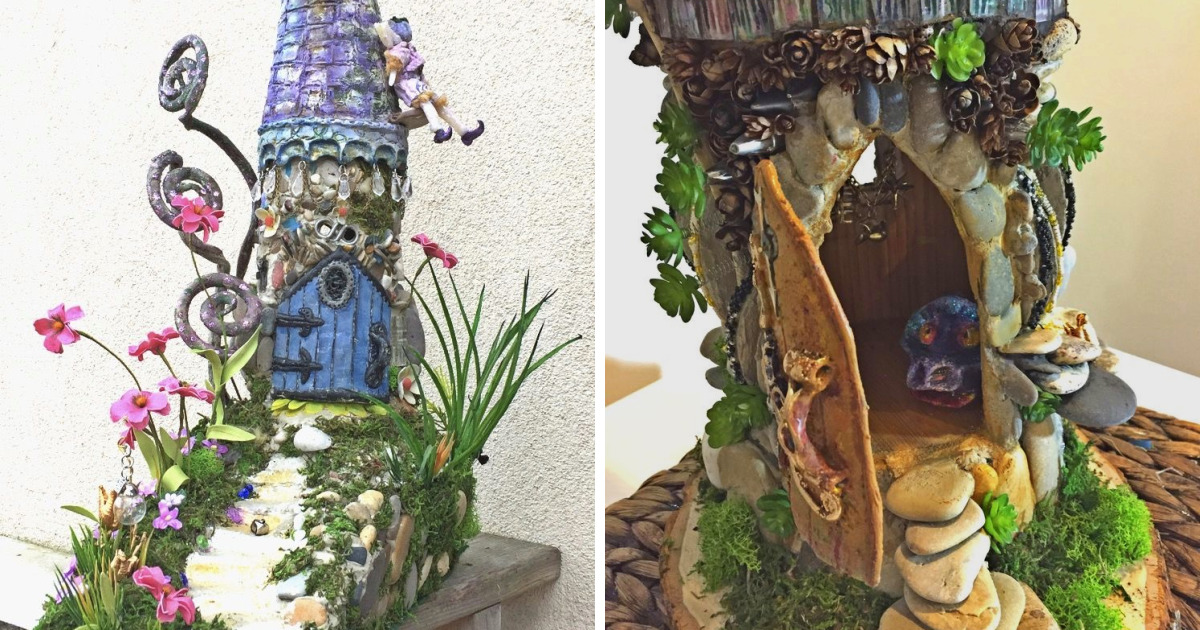
Some people see an empty coffee can, a cracked flowerpot, or a cereal box headed for the recycling bin. I see a future cottage with questionable plumbing, excellent moss landscaping, and a front door small enough to make a fairy feel like a suburban homeowner. That is how my hobby began: one ordinary afternoon, surrounded by scraps, bottle caps, twigs, and a suspicious amount of glue, I decided to make fairy houses with recycled materials.
At first, I thought I was simply making cute garden decorations. Then I realized I had accidentally opened a tiny architectural firm for imaginary tenants. One house became three. Three became a village. Soon, the windowsill, porch, and garden corner looked like a real estate boom had hit Pixie County. The best part? Most of the materials came from things that would otherwise have been tossed away.
Making recycled fairy houses is more than a craft project. It is a creative way to practice upcycling, reduce waste, personalize a garden, and turn everyday objects into miniature art. It is budget-friendly, beginner-friendly, and wonderfully forgiving. If a roof leans a little, it is not a mistake. It is “rustic woodland charm.” If the door is crooked, clearly the fairy had strong opinions about modern design.
Why Recycled Fairy Houses Are So Charming
Fairy houses work because they invite people to look closer. A big garden can impress visitors, but a tiny mushroom porch made from a cork and a painted acorn cap makes them crouch down and say, “Wait, is that a staircase made from popsicle sticks?” That moment of discovery is the magic.
Using recycled materials makes the process even better. Instead of buying every tiny accessory from a craft store, you begin seeing creative potential in ordinary household objects. A jar lid becomes a roof. A cardboard tube becomes a tower. A broken terracotta pot becomes a cliffside cottage. A button becomes a window. Bottle caps turn into stepping stones. Suddenly, the recycling bin is not clutter; it is a supply closet with commitment issues.
This kind of upcycled craft also teaches a useful idea: waste is often just a material waiting for a better job. Reusing containers, fabric scraps, paperboard, and old household items can help keep materials in use longer. That does not mean every yogurt cup must become a castle, but once you start building fairy houses, it may try.
The Materials I Love Using Most
The beauty of making fairy houses from recycled materials is that the supply list is flexible. You do not need fancy tools or expensive kits. In fact, the less perfect the material looks, the more character it often brings to the finished house.
Cardboard, Paperboard, and Tubes
Cardboard is one of my favorite starter materials because it is easy to cut, shape, and layer. Cereal boxes make excellent wall panels, paper towel tubes become towers, and egg cartons can be cut into roof tiles, stones, or flower boxes. For indoor fairy houses, cardboard works beautifully. For outdoor houses, it needs sealing, protection, or a sheltered spot because rain is basically cardboard’s arch-nemesis.
Glass Jars and Plastic Containers
Empty jars, small plastic tubs, and food containers can become sturdy fairy house bases. A clean peanut butter jar can turn into a round cottage with a twig roof. A yogurt container can become a mushroom house with a painted lid. Clear jars are especially fun because you can place a battery-operated tea light inside and create a glowing fairy lantern house. It looks magical at night and mildly suspicious to neighbors, which is part of the charm.
Bottle Caps, Corks, and Lids
Bottle caps are tiny craft miracles. They can become stepping stones, flowerpots, shingles, stools, tables, or wall decorations. Wine corks can be sliced into pavers or stacked into chimneys. Jar lids make sturdy roofs, pond bases, or platforms. These little pieces add detail fast, and details are what make a fairy house feel alive.
Broken Pots and Garden Scraps
Broken terracotta pots are perfect for miniature gardens and fairy homes. A cracked piece can become a curved wall, a staircase, a retaining wall, or a hillside. Small stones, bark, seed pods, pinecones, dried moss, and twigs add a natural look. I like mixing recycled household scraps with found natural materials because it keeps the fairy houses from looking too polished. Fairies, in my opinion, are not known for hiring minimalist interior designers.
Fabric Scraps and Old Clothing
Small pieces of old fabric can become curtains, rugs, flags, awnings, or tiny laundry lines. Denim makes sturdy pathways or roof patches. Lace adds a cottagecore feeling instantly. Even old buttons can become doorknobs, wall art, or round windows. If you have a jar of random buttons somewhere, congratulations: you are already rich in fairy currency.
How I Plan a Fairy House Before Building
I usually begin with one recycled object and let it decide the shape of the house. A tin can suggests a tower. A small box suggests a cottage. A cracked pot suggests a hillside home. A jar suggests a lantern house. Planning this way keeps the design natural instead of forcing materials to behave like something they are not.
Before gluing anything, I ask three simple questions. Where will the fairy house live? Will it be indoors or outdoors? Does it need to survive rain, wind, curious pets, or a squirrel with interior design ambitions?
Indoor fairy houses can use paper, cardboard, fabric, and lightweight decorations without much worry. Outdoor fairy houses need more durable materials, better sealing, and good drainage if plants are included. If I am placing a fairy house in a container garden, I make sure water can drain properly. Tiny gardens may be whimsical, but plant roots still expect basic respect.
Step-by-Step: My Basic Recycled Fairy House Process
Step 1: Choose the Base
The base is the body of the house. I might use a jar, a tin can, a small box, a plastic bottle, or a broken pot. I clean it thoroughly, remove labels, and check for sharp edges. If I use metal cans, I smooth or cover the rim. Fairy houses should be charming, not secretly dangerous.
Step 2: Add Texture
Texture turns trash into treasure. I cover plain surfaces with torn paper, fabric scraps, bark, small stones, twigs, or layered cardboard. A smooth plastic container suddenly looks like an old cottage when it has a pebble wall and a twig frame around the door. This is where the house begins to gain personality.
Step 3: Build the Roof
The roof is often the most eye-catching part. I have made roofs from jar lids, folded cardboard, pinecone scales, bark pieces, egg carton shingles, and overlapping bottle caps. A mushroom-style roof can be made from a bowl-shaped lid or a painted plastic container. For a woodland cabin look, nothing beats twigs lined up like tiny logs.
Step 4: Create Doors and Windows
Doors are my favorite part because they instantly make the house feel inhabited. I cut doors from cardboard, craft sticks, bark, or thin scraps of wood. Buttons become knobs. Twine becomes a hinge detail. Windows can be made from bottle caps, small frames cut from cardboard, or clear plastic packaging. I avoid making everything too perfect because a slightly uneven fairy door has more story than a flawless one.
Step 5: Add Mini Landscaping
A fairy house looks happier when it has a little world around it. I use pebbles for paths, moss for lawns, cork slices for stepping stones, and small shells for planters. In living miniature gardens, I choose small plants that fit the scale, such as compact succulents, moss-like ground covers, tiny herbs, or miniature foliage plants. The trick is to match the plant to the light and moisture conditions, not just to the cuteness level. Cute plants can still be dramatic if overwatered.
Step 6: Seal and Protect
If the house will stay outdoors, I protect it with a weather-resistant sealer when appropriate for the material. I also place delicate houses under a porch, in a covered planter, or near a sheltered garden edge. Recycled fairy houses do not need to last forever, but I like giving them a fighting chance against rain, mud, and the occasional leaf blower incident.
Design Ideas for Recycled Fairy Houses
The Tin Can Tower
A clean tin can makes a wonderful round tower. I cover the outside with small stones or painted paper clay, add a cone roof from cardboard, and use a button for the doorknob. A tiny flag made from fabric scraps turns it into a proper fairy lookout post. I imagine the fairy inside spends most evenings judging garden snails from above.
The Broken Pot Cottage
Broken flowerpots are perfect for layered fairy scenes. Larger shards can create terraces, while smaller pieces become stairs. Add moss, succulents, and a small doorway tucked under a curved shard, and the whole thing looks like a secret home built into a cliff. It is also a satisfying way to forgive yourself for dropping a pot.
The Jar Lantern House
A glass jar can become a glowing fairy house with a painted roof, twig door, and battery-operated tea light inside. I like frosting the glass slightly or painting little window shapes so the light shines softly. At night, it looks like someone tiny is home, possibly making tea, possibly avoiding emails.
The Cardboard Cottage
For indoor displays, cardboard is wonderfully versatile. I build the walls from a small box, add roof shingles made from cereal-box strips, and decorate with fabric curtains. This is a great project for beginners because mistakes are easy to fix. Add another layer, paint over it, call it “aged texture,” and move forward with confidence.
The Plastic Bottle Mushroom House
A plastic bottle can be cut into a small dome or cylinder, then painted into a mushroom cottage. A red or brown cap-like roof, white dots, and a round door make it instantly recognizable. This project is playful, lightweight, and great for using bottles that are clean but not suitable for local recycling programs.
Why This Craft Is Great for Kids and Families
Fairy houses are excellent family projects because everyone can contribute at their own skill level. Younger children can collect pebbles, choose colors, arrange paths, or paint simple shapes. Older kids can design structures, build doors, plan miniature landscapes, and solve engineering problems like, “How do we make this roof stop sliding off like a pancake in a rainstorm?”
It also introduces children to environmental thinking in a hands-on way. Instead of only hearing about reducing waste, they get to transform a used object into something imaginative. That experience can make sustainability feel creative rather than boring. Recycling bins are important, yes, but upcycling adds a spark: it shows that old materials can have another life before they become waste.
For safety, I keep sharp tools, hot glue, wire cutters, and sealants in adult hands. Kids can still do plenty of designing, painting, arranging, and storytelling. The goal is to make a magical little house, not to turn craft night into a tiny construction-site emergency.
Common Mistakes I Learned the Glittery Way
My first mistake was using materials outdoors without thinking about weather. Cardboard and untreated paper looked adorable for about one afternoon. Then the rain arrived, and my fairy cottage became more of a fairy pancake. Now I either seal paper-based houses carefully or keep them indoors.
My second mistake was overdecorating. When every surface has glitter, beads, bark, buttons, moss, shells, and three kinds of paint, the fairy house starts to look like it lost a fight with a craft drawer. I now choose one main texture, one accent texture, and a few tiny details. Miniature design works best when the eye has somewhere to rest.
My third mistake was forgetting scale. A door the size of the wall, a chimney wider than the roof, and a path made of giant stones can make the house look confused. Of course, fairy architecture is fictional, so there is room for whimsy. Still, repeating similar-sized details helps the house feel more believable.
How Fairy Houses Improve a Garden Space
A recycled fairy house can turn a plain corner into a story. Place one under a fern, beside a container garden, near a tree stump, or along a walkway, and suddenly the garden feels interactive. Guests notice it. Children search for it. Even adults who claim to be “very practical” will bend down to inspect the tiny mailbox.
These miniature homes also encourage slower looking. In a world full of screens and scrolling, a fairy garden asks people to pause. You notice moss, stones, leaf shapes, shadows, and small seasonal changes. A fallen acorn becomes a future roof. A curled piece of bark becomes a porch. A humble weed may become a fairy hedge if it behaves itself.
My Personal Experience Making Fairy Houses With Recycled Materials
The first fairy house I made was not elegant. It was built from a coffee can, cardboard roof pieces, and a door that looked like it had been installed during an earthquake. I painted the walls brown, glued on twigs, added a pebble path, and placed it in a planter. I stood back expecting mild disappointment. Instead, I laughed. It had personality. It looked like a tiny woodland hermit had built it during a long weekend with limited tools but excellent optimism.
That first house taught me the most important lesson: recycled fairy houses do not need perfection. They need imagination. When I stopped trying to make everything look store-bought, the houses became better. A rough twig made a better beam than a polished stick. A chipped button made a more interesting doorknob than a new bead. A cracked jar lid looked like an old metal roof. The flaws gave the houses history.
Over time, I started saving small materials in labeled boxes. One box holds bottle caps and lids. Another holds corks, buttons, and beads. I keep clean cardboard pieces flat so they do not take over the room like a paper-based jungle. I also keep a “maybe useful” container, which is dangerous because everything becomes maybe useful. A broken necklace? Fairy chandelier. Empty mint tin? Fairy suitcase. Old shoelace? Rope bridge. The line between craft supply and clutter can become thin, so I try to sort regularly and only keep items I can realistically use.
One of my favorite projects was a fairy house made from a broken teapot. The spout became a chimney, the handle looked like a curved balcony, and the missing lid gave me room to add a moss roof. I placed it in a shady garden bed with smooth stones leading to the door. It looked so natural that visitors kept asking where I bought it. That is the highest compliment for recycled art: when someone assumes your trash had a retail price.
I have also learned that fairy houses make wonderful gifts. A small jar lantern house can become a birthday present. A broken-pot fairy garden can brighten a porch. A cardboard cottage can decorate a bookshelf. Each one feels personal because the materials carry a story. “This roof used to be a cookie tin” is far more fun than “I clicked add to cart.”
The process has changed how I look at waste. I still recycle what should be recycled, but I pause before throwing away interesting shapes. I ask whether something can become a window, roof, path, sign, planter, fence, or chimney. Not everything deserves a second life as fairy architecture, of course. Some things should absolutely leave the house before they start a colony. But many clean, safe materials can become art with a little imagination.
Most of all, making fairy houses reminds me that creativity does not require perfect supplies. It starts with attention. It starts with seeing possibility in ordinary things. A bottle cap is not only a bottle cap. A twig is not only yard debris. A cracked pot is not only a gardening tragedy. In the right hands, with enough glue and a sense of humor, they can become a tiny home for a tiny imaginary resident with excellent taste in recycled design.
Conclusion: Tiny Houses, Big Imagination
Making fairy houses with recycled materials is one of those hobbies that looks small but feels surprisingly meaningful. It combines art, sustainability, gardening, storytelling, and a little bit of delightful nonsense. You can start with simple supplies from your recycling bin, add natural materials from the yard, and build something that makes people smile.
Whether you create a glowing jar cottage, a broken-pot village, a cardboard bookshelf house, or a tin can tower, each project proves that creativity does not have to be expensive. Sometimes the best materials are already sitting in your home, waiting for someone to notice their secret fairy potential.
Note: Always clean recycled materials before crafting, avoid sharp edges, and use adult supervision for cutting, drilling, hot glue, or outdoor sealants.













