
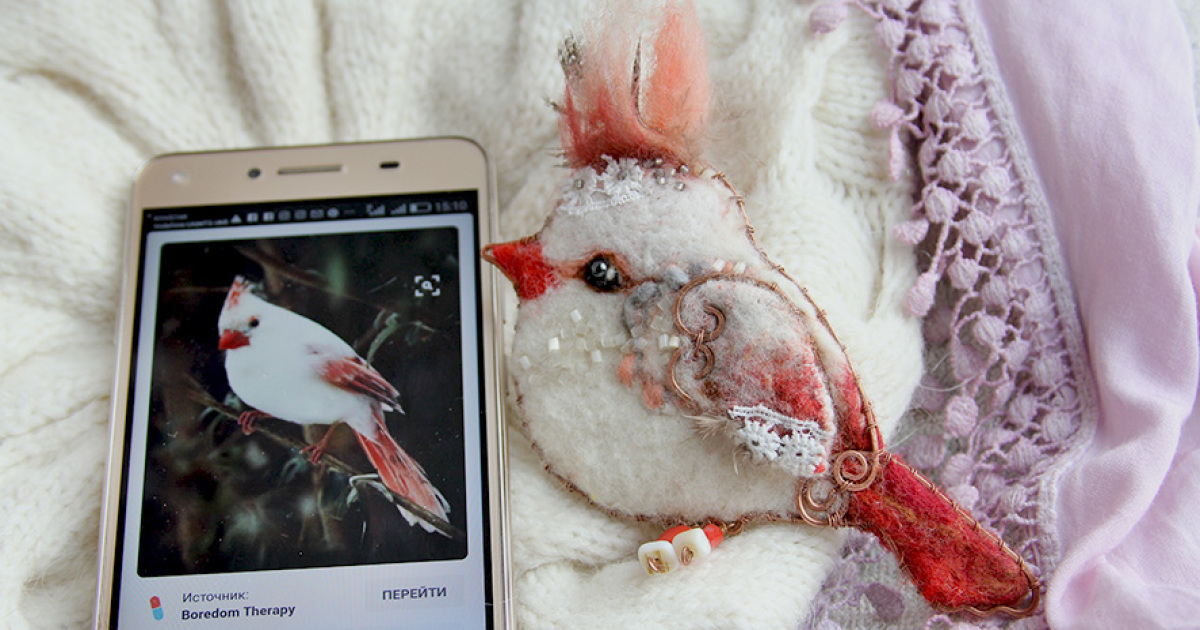
I didn’t set out to become the kind of person who stabs wool thousands of times on purpose. It just… happened. One day I was
scrolling through bird photos (as one does), and the next thing I knew I was needle-felting tiny feathered divas into wearable
brooches. Now my jacket looks like it runs a very exclusive backyard feeder.
If you’ve ever looked at a bird and thought, “Wow. That little dinosaur is dressed better than me,” you already understand
why real bird photos make the best reference for felt brooches. A good photo doesn’t just show colorit shows attitude:
the skeptical head tilt, the puffed-up “I’m not cold, you’re cold” fluff, the intense stare that says, “I saw you refill the feeder late.”
In this guide, I’ll walk you through how I use actual bird pictures to needle felt brooches with personalitywithout turning every
chickadee into a generic gray blob. You’ll get practical techniques, common mistakes (I have made them all, proudly), and
specific examples so your felt birds come out charming instead of… vaguely potato-shaped.
Why Real Bird Photos Make Better Felt Brooches
Needle felting is basically sculpting with wool: you use a barbed needle to tangle loose fibers until they firm up into a shape.
That shape can be anything, but birds are special because they’re packed with identifying detailsalso known as “field marks.”
These are the stripes, spots, wing bars, eye rings, crests, and color blocks that make a bird recognizable at a glance.
When you work from an actual photo (your own is best), you’re not guessing where the white patch sits on a chickadee’s cheek
or how the crest on a tufted titmouse sweeps back like it’s late for a meeting. The photo tells you what matters:
the silhouette, the contrast zones, and the “face.” And in brooch-sized art, those are the difference between
“That’s a goldfinch!” and “That’s… a lemon with anxiety?”
A bonus: photos capture posture and behavior. A nuthatch looks different when it’s doing its signature upside-down
tree-trunk routine. A wren looks like it’s perpetually auditioning for a musical. If you want “character,” posture is your secret weapon.
Gather Your Supplies (and Your Patience)
You don’t need a craft store’s worth of gear to get started, but a few choices will make your life much easierand your fingers less perforated.
Wool: the “inside” and the “outfit”
I like using a firm, inexpensive core wool (often coarser) for the base shape, then layering finer, prettier fibers on top for color.
Think of it like building a tiny bird mannequin first, then dressing it in its best plumage.
Needles: different sizes for different jobs
Felting needles come in sizes (often referred to by gauge numbers) that generally align with how coarse or fine the needle is.
Coarser needles are great for fast shaping and firming the core; finer needles help smooth the surface and add crisp details.
If you only buy a few, aim for a “workhorse” needle plus a finer finishing needle.
Work surface and finger safety
Use a felting pad (foam, wool mat, or brush-style mat) so you’re stabbing into something that forgives you.
And yes: finger guards or leather protectors are not “optional” if you enjoy having skin.
The craft is relaxing until you forget where your thumb is.
Brooch hardware and finishing materials
For turning a felt bird into a brooch, you’ll want:
- Pin back (a standard bar pin)
- Backing material (felt, suede-like fabric, or another sturdy textile)
- Strong thread and a sewing needle (for the most secure attachment)
- Glue (optional, as reinforcementnot as the entire plan)
- Small scissors for trimming fuzz and backing
Pick a Bird Photo That Will Felt Well
Not every gorgeous bird photo translates into a brooch. Brooches are small, and small art needs bold information.
Here’s what I look for:
1) A clear silhouette
Side profiles are your best friend. They reveal beak shape, body proportions, and tail lengthaka the stuff that makes
a sparrow not look like a finch wearing a disguise.
2) Visible field marks
Choose a photo where the “ID clues” are obvious: the bib on a chickadee, the crest on a titmouse, the wing bars on a goldfinch,
the mask on a cedar waxwing. If your reference is a blurry gray bird in deep shade, you’ll be inventing detailsand birds will know.
3) Good light, honest color
Lighting changes everything. A cardinal in golden-hour sun looks like it’s been edited by a romance novelist.
A cardinal in shade looks like it’s reconsidering its life choices. Both can be beautifulbut pick one and match it on purpose.
4) Ethics matter (even if your bird is about to become wool)
If you take your own reference photos, prioritize the bird’s well-being: keep a respectful distance,
avoid stressing wildlife, and be extra careful around nesting birds. If you’re using someone else’s photo,
make sure you have permission or use a properly licensed image. “It was on the internet” is not a license.
Make a “Felting Map” From Your Photo
Before I stab a single fiber, I translate my photo into a planbecause once you start felting, it’s easy to drift into
“freestyle chaos.” A simple map keeps your bird recognizable.
Step A: Identify the big color blocks
Break the bird into 3–6 major zones: head, throat, back, belly, wings, tail. Write down the dominant color for each.
This prevents the classic mistake of making everything the same mid-tone and wondering why your bird looks like dust.
Step B: Circle 2–3 signature marks
Pick the features that “sell” the species. Examples:
- Tufted titmouse: crest + dark forehead shadow + peachy flanks
- Chickadee: black cap + black bib + bright cheek patch
- American goldfinch (breeding male): bold yellow body + black cap + black wings with light bars
- Bluebird: saturated blue back + warm rusty chest
Step C: Decide your “brooch crop”
You don’t have to felt the entire bird. Sometimes a head-and-shoulders portrait makes a stronger pin (and saves you from felting tiny feet).
If you do include legs, plan them earlybird legs are basically toothpicks with opinions.
Step-by-Step: How I Needle Felt a Bird Brooch From a Photo
This is my go-to process for a small, sturdy, wearable felt bird. You can adapt it for any species.
1) Build a firm core shape first
Start with core wool and felt it into a simple “bean” or “egg” shape for the body. Keep poking until it’s firm enough that it doesn’t squish easily.
A soft core leads to a floppy brooch and sad, sagging field marks.
2) Add the head as its own form
For cleaner proportions, I usually create a small head shape and felt it onto the body, rather than trying to pull a head out of a single blob.
This makes it easier to sculpt the neck and get that birdy “chin” area right.
3) Sculpt the beak like it matters (because it does)
Beak shape is one of the quickest ID cues. Even on a tiny brooch, a finch beak reads differently than a wren beak.
Use a small amount of darker wool and felt it in gradually. For sharper definition, use a finer needle near the edges.
4) Lay down your base colors in thin layers
Instead of slapping on thick chunks of color, use wispy layers and felt them in. This gives you smoother transitions and more control.
Birds rarely look like solid paint buckets. Even “black” feathers often have subtle brown, gray, or blue tones depending on light.
5) Add wings and tail as “plates,” not just paint
Wings and tails often look better if they have a little raised structure. I felt a thin wing shape separately on the mat,
then attach it to the body and blend the edges. It creates a natural layered looklike actual feathers overlapping.
6) Place field marks lastlike eyeliner
Field marks are high-impact, so do them toward the end when the shape is stable. Add wing bars, eye rings, caps, or bibs in small controlled amounts.
Then step back and compare to your photo. If it reads correctly from a few feet away, you nailed it.
7) Smooth the surface (without felting your soul away)
To reduce fuzz, I use a finer needle and shallow pokes across the surface. This tucks stray fibers in and gives a more polished finish.
Don’t chase perfection until you stop enjoying the craft. Birds are fuzzy in real life. You’re allowed to be fuzzy too.
8) Create the “brooch back”
A brooch needs a stable backing so it sits nicely on clothing. I cut a backing shape (felt or a suede-like fabric works well)
slightly smaller than the bird’s outline so it won’t show from the front.
Then I attach the pin back securelyideally by stitching through the backing fabric and anchoring it well. Glue can help,
but stitching is what keeps your bird from doing a dramatic swan dive off your lapel at the worst possible moment.
How I Add “Character” Without Turning It Into a Cartoon
“Character” is a balancing act. Too realistic and your brooch looks like museum taxidermy (no thanks). Too cartoonish and your chickadee
looks like it’s auditioning for a children’s cereal box. Here are my favorite subtle tricks:
A tiny head tilt
A slight tilt suggests curiositylike the bird is trying to understand why humans invented meetings. When I attach the head, I angle it just a touch.
Soft shadowing around the face
Many birds have gentle shading around the eye, cheek, or throat. Adding a whisper of a darker tone makes the face feel alive.
The trick is restraint: you want “dimension,” not “bird smokey eye.”
Texture where it counts
I leave the belly slightly fluffier than the wings, because many birds look puffed in the front and sleeker on the back.
That texture contrast reads as “real” even when the brooch is tiny.
Color mixing instead of color matching
If you try to match a single flat color, the piece can look lifeless. I blend two or three close shades for the back and wings,
especially for grays and browns. It mimics the complexity of feathers without needing microscopic detail.
Brooch Engineering: Make It Wearable, Not Wobbly
A brooch is half art, half physics. You can have the cutest felt bird in the world, but if it droops forward on a sweater,
it’ll look like it fainted dramatically after hearing some gossip.
Pin placement
For stability, the pin mechanism should generally sit in the upper portion of the brooch so the weight hangs correctly.
I aim to position the hinge and catch so the brooch doesn’t flop forward when worn.
Orientation for real life
Most people are right-handed, which affects how the pin is opened and closed. I place the hinge and catch with everyday use in mind,
so it’s easy to fasten without contorting like you’re wrestling your own jacket.
Two reliable attachment methods
-
Sewn-on backing method: Sew the pin back to a sturdy backing (felt or suede-like fabric), then attach that backing to the brooch.
This is my favorite because it’s strong and tidy. -
Slit-and-thread method: Cut two tiny slits in the backing fabric, feed the ends of the pin back through, then reinforce with stitching (and a little glue if you want).
This creates a clean finish and keeps the hardware snug.
Whichever method you choose, test it: pin it to a shirt, tug lightly, and move around. If the brooch shifts like a nervous bird,
add reinforcement before you gift or sell it.
Troubleshooting: When Your Bird Isn’t Birding
“It looks flat.”
Add structure to wings, head, or tail with thin layered shapes rather than only adding color. A little 3D contour makes a huge difference.
“The colors look muddy.”
You may be over-blending. Keep high-contrast areas crisp: cheek patches, wing bars, caps, and bibs should be bold enough to read instantly.
“It’s too fuzzy.”
Use a finer needle and shallow pokes to tuck fibers in. Also check your wool: some fibers naturally look fuzzier.
Fuzz is not always a failuremany birds are basically cotton balls with opinions.
“It’s lopsided.”
Rotate constantly while felting. If one side grows more than the other, felt the larger side more firmly and add small amounts to the smaller side.
Think of it as symmetry therapy.
Care and Storage: Keep Your Felt Bird Looking Fresh
Felt brooches are sturdier than they look, but they prefer a calm life:
- Store in a box or drawer away from crushing pressure.
- Keep drywool doesn’t love surprise puddles.
- If it gets linty, gently pluck fibers or use small scissors to trim fuzz (carefully).
- Avoid heavy perfume sprays directly on the wool.
Experiences: 500+ Words From My Real-Life “Bird to Brooch” Habit
The first time I tried making a bird brooch from a photo, I was convinced I’d create a tiny masterpiece worthy of a museum gift shop.
I chose a bright, dramatic reference imagea backyard cardinal perched like royalty. In my head, the plan was simple:
red wool, little crest, tiny black mask, done. In reality, I learned that “red” is not one color. Red is a whole personality spectrum.
My first attempt looked less like a cardinal and more like a strawberry that had seen some things.
But here’s what surprised me: even the “failed” bird had charm. It was still recognizable enough that a friend said,
“Oh! A cardinal!” before immediately asking, “Why does it look slightly judgmental?” That’s when I realized character doesn’t come from perfection.
Character comes from tiny choicesthe head tilt, the confident contrast, the way the cheek patch catches light.
And also, apparently, from my inability to keep a symmetrical face on anything smaller than a baseball.
Over time, I started treating the photo like a set of instructions rather than a strict test. If the bird’s belly had a soft gradient,
I stopped trying to blend it like paint and started layering thin wisps of woolone shade, then another, then a lighter oneuntil it felt believable.
When I noticed a wing bar didn’t sit exactly where I thought it did, I’d go back to the reference and mark it mentally like a map:
“Wing bar starts here, ends here, keep it crisp.” That simple shiftmaking a “felting map” from the photochanged everything.
My favorite references are the candid ones: birds mid-hop, mid-fluff, or looking off to the side like they just heard a suspicious noise.
Those poses create brooches that feel alive. One of my best pieces came from a photo of a tufted titmouse with its crest slightly raised.
In felt, that crest became the whole mood. I added just a hint of darker shading near the forehead and a warm wash on the flanks,
and suddenly the brooch looked like it had thoughts. Slightly nosy thoughts. The best kind.
I’ve also learned the hard way that brooch hardware is not an afterthought. Early on, I relied too heavily on glue because I was impatient.
One pin held for a while, then popped loose when I attached it to a thicker sweater. Nothing like watching your handmade bird attempt
an unscheduled migration to the floor of a coffee shop. Now I stitch the hardware to a backing, reinforce it, and test it like I’m preparing
for a tiny bird Olympics.
The most rewarding moments are when someone recognizes the species instantly. I once wore a felt chickadee brooch to an outdoor market,
and a stranger said, “Black-capped chickadeenice!” with the confidence of someone who definitely owns binoculars.
That’s the magic of working from real photos: you’re not just making a cute bird shape, you’re capturing the right clues
the cap, the bib, the bright cheekso the character reads at a glance.
And honestly? The habit has changed how I see birds in daily life. I notice field marks more. I notice posture. I notice how light turns a plain brown bird
into something coppery and warm. The photos become little blueprints for future brooches, and suddenly every walk feels like “research.”
It’s a wonderfully wholesome excuse to loiter near shrubs and whisper, “Hold still, you adorable feathered model.”
Conclusion
Using real bird photos to needle felt brooches isn’t about copying every featherit’s about translating what makes that bird unmistakably itself:
the silhouette, the field marks, the posture, and the attitude. Start simple, choose bold references, build a firm core,
and add details with restraint. Your first brooch might be a little wonky. That’s normal. Birds are weird, and art is weirder.
Keep felting, keep learning, and soon your jacket will look like it belongs to someone who’s one step away from installing a birdbath empire.













