
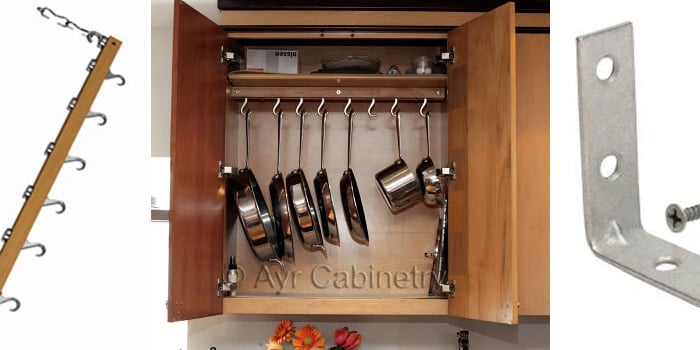
If your kitchen cabinets currently sound like a cymbal crash every time you reach for a saucepan, congratulations: your cookware storage system has officially entered its dramatic era. Installing an in-cupboard pot rack is one of the smartest ways to tame the chaos, protect your pans from scratches, and make your kitchen feel far more functional without knocking down a single wall.
Unlike ceiling pot racks, which can look gorgeous but demand open space and a little bravery, an in-cupboard pot rack hides the clutter behind closed doors. It turns wasted cabinet space into organized, easy-to-reach storage for pots, pans, lids, skillets, and even baking sheets. Better yet, this is a beginner-friendly kitchen organization project when you choose the right rack and measure carefully.
In this guide, you’ll learn how to choose the best in-cabinet pot rack, what tools you need, how to install it step by step, and how to avoid the classic mistakes that turn a “quick weekend upgrade” into a muttered conversation with a drill.
Why Install an In-Cupboard Pot Rack?
A good in-cupboard pot rack solves three common kitchen problems at once: clutter, poor access, and wasted vertical space. Most cabinets swallow cookware in messy stacks. The pan you need is always on the bottom, the lid you want is somehow in another zip code, and every grab sounds like metal applause.
By adding a cabinet pot rack, you create designated slots or levels for each item. That means:
- Less stacking and fewer scratches on nonstick or polished cookware
- Faster access to everyday pots and pans
- Better use of cabinet height and depth
- Easier visibility, especially in deep lower cabinets
- A tidier kitchen with less “Where did the lid go?” energy
This kind of kitchen cabinet organization also works especially well in small kitchens, where every inch matters. If you can’t expand your kitchen, you can at least convince it to behave better.
Types of In-Cupboard Pot Racks
Before you install anything, choose the right style for your cabinet and cookware. Not all pot rack organizers are built the same, and some are better for heavy Dutch ovens while others are perfect for lightweight skillets and lids.
1. Freestanding Vertical Pot Rack
This style sits inside the cabinet and uses adjustable dividers or slots to hold pans upright. It’s often the easiest option because many models require little to no permanent mounting. If you want simple, fast, and forgiving, this is a solid pick.
2. Pull-Out Cabinet Pot Rack
This rack mounts inside the cabinet and slides out on rails, giving you full access to cookware stored at the back. It’s ideal for deep lower cabinets and for anyone tired of crawling halfway into the cabinet like a kitchen archaeologist.
3. Door-Mounted Lid or Pan Rack
Mounted to the inside of a cabinet door, this style is great for lids, shallow pans, or smaller items. It’s a clever solution, but it requires careful measuring so the stored items don’t bump into shelves or cookware inside the cabinet.
4. Over-Shelf or Hook-On Rack
Some organizers hook over an existing shelf or cabinet feature. These are useful for lighter pieces, but they’re generally less ideal for heavy cookware. Think “helpful assistant,” not “cast-iron bodyguard.”
How to Choose the Right Pot Rack
The best pot rack organizer for cabinets depends on three things: your cabinet, your cookware, and your tolerance for installation drama.
Measure First. Then Measure Again Like You Mean It.
Before buying a rack, measure:
- Interior cabinet width
- Interior cabinet depth
- Interior cabinet height
- Cabinet opening width
- Door swing and hinge clearance
- Any obstructions such as shelf pins, face frames, pipes, or a center stile
This step is not optional. A rack that “looks about right” online has launched many unnecessary return labels. If you’re installing a pull-out model, pay special attention to the opening width and hinge clearance. A rack may fit the cabinet box but still scrape the hinges or fail to extend smoothly.
Match the Rack to the Weight of Your Cookware
If your collection includes cast iron, stainless steel sauté pans, or a stockpot big enough to boil pasta for a youth soccer team, buy a sturdy rack with rated hardware and a reliable frame. Lightweight organizers may be fine for lids and small pans, but heavy cookware needs real support.
Think About Access, Not Just Storage
Storing cookware is good. Reaching it without rearranging half the cabinet is better. If your lower cabinet is deep, a pull-out organizer is usually worth the extra effort. If you mostly want to stop pans from collapsing into one another, a freestanding divider-style rack may do the trick.
Tools and Materials You May Need
The exact list depends on the rack style, but most installations call for the following:
- Tape measure
- Pencil
- Level
- Drill/driver
- Drill bits for pilot holes
- Screwdriver
- Mounting screws or hardware included with the rack
- Safety glasses
- Optional: painter’s tape, shelf liner, and a flashlight
If you’re installing a door-mounted organizer, you may also want to remove the cabinet door and lay it flat before attaching hardware. That makes measuring and drilling far easier and reduces the chances of crooked installation.
Prep Work Before Installation
Empty the Cabinet Completely
Yes, completely. This is not the time for “I’ll just work around the colander.” Removing everything lets you inspect the interior, clean the surfaces, and spot obstacles that would otherwise surprise you later.
Clean the Interior
Wipe down the cabinet floor, sides, and door. Grease, dust, and crumbs are terrible project assistants. If the cabinet is especially grimy, use a mild degreaser and let everything dry fully.
Test the Rack Placement
Before drilling any holes, set the rack inside the cabinet and simulate how it will function. Open the doors, move the pans in and out, and check whether handles bump the frame or door. This dry run can save you from drilling the “perfect” holes in the wrong place.
How to Install an In-Cupboard Pot Rack
Step 1: Mark the Placement
Position the rack where it will live and mark the mounting points with a pencil. Keep the organizer square to the cabinet frame. For pull-out systems, many designs sit slightly back from the face frame so the slide can operate without rubbing. For door-mounted racks, center the unit so the weight feels balanced and the shelves or hooks don’t interfere with cabinet contents.
Step 2: Check Clearance One More Time
Open and close the cabinet door. Pull the rack path mentally forward. Make sure cookware handles won’t crash into hinges, shelves, or the opposite door. This is the home-improvement version of “measure twice, cut once,” except with fewer saws and more lid anxiety.
Step 3: Drill Pilot Holes
Predrill pilot holes where needed. This small step matters a lot, especially in melamine, MDF, plywood, or near cabinet edges. Pilot holes help prevent splitting and keep screws from wandering off course like they’ve got other plans for the evening.
Step 4: Mount the Rack
Secure the organizer with the provided screws or recommended hardware. Tighten the screws firmly, but don’t overtighten and strip the cabinet material. If you’re installing a pull-out rack, attach the frame and any rear bracket according to the product layout, then slide the unit in place.
Step 5: Level and Adjust
Use a small level to confirm the rack sits straight. An organizer that’s even slightly crooked can cause pull-outs to bind or freestanding dividers to lean. Adjust before fully tightening everything down.
Step 6: Load the Cookware Strategically
Place your heaviest and most-used pots where access is easiest and the rack feels most stable. Store lids vertically if your rack allows it, and avoid overloading one side. Good organization is not just pretty; it’s mechanical common sense.
Best Layout Tips for Pots, Pans, and Lids
Once the rack is installed, organize with intention. Otherwise, you’ve simply upgraded from “messy pile” to “more sophisticated messy pile.”
Keep Daily-Use Cookware Front and Center
Your skillet, saucepan, and favorite stockpot should be easiest to grab. Holiday roasting pan? That can live farther back without filing a complaint.
Store Lids Separately When Possible
Lids are the wild cards of cookware storage. They slide, rattle, and seem personally opposed to staying put. A lid rack on the cabinet door or a dedicated divider inside the cabinet makes everything calmer.
Use Vertical Storage to Avoid Stacking
Storing pans upright reduces scratches and makes each piece visible. It also prevents that familiar tower-of-cookware effect that collapses the moment you touch the bottom pan.
Common Mistakes to Avoid
Buying Before Measuring
This is the classic mistake. Product dimensions, cabinet openings, hinges, and face frames all matter. “Close enough” is not a measurement system.
Ignoring Weight Capacity
Do not ask a lightweight organizer to hold your heaviest cast-iron collection and then act surprised when it protests. Check the rating and distribute weight sensibly.
Skipping Pilot Holes
You may get away with it once. Or you may split the material, strip the screw, and invent new vocabulary. Pilot holes are worth the extra minute.
Forgetting About Door Clearance
Especially with door-mounted racks, always check whether the loaded organizer will bump shelves, pots, or the cabinet frame when closing.
Overstuffing the Rack
Organization works best when every item has breathing room. A pot rack is not a clown car.
Is a DIY In-Cupboard Pot Rack Worth It?
Absolutely, especially if your kitchen suffers from cabinet clutter and awkward storage. This project is relatively affordable, doesn’t require major remodeling, and delivers immediate daily benefits. You’ll spend less time shuffling cookware, reduce wear on your pans, and make better use of hidden storage space.
It also has one underrated benefit: your kitchen feels calmer. And in a room where dinner, dishes, schedules, and snack negotiations all collide, calmer is a premium feature.
Final Thoughts on Installing An In-Cupboard Pot Rack
Installing an in-cupboard pot rack is one of those kitchen upgrades that seems small until you live with it. Then suddenly you wonder how you tolerated the old system for so long. With the right measurements, the right style of cabinet organizer, and a careful installation, you can transform a frustrating cupboard into a hardworking storage zone.
Whether you choose a pull-out pot rack, a freestanding vertical organizer, or a door-mounted lid rack, the secret is simple: measure well, mount securely, and store strategically. Do that, and your cookware will finally stop auditioning for a percussion ensemble every time you make pasta.
Real-Life Experiences With Installing an In-Cupboard Pot Rack
One of the most interesting things about installing an in-cupboard pot rack is how quickly it changes your daily kitchen rhythm. At first, it feels like a small organization project. You clear a cabinet, pull out the tape measure, compare a few rack styles, and tell yourself this will be a “simple little improvement.” Then you install it, load your pans, and realize this tiny upgrade has somehow made you feel like the CEO of dinner.
A lot of people discover the same thing during the process: the hardest part usually isn’t the installation itself. It’s making decisions. Which pans actually deserve cabinet real estate? Do you really need five frying pans, or have you been storing cookware the way some people store emotional baggage? An in-cupboard pot rack has a funny way of encouraging honesty. Once every item gets its own slot, duplicates become obvious and those mystery lids from extinct saucepans finally lose their power.
There’s also the surprisingly satisfying moment when you open the cabinet after installation and nothing falls out. Nothing slides. Nothing clangs. Nothing tries to bonk you on the wrist. It’s deeply peaceful. The cabinet suddenly looks bigger, even though you didn’t gain an extra inch. That’s the magic of vertical storage and better access: the same space starts working smarter.
Another common experience is learning that cabinet quirks matter more than expected. Many people assume a rack will fit because the cabinet itself seems spacious, only to discover that hinges, face frames, or a slightly narrow opening are the real plot twists. That’s why careful measuring feels almost boring at first, but later becomes the hero of the story. The folks who measure width, depth, and door clearance tend to finish the project smiling. The ones who guess are often introduced to the return process.
People with heavy cookware often report the biggest payoff. Cast iron, Dutch ovens, and large sauté pans are wonderful to cook with but terrible to dig out of a pile. Once those pieces are stored upright or on a sturdy pull-out rack, cooking gets easier because the friction disappears. You stop avoiding the “good pan” simply because it’s trapped under three others like a hostage in your base cabinet.
Even the installation itself can be oddly rewarding. Drilling pilot holes, lining up hardware, and seeing the rack sit squarely inside the cupboard gives you that rare DIY combination of usefulness and bragging rights. It’s not flashy like a full kitchen remodel, but it’s the kind of project you show someone anyway. Not because it’s dramatic, but because it works so well. “Look,” you say, opening the cabinet with entirely justified pride, “my lids have a system now.”
And that may be the best part of all: this project doesn’t just organize pots and pans. It removes one of those tiny daily annoyances that quietly steals time and patience. In return, your kitchen feels more efficient, your cabinets feel less chaotic, and cooking feels just a little smoother. For a modest project hidden behind a cabinet door, that’s a pretty impressive return on effort.













