
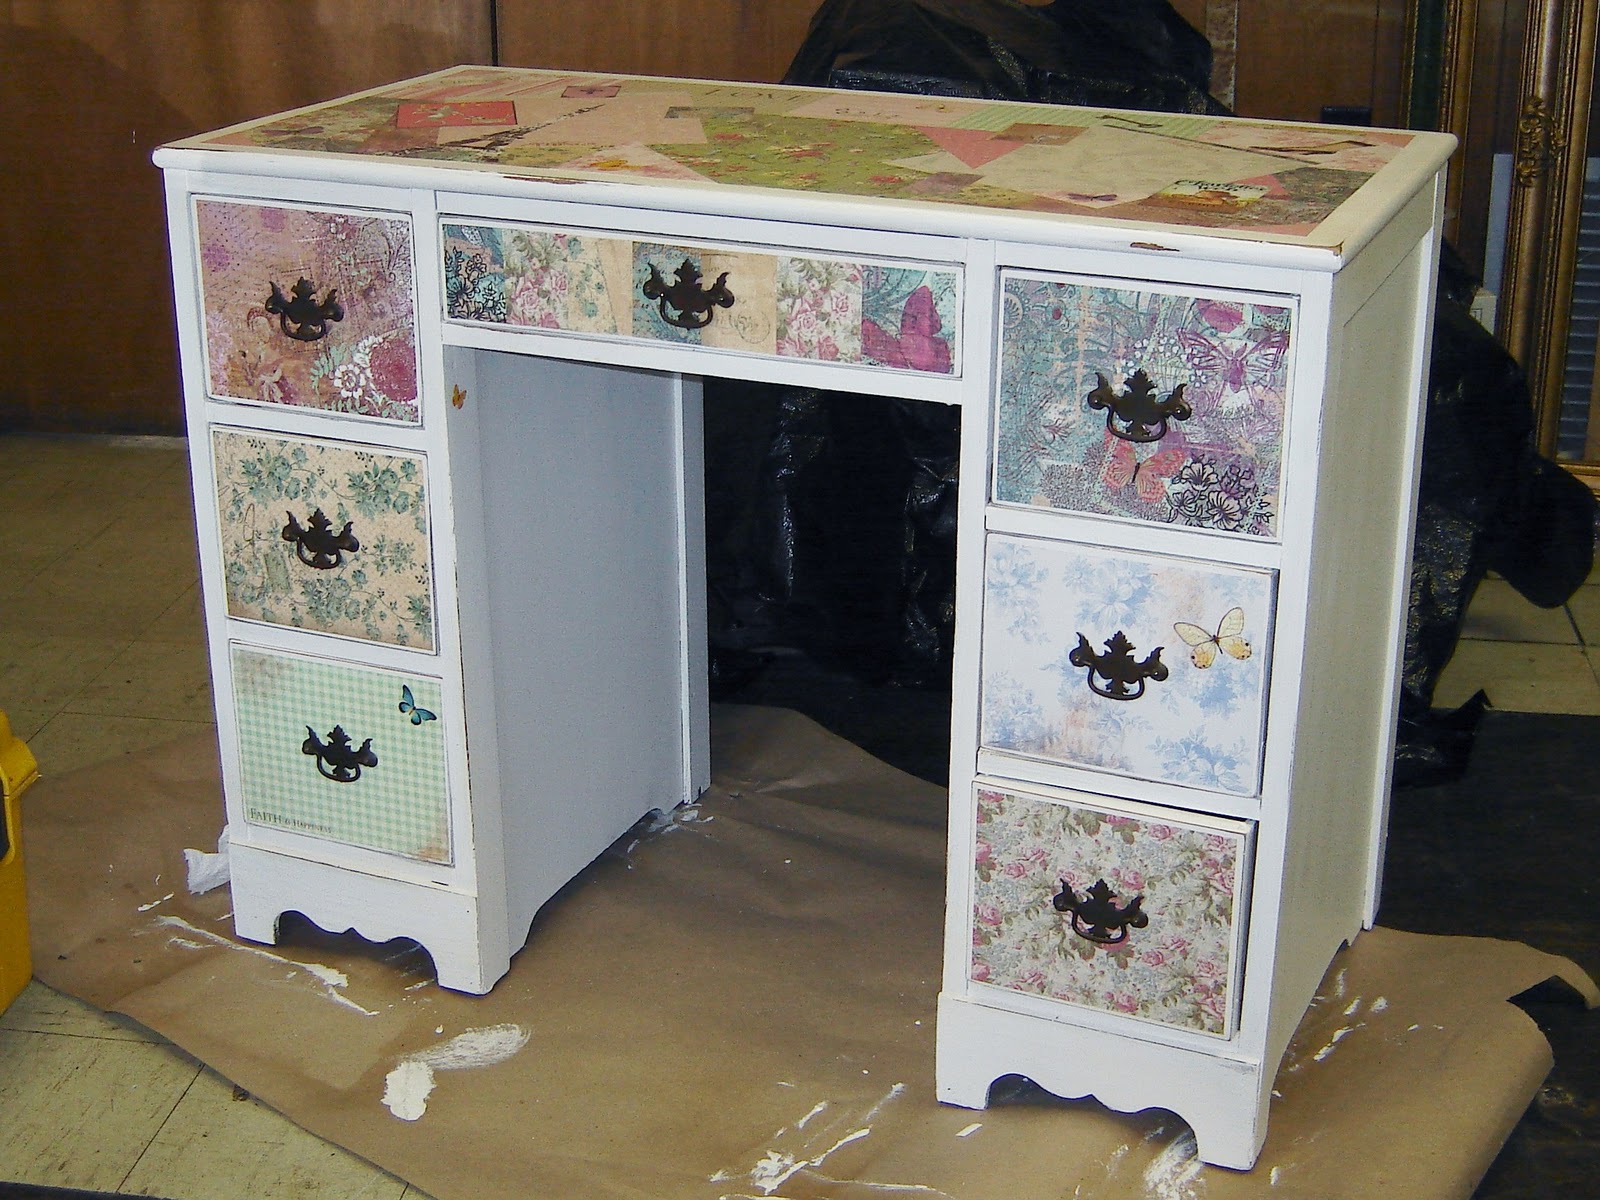
A little girl’s desk does not have to look like it escaped from a beige office cubicle. With paint, decorative paper, Mod Podge, and a gentle antique finish, an ordinary secondhand desk can become a charming little workstation for coloring, homework, sticker collections, secret diary entries, and dramatic declarations of future veterinarian greatness.
This Little Girls Modpodged and Antiqued Desk project blends two classic furniture makeover techniques: decoupage and antiquing. Decoupage uses decorative paper and adhesive to create a custom surface, while antiquing adds soft age, depth, and personality. Together, they can turn a plain desk into something that feels collected, imaginative, and just a little bit magical.
The best part is that this DIY desk makeover does not require professional woodworking skills or a workshop full of mysterious tools that make intimidating noises. A little patience, a good brush, and the willingness to accept that the first coat of paint may look questionable are usually enough.
Why a Mod Podge and Antique Desk Makeover Works So Well
A child’s desk is usually a small piece of furniture, which makes it an ideal beginner-friendly upcycling project. It is large enough to make a visual impact in a bedroom or playroom, but small enough that you are not repainting an entire dining room set while questioning every life choice you have ever made.
Mod Podge gives the desk a personalized look that paint alone cannot provide. Decorative scrapbook paper, floral wrapping paper, maps, butterflies, storybook-style prints, stars, animals, or soft gingham patterns can create an instantly custom surface. The antiqued finish keeps the result from looking overly shiny or factory-made.
The goal is not to make the desk appear genuinely old and forgotten in an attic for 140 years. The goal is to create a warm, vintage-inspired look with softened edges, subtle depth, and enough protection to survive crayons, pencils, snacks, and the occasional unidentified sticky substance.
Choose a Style Before You Pick Up a Paintbrush
Before buying supplies, decide what kind of personality the desk should have. A clear design direction prevents the finished piece from becoming a visual argument between pink polka dots, purple glitter, floral paper, and a random unicorn decal.
Sweet Vintage Garden Desk
Use soft white, pale sage, blush pink, or light blue paint. Add floral decoupage paper to the desktop or drawer fronts, then antique the edges with a soft brown glaze or wax. This style works beautifully in cottage-inspired bedrooms and rooms with vintage brass, wicker, or painted wood accents.
Whimsical Storybook Desk
Choose illustrations of woodland animals, stars, mushrooms, castles, or gentle watercolor patterns. Paint the desk in a muted pastel, then use a light antique finish around corners and raised details. This look feels playful without becoming so busy that it causes a minor visual traffic jam.
Classic French Country Desk
For a more timeless look, use creamy white, dusty blue, or soft gray paint with botanical paper details. Distress only the edges that would naturally wear over time, such as drawer corners, legs, and the front edge of the desk.
Colorful Creative Corner Desk
For a bolder children’s desk makeover, use cheerful colors like coral, mint, lavender, or sunny yellow. Add patterned paper inside drawers, along the desktop border, or on the sides of the desk. Keep the antiquing subtle so the color remains the star.
Materials for a Little Girls Modpodged and Antiqued Desk
Gather everything before starting. This is especially important because furniture paint has an uncanny ability to dry faster the moment you realize your brush is in another room.
- A sturdy wood, laminate, or previously painted desk
- Drop cloth, cardboard, or plastic sheeting
- Mild cleaner and lint-free cloths
- Fine- and medium-grit sandpaper or sanding sponge
- Primer, if the surface is glossy, stained, laminate, or uneven
- Furniture paint, chalk-style paint, or durable cabinet paint
- Decorative paper, scrapbook paper, tissue paper, or decoupage paper
- Mod Podge or a comparable decoupage medium
- Foam brush, soft bristle brush, and small detail brush
- Plastic scraper, brayer, old gift card, or clean cloth for smoothing paper
- Antiquing glaze, dark wax, or watered-down brown paint
- Clear protective topcoat suitable for painted furniture
- Painter’s tape, scissors, ruler, pencil, and craft knife
- Optional new knobs, drawer liner, stencils, decals, or decorative trim
Safety and Surface Checks Come First
Do not rush into sanding a mystery desk from a garage sale, family basement, or thrift store. If the paint is old, peeling, cracked, or of unknown age, treat it cautiously. Older painted furniture can create hazardous dust when sanded or scraped, especially in spaces where children live and play.
Inspect the desk for loose joints, splinters, sharp hardware, missing drawer stops, unstable legs, and peeling paint. Tighten screws, repair wobbles, and replace damaged hardware before decorating. A desk can be charmingly antique-looking without being structurally adventurous.
Work in a well-ventilated area. Follow the label instructions for every primer, paint, glaze, adhesive, and protective finish. Let the project cure fully before bringing it into a child’s room. “Dry to the touch” and “ready for a daily art studio” are not always the same thing.
Step 1: Clean and Prepare the Desk
Remove drawers, knobs, handles, and detachable hardware. Clean the desk thoroughly with a mild cleaner to remove dirt, wax, grease, pencil marks, and mysterious fingerprints. Paint and adhesive need a clean surface; they are creative, but they are not miracle workers.
Lightly sand glossy areas so the primer or paint can grip the surface. For bare wood, sand with the grain. For a previously painted desk in good condition, a light scuff sanding is usually enough. Wipe away all sanding dust with a damp cloth or tack cloth.
If the desk has deep scratches, dents, or chipped veneer, fill and smooth those areas before painting. Small imperfections can add character, but a crater large enough to store crayons is generally not the vintage look anyone is chasing.
Step 2: Prime and Paint the Base Color
Primer is especially helpful on laminate, glossy finishes, heavily stained wood, or surfaces with uneven color. Use a bonding primer when needed, then allow it to dry according to the product label.
Apply thin coats of paint rather than one heavy coat. Thin coats are less likely to drip, wrinkle, or create a texture that resembles frosting from a birthday cake gone wrong. Two or three light coats usually create a smoother, more durable result than one thick coat.
For an antique desk look, choose a soft base color that complements the paper. Cream, ivory, dusty rose, pale blue, soft mint, warm gray, and muted lavender are all popular choices for a vintage children’s desk. Allow the paint to dry thoroughly before moving on to decoupage.
Step 3: Plan the Mod Podge Design
Lay out your paper pieces before applying any adhesive. This is the stage where you discover that the gorgeous floral paper you loved in the store is now upside down, cut too short, or somehow missing the one flower you wanted in the center.
Consider using decorative paper on one or more of these areas:
- The desktop center panel
- Drawer fronts
- The inner sides of drawers
- The desk sides or back panel
- A border around the writing surface
- A small decorative strip beneath the drawer or along the apron
For a desk that will receive regular use, avoid covering the entire writing surface with very delicate paper unless you plan to apply a durable protective finish over it. A framed center panel or border is often easier to maintain than a paper-covered desktop from edge to edge.
Measure Before Cutting
Measure each panel carefully, then cut the paper slightly larger than needed. Trim the edges after positioning if necessary. When using large paper pieces, dry-fit them first and mark placement lightly with a pencil.
Use Thin, Even Mod Podge Layers
Brush an even coat of Mod Podge onto a small section of the desk. Place the paper carefully, then smooth from the center outward using a brayer, plastic scraper, gift card, or clean cloth. Work gently to push out air bubbles without tearing the paper.
Apply another thin coat over the paper after it has settled. Let it dry fully before adding more coats. Several thin coats are better than one thick, cloudy layer. Thick adhesive can trap wrinkles, create brush ridges, and make the desk look as though it has survived a glue-related weather event.
If a bubble appears after drying, pierce it carefully with a tiny pin, press it down, and add a small amount of adhesive beneath the lifted area. For small wrinkles, a little strategic antiquing later can often make them much less noticeable.
Step 4: Create the Antiqued Finish
Antiquing is what gives the desk depth. It softens bright paint, highlights carved details, and makes the project feel less like a brand-new craft-store display. The key word is subtle. A little antique glaze goes a long way; you are adding history, not auditioning the desk for a haunted mansion.
Use dark wax, antiquing glaze, or diluted brown paint sparingly. Brush it into corners, grooves, raised trim, drawer edges, and around the legs. Wipe away the excess immediately with a soft cloth until only a whisper of color remains in the recessed areas.
To distress painted edges, use fine sandpaper after the paint has dried. Focus on places that would naturally show wear: drawer corners, desk edges, legs, and raised details. Avoid randomly sanding the middle of a drawer front unless the desk is supposed to look like it lost an argument with a belt sander.
Step back frequently and assess the desk from a few feet away. Antiquing can look darker while wet, so resist the temptation to keep adding more. It is much easier to add depth than to remove a heavy brown stain that suddenly makes the desk look like it was found in a swamp.
Step 5: Seal the Desk for Everyday Use
A child’s desk needs protection. Mod Podge seals decorative paper, but a furniture topcoat can provide an additional layer of durability for painted and frequently used surfaces. Choose a clear finish compatible with your paint and adhesive system.
Apply thin, even coats with a quality synthetic brush. Allow each coat to dry as directed. Lightly sand between coats only when the product instructions recommend it, and always remove dust before applying the next coat.
For a desktop, consider at least two or three protective coats, especially if the desk will be used for homework, drawing, crafts, or snack-time negotiations. Let the finish cure completely before placing books, pencil cups, lamps, or art supplies on the surface.
Details That Make the Desk Feel Special
The final details are where an ordinary painted desk becomes a personalized little treasure. Replace plain knobs with ceramic flowers, wooden stars, glass pulls, or simple painted knobs. Line drawers with coordinating paper. Add a small name plaque, a framed photo, a matching chair cushion, or a fabric-covered bulletin board above the desk.
Keep the desk practical. Leave enough open surface for writing, drawing, and storing supplies. A pretty desk that cannot hold a coloring book is basically just a very expensive nightstand with ambition.
Common Mistakes to Avoid
Skipping Surface Preparation
Paint and adhesive are more likely to peel when applied over dust, wax, grease, or glossy surfaces. Cleaning and light sanding may not be glamorous, but they are the reason your makeover lasts longer than a weekend.
Using Too Much Mod Podge
Heavy coats can create bubbles, streaks, and cloudy areas. Apply light, even layers and allow drying time between coats.
Choosing Paper That Is Too Thick
Very thick cardstock may resist smoothing around corners or curved edges. Scrapbook paper, decoupage paper, tissue paper, and lightweight printed paper are generally easier to work with.
Antiquing Every Single Surface
Antiquing should highlight edges and details, not cover the desk in brown haze. Keep some areas clean and bright so the decorative paper and paint color can shine.
Using the Desk Before It Has Cured
Paint may feel dry long before it reaches its full durability. Give the finish the time stated on the product label before heavy use.
How to Care for a Mod Podged and Antiqued Desk
Clean the desk with a soft, slightly damp cloth. Avoid abrasive scrubbers, harsh cleaners, and soaking the decoupaged areas with water. Wipe spills quickly, especially juice, markers, glue, nail polish, or anything described by a child as “just a little experiment.”
Use a desk pad for intense art projects, and place felt pads beneath lamps, pencil organizers, and decorative accessories. Check the desk periodically for chips, lifted paper edges, or loose hardware. Small touch-ups are much easier than a full rescue mission six months later.
Hands-On Experience: What This Little Desk Makeover Teaches
Making a little girl’s Mod Podged and antiqued desk is one of those projects that looks simple from across the room and surprisingly emotional once you start. It begins as a piece of furniture, often scratched, dull, or forgotten in a corner. Then, somewhere between the first coat of paint and the moment the paper pattern starts to come alive, it becomes more than a desk.
The experience usually teaches patience first. Furniture makeovers are not difficult because the steps are mysterious; they are difficult because every layer needs time. Paint needs time. Mod Podge needs time. Topcoat needs time. The person doing the project also needs time to stop touching the surface every nine minutes to see whether it is dry yet.
It also teaches the value of planning. A small paper sample can look completely different when spread across a desk drawer. A pale pink paint can look warm in daylight and unexpectedly peachy under a bedroom lamp. Laying out paper, paint chips, knobs, and accessories together before committing makes a huge difference. This is especially true when creating a desk for a child with strong opinions. “I like butterflies” can quickly become “I like every butterfly that has ever existed.”
Another memorable part of the process is learning when to stop. The first instinct is often to add more: more distressing, more glaze, more paper, more decorative trim, more glitter. But the most successful antique desk makeovers usually have breathing room. A single floral panel, a softly aged edge, and a pretty knob can say much more than fifteen competing decorations.
The project can also become a wonderful shared activity. An adult can handle sanding, painting, cutting, and sealing while a child helps choose colors, arrange paper, select drawer knobs, or vote on where a favorite detail should go. That small level of participation gives the finished desk a stronger sense of ownership. A child may be more excited to sit and draw at a desk she helped design than at one that simply appeared in the room fully finished.
There is also something satisfying about turning an imperfect piece into a useful one. A scratch becomes part of the desk’s story. A plain drawer front becomes a place for tiny flowers or a favorite pattern. An old desk that once looked tired can become a cozy homework station, an art corner, or a place where a child writes her first stories.
Most importantly, the finished desk does not need to look like a museum piece. It should look loved. A slightly imperfect paper edge, a brushstroke that is not completely invisible, or a gentle distressed corner can make the desk feel handmade rather than mass-produced. That personality is the entire point. A little girl’s desk should have room for crayons, books, dreams, and the occasional sticker placed in a location nobody approved.
Final Thoughts
A Little Girls Modpodged and Antiqued Desk is a creative way to transform a basic furniture piece into a meaningful part of a child’s room. With thoughtful surface preparation, a coordinated paper design, light antiquing, and a durable protective finish, you can create a desk that feels whimsical, useful, and full of personality.
Keep the design simple, protect the high-use surfaces, and let the desk reflect the child who will use it. The result is not just a painted desk makeover. It is a little creative headquarters for coloring, learning, imagining, and making a very serious list of future pet names.














