
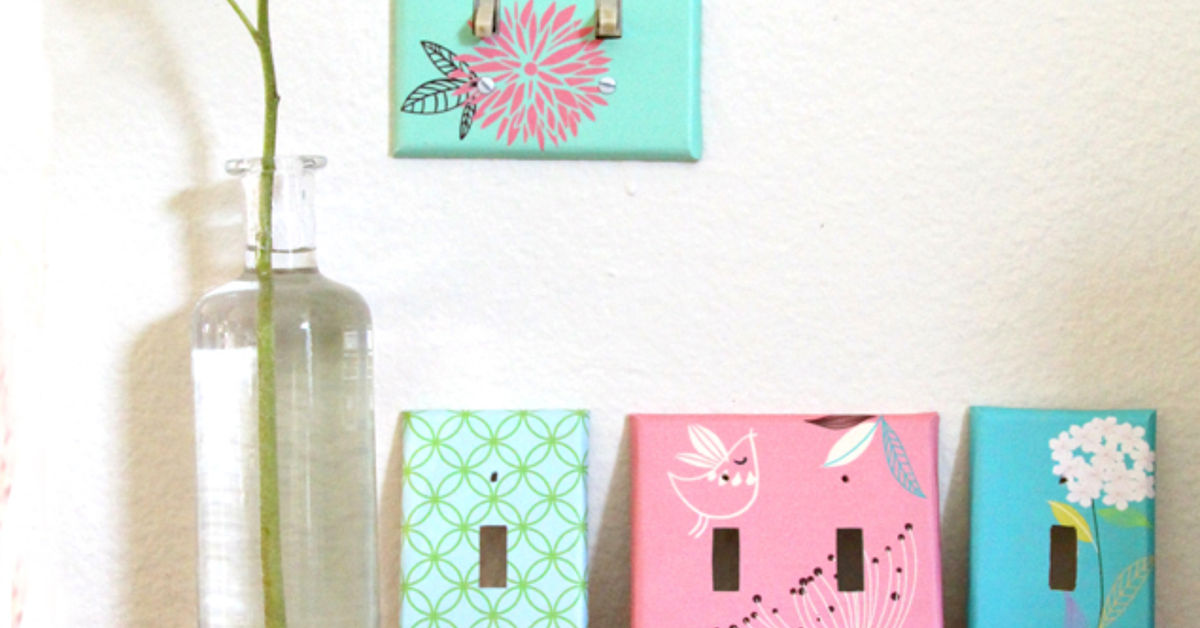
Designer switchplates are the tiny earrings of a room. Most people forget they exist until one looks aggressively beige against a freshly painted wall, and suddenly the whole room feels like it is wearing socks with sandals. The good news? You do not need a celebrity decorator, a trust fund, or a mysterious antique market in Connecticut to fix it. You can make your own designer switchplates with basic supplies, a little patience, and the kind of confidence usually reserved for people who say, “I can totally eyeball that measurement.”
Switchplates, also called light switch covers, outlet covers, or wall plates, do more than hide screws. They frame the electrical device, protect the wall opening, and quietly influence how polished a room feels. A standard white plastic plate is perfectly fine, but a custom switchplate can tie together wallpaper, cabinet hardware, artwork, tile, trim, or a dramatic paint color. It is a small DIY home decor project with a big “wait, did you hire someone?” payoff.
This guide walks you through safe prep, material choices, design ideas, painting methods, decoupage techniques, finishing tips, and real-life lessons from the land of gluey fingers and suspiciously permanent glitter. By the end, you will know how to turn plain switch covers into custom decorative switchplates that look intentional, durable, and delightfully expensive.
Why Designer Switchplates Are Worth the Effort
Small details can change how a room feels. A plain switchplate on a white wall disappears, which is useful. But a plain white switchplate on moody green paint, floral wallpaper, plaster-look walls, or a tiled backsplash can look like a tiny refrigerator door stuck to the room. Custom switchplates solve that problem by making the cover blend in, stand out, or support the room’s design story.
There are three main reasons to make your own. First, it is budget-friendly. One basic plastic switchplate can cost only a few dollars, and many projects use leftover fabric, wallpaper scraps, sample paint, craft paper, or napkins. Second, it is beginner-friendly. You are decorating a small, removable object, not refinishing an entire dining table while your family asks when dinner will happen. Third, it gives you control. You can match your room exactly instead of choosing between “builder white,” “slightly sad almond,” and “brushed nickel that somehow matches nothing.”
DIY designer switchplates also work especially well in rental-friendly updates. If you keep the original plates in a labeled bag, you can reinstall them before moving out. Just avoid permanent changes to the electrical device or wall unless you have permission.
Safety First: Decorate the Plate, Not the Electrical Parts
Before we invite paint, glue, paper, and ambition to the party, let’s be clear: the switchplate is the removable cover. The switch, outlet, wiring, and electrical box behind it are not craft surfaces. Do not paint around an installed plate. Do not brush sealant near exposed electrical parts. Do not let adhesive drip into the switch opening. Electricity is useful for lamps and phone chargers; it does not need a decoupage makeover.
Basic Safety Rules
- Turn off power at the switch or breaker if you are uncomfortable removing the plate.
- Use a screwdriver to remove the cover plate carefully.
- Keep screws in a small bowl or tape them to the back of the plate.
- Decorate only the removed plate on a protected work surface.
- Do not cover the switch opening, outlet openings, or screw holes with thick layers of material.
- Let paint, glue, and sealer fully cure before reinstalling.
- If a switchplate or outlet cover ever feels hot, smells odd, looks scorched, or has cracks exposing parts behind it, stop decorating and call a qualified electrician.
If the existing cover is cracked, warped, loose, or stained from heat, replace it instead of decorating it. A pretty cover should still function like a proper cover. Beauty is welcome; unsafe electrical behavior is not invited.
Choose the Right Switchplate for Your Project
Start with the correct plate type. Common wall plates include toggle switch plates, rocker or Decora-style plates, duplex outlet covers, combination plates, coaxial or data plates, blank wall plates, and multi-gang plates for two, three, or more switches. Bring your old plate to the store if you are unsure. It is much easier than standing in the aisle whispering, “Are you a rocker? Are you a toggle? Why are there so many rectangles?”
Plastic plates are easy to paint and decoupage, lightweight, and inexpensive. Metal plates can look polished and high-end, but they may need special primer and careful sanding for paint to adhere. Wood plates can be beautiful for staining, painting, or sealing, but choose products intended for wall plate use rather than improvising with random craft wood. Screwless wall plates offer a clean modern look, but their two-part design may be harder to customize unless you decorate only the visible outer cover.
For beginners, a basic smooth plastic plate is the easiest canvas. Buy one extra for testing. This is the DIY version of having a stunt double.
Tools and Supplies You May Need
Your supply list depends on the finish you want, but most designer switchplate projects use a combination of the following:
- Plain switchplates or outlet covers
- Screwdriver
- Mild soap and water
- Rubbing alcohol or a degreasing wipe
- Fine-grit sandpaper or sanding sponge
- Tack cloth or lint-free rag
- Painter’s tape
- Plastic-friendly primer
- Spray paint, acrylic paint, or craft paint
- Foam brushes or small artist brushes
- Fabric, wallpaper scraps, decorative paper, napkins, maps, book pages, or printed patterns
- Decoupage medium
- Craft knife or small scissors
- Cutting mat
- Clear protective topcoat
- Toothpick or skewer for opening screw holes
Work in a ventilated area, especially when using spray paint or clear coat. Protect your table with cardboard or a drop cloth. Also protect your clothes unless you enjoy the “abstract primer” fashion movement.
Method 1: Paint Your Switchplates for a Custom Color Match
Painting is the simplest way to make switchplates look custom. You can match the wall color, coordinate with trim, mimic metal, add a bold accent, or create a soft matte designer finish.
Step 1: Clean the Plate
Remove the plate from the wall. Wash it with mild soap and water, then dry it completely. Wipe it with rubbing alcohol to remove fingerprints, grease, and invisible household mysteries. Paint sticks better to clean surfaces. This is not the time to trust vibes.
Step 2: Lightly Sand
Use fine-grit sandpaper to scuff glossy plastic or metal. You are not trying to carve your initials into it; you just want to dull the shine so primer and paint can grip. Wipe away sanding dust with a tack cloth or lint-free rag.
Step 3: Prime If Needed
For plastic or slick metal, use a primer made for that surface. Primer helps paint adhere and can reduce peeling around edges and screw holes. Let the primer dry according to the product instructions.
Step 4: Apply Thin Coats
Spray paint usually gives the smoothest finish. Place the plate on cardboard and spray several light coats rather than one dramatic puddle. Heavy coats can drip, bubble, or create a finish that looks like it lost a fight with a candle. Brush-on acrylic paint works too, especially for hand-painted details, but use thin layers and allow drying time between coats.
Step 5: Seal and Cure
Once the color is dry, apply a clear protective coat if the plate will be touched often. Satin and matte finishes look modern, while gloss is easier to wipe clean. Let the plate cure fully before reinstalling. Dry to the touch does not always mean ready for daily use.
Method 2: Decoupage Switchplates With Fabric or Paper
Decoupage is the art of applying paper or fabric to a surface with adhesive and sealer. In switchplate language, it means you can turn a scrap of wallpaper, a favorite cotton print, a vintage map, or a pretty napkin into a tiny custom design feature.
Best Materials for Decoupage
Fabric is forgiving and adds texture. Wallpaper scraps are excellent for making switchplates disappear into wallpapered walls. Decorative paper creates crisp patterns, but very thick paper can be hard to fold around edges. Paper napkins create a delicate painted look, but they tear easily and require a gentle hand. If patience is not your strongest character trait, start with fabric or medium-weight paper.
Step-by-Step Decoupage Process
- Remove, clean, and lightly sand the switchplate.
- Cut your fabric or paper at least half an inch larger than the plate on all sides.
- Brush a thin, even layer of decoupage medium onto the front of the plate.
- Place the material over the plate and smooth from the center outward.
- Wrap the edges around the back, trimming corners so they fold neatly.
- Cut an X over the switch or outlet opening, fold the flaps to the back, and glue them down.
- Open screw holes with a toothpick before the medium dries hard.
- Apply two or three thin topcoats, letting each coat dry before the next.
The secret is thin layers. Too much glue can wrinkle paper or soak fabric unevenly. Smooth gently, and do not panic if the first minute looks questionable. Many decoupage projects pass through an awkward phase, like middle school but with better lighting.
Method 3: Create a Faux Designer Finish
If you love the look of marble, brass, ceramic, terrazzo, leather, or stone but not the price tag, a faux finish can give your switchplates a boutique feel.
Faux Marble
Paint the plate white or off-white. Use a small feather, fine brush, or torn sponge to add soft gray veining. Blur the lines slightly with a dry brush. Finish with a glossy clear coat for a polished stone effect.
Antique Brass
Use a metallic brass spray paint as the base. Add a tiny amount of dark brown or black paint into creases and around edges, then wipe most of it away. This creates depth and makes the plate look less like a brand-new trophy and more like hardware with history.
Terrazzo
Paint the plate a neutral base color. Add small irregular chips in muted colors using a tiny brush. Keep the shapes random and uneven. Real terrazzo is not made of perfect polka dots, and neither should yours be.
Color-Drenched Minimalism
Paint the switchplate the same color as the wall. This works beautifully in rooms with deep, saturated paint colors. The result is subtle, modern, and expensive-looking. It says, “I considered every detail,” without screaming, “I spent Saturday painting a plastic rectangle.”
Design Ideas by Room
Kitchen
In a kitchen, switchplates should be wipeable and practical. Try a painted plate that matches the backsplash grout, cabinet hardware, or wall color. For a playful breakfast nook, decoupage with gingham, citrus prints, or vintage recipe-card patterns. Avoid bulky embellishments near counters where splashes and cleaning happen often.
Bathroom
Bathrooms need moisture-conscious finishes. Use paint and clear coat that can handle occasional humidity, and let everything cure fully before reinstalling. A faux marble or ceramic-look finish can coordinate with tile. Skip fabric in high-humidity bathrooms unless it is thoroughly sealed and not near direct water exposure.
Bedroom
Bedrooms are ideal for softer designs: linen-look fabric, floral paper, hand-painted stars, muted metallics, or switchplates that match the wall for a calm, built-in look. In a child’s room, use cheerful colors, but avoid glued-on beads or small decorations that could loosen over time.
Living Room
For a living room, coordinate switchplates with frames, curtain rods, lamps, or furniture hardware. A black, bronze, or aged brass finish can make a standard switch look intentional. If your room has wallpaper, covering the plate with matching wallpaper creates a seamless designer effect.
Home Office
Try a clean matte finish, a leather-look paint effect, or a subtle geometric pattern. A home office switchplate should look smart but not distract from the very serious business of opening tabs and pretending they are all necessary.
Common Mistakes to Avoid
The first mistake is decorating the plate while it is still on the wall. Remove it. Always. You will get cleaner edges, better coverage, and fewer safety concerns.
The second mistake is skipping prep. A glossy plate with dust and fingerprints will reject paint like a cat rejecting a new bed. Clean, sand, and prime when needed.
The third mistake is using thick materials. Heavy fabric, chunky trim, rhinestones, shells, or raised ornaments can prevent the plate from sitting flat. They can also make the switch harder to operate. Decorative does not mean bulky.
The fourth mistake is blocking screw holes or openings. Keep all openings clean. Test-fit the plate before the final topcoat if possible.
The fifth mistake is reinstalling too soon. Paint and sealers need time to cure. If you install the plate while it is still soft, screws can twist the finish, edges can stick, and your beautiful work can end up wearing tiny screw-shaped scars.
How to Make DIY Switchplates Look Professional
Professional-looking switchplates usually have three things in common: clean edges, smooth finish, and design restraint. Trim material carefully around openings. Use a craft knife with a sharp blade. Apply paint or sealer in thin coats. Let each layer dry. Choose one design idea per plate rather than combining marble, glitter, lace, metallic paint, and a small inspirational quote. Your switchplate is not auditioning for a craft store reality show.
Also think about the screws. Paint screw heads to match the plate by pushing them into cardboard and spraying lightly. Do not clog the screw slots with paint. For decoupage projects, you can dab screw heads with matching paint after installation. This tiny detail makes the whole project look more finished.
Budget-Friendly Designer Looks
You do not need expensive supplies. Use leftover wall paint for a perfect color match. Ask for wallpaper samples or save scraps from a wallpaper project. Repurpose gift wrap, old maps, sheet music, scrapbook paper, fabric remnants, or paper napkins. Thrift stores can be treasure chests for frames, fabric, books, and interesting paper textures.
For a luxury look, copy the finishes already in your room. If your cabinet pulls are matte black, try matte black switchplates. If your mirror frame is antique gold, create a softened gold finish. If your room has blue-and-white ceramics, use a small-scale blue pattern. Repetition makes design feel intentional, even when the project cost less than lunch.
Cleaning and Maintenance
Once your designer switchplates are installed, clean them gently. Use a soft cloth, not an abrasive scrubber. Avoid soaking decoupaged plates. For painted plates, mild soap and water are usually enough after the finish has cured. If edges begin to lift on a paper-covered plate, remove the plate and repair it on a work surface with a small amount of decoupage medium and another clear coat.
High-touch plates may need a refresh after a few years. Fortunately, this is not tragic. It is an excuse to try a new finish, which is how a person ends up with a drawer labeled “future switchplate ideas.” This is normal. Probably.
Real Experience: What You Learn After Making Your Own Designer Switchplates
The first thing you learn when making your own designer switchplates is that small projects are only small in size, not in personality. A switchplate seems harmless sitting on the table, but once you start painting or wrapping it, it suddenly has opinions. The corners want to wrinkle. The screw holes disappear under fabric like they have entered witness protection. The paint looks perfect until one tiny dust speck lands in the middle and claims ownership. This is all part of the process.
One practical lesson is to make a sample plate before committing to every cover in a room. A color that looks elegant on a paint chip can look oddly plastic on a switchplate. Metallic paint can be gorgeous, but some finishes look too shiny unless softened with a matte or satin clear coat. Fabric can look charming, but if the pattern is too large, the small plate may show only half a flower and one mysterious leaf. Small-scale patterns usually work best.
Another experience-based tip: label the back of plates if you are doing several at once. Multi-gang plates from different rooms can look similar until it is time to reinstall them. Then you may find yourself walking through the house holding a switchplate like a detective holding a clue. Write “kitchen left,” “hall,” or “guest bath” on painter’s tape and stick it to the back before decorating.
Drying time also deserves respect. Many DIY regrets begin with the phrase, “It’s probably dry enough.” It is almost never dry enough. Paint can feel dry on top while still being soft underneath. Decoupage can look clear before it has hardened. Clear coat can be touchable before it is ready to handle screws. Give each layer breathing room. Your future self, the one not repairing fingerprints in the finish, will be grateful.
Ventilation matters more than people think. A small switchplate does not use much spray paint, but fumes still build up. Work outdoors or in a well-ventilated area, protect the surface below, and keep pets away unless you want a custom finish called “cat hair in satin black.” Also, spray paint travels farther than expected. Cardboard boxes make excellent mini spray booths.
The most satisfying moment is reinstalling the plate and seeing the room look more finished. It is a tiny upgrade, but it can make paint look richer, wallpaper look more seamless, and hardware feel more coordinated. Guests may not immediately say, “Nice switchplate,” because that would be a very specific guest. But they often notice that the room feels pulled together. That is the magic of small design details: they support the room without demanding applause.
Finally, making designer switchplates teaches you that customization does not have to be complicated. You do not need to renovate a whole room to feel creative at home. Sometimes the best project is the one you can finish in an afternoon, using leftover materials, while feeling just a little smug about how good it looks. And honestly, a little smugness is allowed when your light switch is dressed better than some furniture.
Conclusion
Making your own designer switchplates is one of the easiest ways to upgrade a room without remodeling, rewiring, or emotionally negotiating with a tile saw. With careful prep, safe removal, clean finishing, and a clear design plan, plain wall plates can become custom accents that match your paint, wallpaper, hardware, or personality. Whether you choose spray paint, decoupage, faux marble, antique brass, terrazzo, or a subtle color-drenched look, the key is to keep the plate functional, flat, sealed, and fully cured before reinstalling.
Think of this project as proof that good design does not always arrive in giant boxes. Sometimes it fits in your palm, costs a few dollars, and starts with a screwdriver.














