
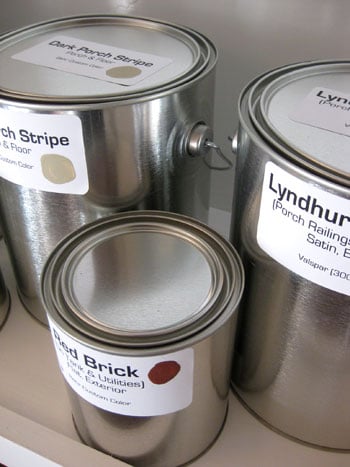
There are two types of homeowners: people who know exactly where their leftover paint is, and people who own seven mystery cans labeled “gray-ish?” with drips down the side like tiny crime scenes. For a long time, our basement paint situation belonged firmly in the second group. Every touch-up project began with hope, a flashlight, and a suspiciously sticky can opener.
Organizing our paint cans in the basement turned out to be one of those humble home projects that pays off immediately. It does not require a dramatic renovation, a celebrity organizer, or a label maker that costs more than the paint itself. What it does require is a practical system: sort what you have, keep only what is useful, store it safely, label it clearly, and make sure future-you does not have to play “basement archaeology” every time a chair scuffs the wall.
This guide walks through a smart, safe, and surprisingly satisfying way to organize leftover paint cans in a basement. We will cover paint storage, shelf setup, labeling, disposal, safety, and the little lessons learned when the basement finally stops looking like a retired hardware store.
Why Organizing Basement Paint Cans Matters
Leftover paint is useful. It is also weirdly good at multiplying in dark corners. One gallon becomes three quarts, two sample pots, a spray can, and a mystery lid that belongs to absolutely nothing. When paint cans are scattered across the basement floor, several things happen, none of them charming.
First, you forget what you own and accidentally buy more. Second, cans rust when they sit directly on damp concrete. Third, old paint dries out, separates, or becomes unusable because the lid was not sealed properly. Fourth, you waste time searching for a wall color that should have been easy to find. Finally, oil-based paints, solvents, paint thinners, and spray paints need extra care because they can be flammable or require hazardous-waste disposal.
A clean paint storage system solves all of that. It protects your supplies, makes touch-ups faster, reduces waste, and frees up basement space for things that actually belong there, like holiday decorations, tools, and that box of cables everyone is afraid to throw away.
Step One: Gather Every Paint Can In One Place
The first step is not glamorous, but it is necessary: collect every paint can, sample jar, stain tin, primer bucket, spray paint can, and suspicious half-empty container from around the house. Check the basement, garage, closets, utility room, laundry area, shed, and under-sink cabinets.
Once everything is together, group items by type. Put interior wall paint in one area, exterior paint in another, primer in another, wood stain and polyurethane separately, and spray paint in its own category. Keep solvents, paint thinner, mineral spirits, and stripper away from regular latex paint. These products are not casual roommates.
This big gathering step gives you a realistic view of your collection. You may discover you own four versions of white, two cans of trim paint, and a dramatic red from a “bold accent wall phase” nobody wishes to discuss at dinner.
Step Two: Decide What Paint Is Worth Keeping
Not every can deserves a basement retirement plan. Some paint is still valuable for touch-ups and small projects. Some has clearly joined the afterlife. Before organizing, inspect each container carefully.
Keep paint if:
- It matches a current wall, trim, cabinet, ceiling, door, or exterior surface.
- The lid seals tightly and the can is not badly rusted.
- The paint stirs smooth after mixing.
- It does not smell sour, rotten, moldy, or unusually strong.
- You have enough left to make future touch-ups worthwhile.
Let paint go if:
- It is lumpy, rubbery, chunky, or jelly-like after stirring.
- It has been frozen and thawed repeatedly.
- The can is rusty, leaking, swollen, or impossible to reseal.
- You no longer have that color anywhere in the home.
- You cannot identify the color, room, brand, or finish.
A useful rule: if you would not trust it on a visible wall, do not give it prime shelf space. Basement storage is not a museum for paint mistakes.
Step Three: Transfer Small Amounts Into Better Containers
Half-empty gallon cans take up space and allow more air inside, which can shorten the life of the paint. If only a small amount remains, transfer it into a clean, airtight quart can, lined metal can, glass jar, or paint-safe plastic container. Choose a container that is only slightly larger than the amount of paint you are saving.
Before transferring, make sure the paint is still usable. Stir it well, strain it if needed, and pour slowly. Wipe the rim before sealing. For extra protection, place a layer of plastic wrap over the opening before tapping the lid closed with a rubber mallet. Avoid hammering directly on the lid because a bent lid can ruin the seal. Paint does not appreciate being bludgeoned.
For touch-up amounts, consider small screw-top jars or dedicated paint touch-up containers. They are easier to grab than a gallon can and perfect for fixing wall scuffs, baseboard nicks, or that one corner where the vacuum cleaner has declared war.
Step Four: Label Like Your Future Self Has No Memory
A beautiful row of paint cans is useless if none of them are labeled. The label should answer every question future-you might ask while standing in the basement wearing slippers and holding a brush.
Include these details on every label:
- Room or surface: “Living Room Walls,” “Kitchen Trim,” “Front Door,” or “Basement Ceiling.”
- Paint brand and product line.
- Color name and color number.
- Finish or sheen, such as flat, eggshell, satin, semi-gloss, or gloss.
- Date purchased or date opened.
- Formula code, if available.
- Notes, such as “used on north wall only” or “matches stair risers.”
Put one label on the side and one on the lid. The side label helps when cans are lined up on a shelf. The top label helps when you are looking down into a bin or cabinet. Add a small painted swatch on the lid or front of the container. This makes color identification instant, especially when you own multiple shades of white with names like “Cloud Whisper,” “Snow Polite,” and “Definitely Still White.”
Step Five: Store Paint On Shelves, Not On The Basement Floor
Basements are convenient for paint storage because they are often cooler, darker, and more stable than garages or attics. However, the basement floor is not the place for paint cans. Concrete can hold moisture, and moisture can rust metal cans. Rust leads to leaks, ruined paint, and colorful surprises nobody asked for.
Use sturdy shelves that can handle weight. A full gallon of paint is heavy, and ten gallons together are basically a tiny gym membership. Metal utility shelving, heavy-duty plastic shelving, or wall-mounted shelves can all work if they are level and strong. Keep the heaviest cans on lower shelves to prevent tipping and make lifting safer.
If your basement is humid, add a dehumidifier or moisture absorber nearby. Avoid storing paint beside water heaters, furnaces, open flames, direct sunlight, or anything that produces high heat. Paint prefers a cool, dry, steady environment. Extreme heat can dry it out, and freezing can ruin latex paint by causing separation and lumps.
Step Six: Create Paint Zones
Once your cans are safe, sealed, and labeled, arrange them in zones. This is where the basement starts to look intentional instead of vaguely haunted.
Recommended paint zones:
- Interior wall paint: grouped by room.
- Trim and doors: grouped by finish and color.
- Ceiling paint: kept together because ceiling paint is easy to forget and annoying to rebuy.
- Primer: separated by type, such as drywall primer, stain-blocking primer, or bonding primer.
- Exterior paint: grouped away from interior products.
- Stains and sealers: stored upright and clearly labeled.
- Spray paint: stored upright in a ventilated, temperature-stable area.
- Hazardous products: separated and marked for proper disposal or careful storage.
For a simple system, use shelf labels: “Living Areas,” “Bedrooms,” “Trim,” “Exterior,” “Primer,” and “Disposal.” The “Disposal” section is important because it prevents unwanted paint from sneaking back into circulation like a bad houseguest.
Step Seven: Make A Paint Inventory
A physical label is great. A digital inventory is even better. Create a simple spreadsheet or note on your phone with each paint color, brand, sheen, room, date, and location on the shelf. Take a photo of the label and the color swatch. This tiny habit can save you from hauling cans upstairs just to check whether the dining room is eggshell or satin.
You can also keep a “paint map” for the house. List every room and the exact paint used on walls, ceiling, trim, doors, cabinets, and built-ins. If you ever sell the home, this information becomes a surprisingly thoughtful bonus for the next owner. It says, “Welcome. Also, I did not leave you to suffer through color-matching purgatory.”
How To Dispose Of Paint Safely
Paint disposal depends on the type of paint and local rules. Latex and water-based paints are usually handled differently from oil-based paints, stains, solvents, and thinners. Always check your city, county, or waste-management guidelines before tossing anything.
For small amounts of leftover latex paint, many communities allow disposal after the paint is fully dried. People often use cat litter, sawdust, cardboard scraps, or commercial paint hardener to solidify the paint. Once dry, the lid is usually left off so waste collectors can see it is no longer liquid. However, rules vary, so local guidance wins.
Oil-based paint, paint thinner, stripper, and many solvent-based products usually require household hazardous-waste collection. Do not pour paint, solvents, or rinse water down drains, into storm sewers, onto soil, or into the trash while still liquid. That is not decluttering; that is creating a tiny environmental villain origin story.
If the paint is still good but no longer needed, donation may be an option. Community theater groups, schools, artists, neighbors, local reuse centers, and organizations like Habitat for Humanity ReStore may accept usable paint depending on their policies. One person’s leftover beige may become another person’s budget-friendly bookshelf makeover.
Basement Paint Storage Mistakes To Avoid
Even a tidy system can fail if a few basics are ignored. Avoid storing paint directly on the floor, especially in basements with moisture issues. Do not keep cans near heat sources. Do not stack heavy cans too high. Do not leave lids loose. Do not store unidentified mystery paint “just in case,” because “just in case” is how clutter gets a mortgage.
Also avoid keeping every paint sample forever. Samples are helpful during decision-making, but once the room is painted, most sample pots become clutter. Save only the chosen color and perhaps one runner-up if it is likely to be used elsewhere soon. Otherwise, release the tiny pots back into the circle of responsible disposal.
Simple Supplies For A Basement Paint Organization Project
You do not need fancy equipment, but a few supplies make the process easier:
- Heavy-duty shelving
- Quart cans, small jars, or airtight paint containers
- Painter’s tape or waterproof labels
- Permanent marker or label maker
- Rubber mallet
- Plastic wrap
- Paint can opener
- Stir sticks
- Disposable gloves
- Drop cloth or cardboard for transfers
- Cat litter, sawdust, or paint hardener for latex paint disposal where allowed
- A spreadsheet, notebook, or phone note for inventory
The best system is the one you can maintain. If you love a picture-perfect row of matching cans, go for it. If you prefer labeled bins by room, that works too. The goal is not perfection. The goal is being able to find the bathroom paint before the touch-up spot starts bothering you every morning.
My Experience Organizing Our Paint Cans In The Basement
When we finally tackled our paint cans, the basement shelf looked like a timeline of every decorating decision we had ever made, including a few choices that deserved witness protection. There were cans from the living room, kitchen, hallway, bedrooms, trim, doors, and one bold color that seemed to say, “Remember when you thought I was sophisticated?” I did remember. I also remembered repainting over it two months later.
The first surprise was how many cans were nearly empty. We had been saving full-size containers with barely enough paint inside to cover a picture-frame nail hole. Transferring those leftovers into smaller labeled jars instantly cleared shelf space. It also made touch-ups feel less dramatic. Instead of wrestling with a gallon can, I could grab a small jar, stir it, dab the wall, and return it to the shelf like a competent adult.
The second surprise was how many labels were missing or useless. “Kitchen?” written in faded marker is not a paint label. Neither is a dried drip that might be blue, gray, or emotionally exhausted green. We created new labels with the room, color name, sheen, brand, and date. We also painted a swatch on each lid. That one detail changed everything. Now the shelf reads visually, not just alphabetically.
We also learned that the basement floor is where paint cans go to rust. A few cans had faint orange rings on the bottom, and one had started to crust around the rim. Nothing had leaked yet, but it was a clear warning. We moved everything onto shelves, put heavier gallons low, and kept smaller jars higher. The whole setup felt safer immediately.
Our favorite improvement was creating a “current house colors” zone. These are the paints that match walls and trim we actually still have. Anything from old projects, abandoned color tests, or furniture makeovers had to earn its place. If it was usable but not needed, we set it aside for donation. If it was bad, dried, or unidentifiable, it went into the disposal plan according to local rules. The basement shelf became less of a paint graveyard and more of a home maintenance station.
The real victory came a few weeks later when a chair scraped the hallway wall. Instead of sighing dramatically, we went downstairs, found the exact paint in under thirty seconds, and fixed the mark before it became a household landmark. That is the beauty of organizing paint cans: the project itself is simple, but the payoff keeps showing up.
Conclusion: A Better Basement Starts With One Shelf
Organizing our paint cans in the basement was not the flashiest home project, but it was one of the most practical. A good paint storage system saves money, protects leftover paint, reduces waste, improves safety, and makes future touch-ups easier. The process is simple: gather everything, sort by type, check what is usable, transfer small amounts, label clearly, store cans off the floor, and dispose of unwanted paint responsibly.
Once the system is in place, maintaining it takes only a few minutes after each painting project. Add the new paint to the inventory, label the container, wipe the rim, seal it properly, and return it to the right shelf. That small habit keeps your basement from becoming a paint-can jungle again. And honestly, any project that makes the basement less chaotic deserves a tiny round of applause.














