
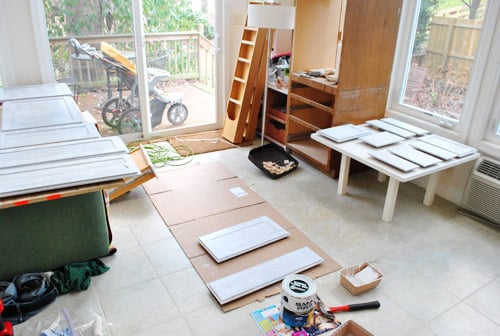
There are glamorous parts of a kitchen makeover, and then there is primer. Primer is the broccoli of cabinet projects: not exciting, absolutely necessary, and strangely satisfying once you realize it is the reason dinner turns out well. When we decided to refresh our wood kitchen cabinets, we quickly learned that primer was not just a step in the process. It was the process. Paint gets the compliments, sure, but primer does the hard, unglamorous work of gripping old finishes, blocking stains, calming wood grain, and giving the topcoat a fighting chance in a room full of steam, splatters, coffee drama, and cooking chaos.
If you are planning to paint wood cabinets, priming is the moment that determines whether your finish looks smooth and durable or like it lost an argument with a frying pan. This guide walks through what we learned about priming wood kitchen cabinets, why it matters, how to choose the right primer, and the practical steps that help a DIY cabinet project look far more polished than its budget suggests.
Why Priming Wood Kitchen Cabinets Matters So Much
Wood cabinets are beautiful, durable, and occasionally a little stubborn. Unlike drywall, wood has grain, knots, tannins, old finishes, and years of kitchen residue that do not magically disappear because you bought a fresh gallon of paint. If you paint directly over stained or sealed cabinets without proper prep and priming, the result can include peeling, uneven sheen, blotchy coverage, and mysterious yellow-brown bleed-through that makes you question your life choices.
Primer creates a bridge between the old cabinet surface and the new paint. On wood cabinets, that bridge is doing several jobs at once:
1. It improves adhesion
Most wood kitchen cabinets already have a clear coat, stain, varnish, polyurethane, or previous paint on them. A quality primer helps the new finish stick to that older surface instead of sliding around like socks on a polished hallway floor.
2. It blocks stains and tannins
Some woods, especially darker or heavily stained cabinets, can bleed through paint if they are not sealed correctly. Knots, smoke residue, old cooking grease, and water stains can also creep back to the surface. A good stain-blocking primer helps stop that nonsense before it starts.
3. It evens out porosity
Bare wood, patched spots, and repaired dents absorb paint differently than sealed areas. Primer helps create a more uniform surface so the final color looks consistent rather than patchy and confused.
4. It improves the final finish
A primed cabinet surface is easier to sand smooth before paint goes on. That means fewer visible brush marks, a better-looking sheen, and a finished result that feels intentional instead of “weekend experiment with strong opinions.”
Before Primer: The Prep Work That Makes Primer Worth It
One of the biggest lessons from cabinet refinishing is that primer is powerful, but it is not a miracle worker. It still needs a clean, dull, stable surface. Before we ever opened the primer, the real work began.
Remove the doors, drawers, and hardware
Yes, it takes more time. Yes, it is worth it. Removing cabinet doors and drawer fronts makes it much easier to clean, sand, prime, and paint thoroughly. Label everything as you go. Put hinges, screws, and pulls in separate bags or containers and mark each one clearly. Future You will be deeply grateful, and Current You will feel wildly organized for at least fifteen minutes.
Clean away grease and kitchen buildup
Kitchen cabinets collect an impressive layer of invisible grime. Even if they look clean, they are often coated with cooking oils, fingerprints, food residue, and waxy film. Primer does not love grease. In fact, primer and grease are sworn enemies. We cleaned the cabinets carefully with a degreasing cleaner and wiped everything down thoroughly so the surface was free of residue before sanding.
Repair dents, scratches, and worn spots
After cleaning, inspect the wood closely. Fill dents, nail holes, or gouges with a quality wood filler. If caulk lines are cracked at trim joints, fix those too if needed. Let repairs dry completely, then sand them smooth so they disappear into the surface instead of announcing themselves under fresh paint like tiny little billboards.
Sand or degloss the finish
Even when using a bonding primer, most cabinet projects still benefit from light sanding or surface deglossing. The goal is not necessarily to strip the cabinets to raw wood. It is to remove shine, scuff the surface, and help the primer grab on securely. For cabinets in decent condition, a light scuff-sand is often enough. For worn, chipped, or heavily coated cabinets, more aggressive sanding may be needed on damaged areas.
After sanding, remove all dust with a vacuum, tack cloth, microfiber cloth, or damp rag, depending on your process. Cabinet dust has a special talent for reappearing when you think you are done, so wipe carefully and then wipe once more just to be safe.
Choosing the Right Primer for Wood Kitchen Cabinets
Not all primers are created equal, and cabinet projects are not the place for random optimism. The best primer for your cabinets depends on the condition of the wood, the type of existing finish, the color change you want, and how much stain-blocking power you need.
Bonding primer
If your wood cabinets are previously painted, sealed, glossy, or otherwise slick, a bonding primer is often the smart choice. It is designed to grip challenging surfaces and create a solid base for paint. This is especially helpful when you are not stripping everything to bare wood.
Stain-blocking primer
If your cabinets are dark stained wood, have knots, or show signs of tannin bleed, water marks, smoke residue, or other discoloration, a stain-blocking primer is usually the better bet. This kind of primer is made to seal in those underlying problems so they do not show through the topcoat later.
Shellac-based or oil-based options
For especially stubborn stains, odors, or bleed-through, shellac-based or oil-based primers are often recommended because they seal aggressively and sand beautifully. The tradeoff is that they can have stronger odor, more demanding cleanup, and a little less DIY friendliness than some waterborne products. Great performance, less romance.
Waterborne primer
Some modern waterborne bonding primers are excellent for cabinet projects, especially when the cabinets are in sound condition and you want easier cleanup and lower odor. These can be a very practical option for busy households that would prefer not to perfume the house with industrial memories.
In short, if the cabinets are glossy, previously coated, or smooth, lean toward a bonding primer. If the cabinets are stained, dark, knotty, or prone to bleed-through, lean toward a stain-blocking primer. In some cases, the right product gives you both properties, which is the cabinet-world equivalent of finding parking right in front of the store.
How We Primed Our Wood Kitchen Cabinets
Once the cleaning, labeling, patching, sanding, and dust removal were finally complete, it was time for the main event: priming. This part felt oddly satisfying because, for the first time, the project stopped looking like destruction and started looking like progress.
Step 1: Set up a smart work area
We laid cabinet doors flat on a protected surface and used a simple painting station so we could work through them methodically. Cabinet boxes were taped and masked as needed to protect walls, counters, and interiors we were not painting. Ventilation matters here, especially if you are using a stronger primer formula.
Step 2: Start with edges and profiles
On doors and cabinet frames, we used a quality brush to get primer into grooves, corners, and profiles first. Those details are where drips love to gather, so the goal was a thin, even coat rather than flooding the surface.
Step 3: Roll flat areas for a smoother look
After brushing the detailed areas, we rolled the larger flat panels and broad cabinet faces with a small fine-finish roller. This helped create a smoother coat with fewer visible brush marks. For very flat shaker-style doors, this step made a noticeable difference.
Step 4: Watch the direction of the grain
On wood surfaces, it helps to work thoughtfully with the grain, especially when finishing a brushed section. A light “tip-off” pass with the brush can help smooth the primer and reduce texture before it dries.
Step 5: Let it dry completely
This sounds obvious, but it is where impatient DIY energy goes to do battle with common sense. Dry-to-touch is not the same as ready-to-sand or ready-to-paint. We followed the product directions carefully and gave the primer enough time to cure properly before touching it again. Rushing this step is a fabulous way to create fingerprints, drag marks, and regret.
Step 6: Sand the primer lightly
Once dry, we sanded the primed surfaces lightly with a very fine grit to smooth out raised grain, dust nibs, and minor brush texture. This step is underrated. It takes a decent primer coat and turns it into a far more polished base for paint. After sanding, we wiped everything clean again because dust never sleeps.
Common Mistakes When Priming Kitchen Cabinets
Cabinet projects are very forgiving if you are patient and very unforgiving if you decide patience is for other people. Here are some of the most common mistakes to avoid:
Skipping the cleaning step
If grease is still on the cabinets, sanding can smear it around and primer may struggle to bond. Clean first, always.
Using the wrong primer
A generic wall primer is not the same thing as a cabinet-friendly bonding or stain-blocking primer. Cabinets work harder than walls, so their products should too.
Applying primer too heavily
Thick coats can lead to drips, longer dry times, and more texture. Thin, even coats are usually the better path.
Ignoring wood issues
If knots, stains, or tannins are present, use a primer designed to block them. Hoping they will disappear under topcoat is a bold strategy, but not a reliable one.
Not sanding after priming
This is one of the easiest ways to miss out on a smoother finish. A quick fine sanding after primer can dramatically improve the final look.
Is Priming Really Necessary If the Cabinets Already Look Fine?
In a word: yes. Even if your wood cabinets seem clean and stable, primer still plays a major role in adhesion, coverage, and durability. Cabinets deal with more touching, moisture, and mess than many other painted surfaces in the home. A properly primed surface helps the paint stand up better over time, especially around handles, lower cabinets, sink areas, and places where hands always seem slightly sticky for mysterious reasons.
There are rare cases where a product claims to combine primer and paint effectively, but for a kitchen cabinet project, dedicated primer is usually the wiser move. It gives you more control, better problem-solving power, and a more professional result.
Our Honest Take on Priming Wood Cabinets
Before we started, primer sounded like the boring middle chapter of the project. Not dramatic like picking a color. Not satisfying like reinstalling shiny hardware. Just… primer. But after going through the process, we realized it was the part that made everything else possible. It turned old wood cabinets with years of wear into a surface that felt fresh, stable, and ready for transformation.
Priming also changed how we looked at the project emotionally. Once the cabinets were uniformly coated, the kitchen stopped looking like a half-finished construction zone and started looking like a real makeover. The primer coat was the first visual proof that we were not simply taking apart our kitchen for sport. We had a plan. A messy, dusty, mildly chaotic plan, but a plan nonetheless.
If you are thinking about refreshing your own wood kitchen cabinets, do not treat primer like an optional side quest. It is a central part of the journey. Clean thoroughly, sand intelligently, choose the right primer, apply it evenly, let it dry properly, and sand it smooth before paint. That extra effort pays you back in finish quality, durability, and peace of mind every single time you open a cabinet door.
Experience: What Priming Our Wood Kitchen Cabinets Was Really Like
By the time we reached the priming stage, we had already been living in a kitchen that looked like it was in the middle of a mild identity crisis. Doors were stacked in another room, the hardware was sorted into labeled bags, and every countertop seemed to be holding painter’s tape, sandpaper, and at least one cup of coffee that had gone cold an hour earlier. Priming the wood kitchen cabinets felt like the point where the project finally became real.
The first surprise was how much better the cabinets looked before the final paint even went on. Once the primer covered the old stain and uneven patches, the whole kitchen started to look calmer and more intentional. The mismatched repairs disappeared, the wood grain stopped shouting for attention, and the cabinets looked like they had all agreed to cooperate for the first time in years. That alone made the effort worth it.
The second surprise was how much patience the process required. We wanted to move fast. Our brains said, “The primer looks dry, let’s keep going.” The smarter part of the project said, “Read the label. Back away from the roller.” Waiting for the primer to dry fully before sanding and painting took discipline, especially when the kitchen was partially out of commission. But every time we slowed down, the finish rewarded us for it.
We also learned that small details matter more on cabinets than they do on most walls. A drip in a cabinet profile, a dusty corner, a missed greasy spot near the stove, or an overworked brush stroke all seemed bigger once primer went on. That was not necessarily bad news. In fact, primer acted like a helpful editor. It revealed what still needed attention while the project was still fixable. We found a few rough filler spots, sanded them smoother, and caught them before the final paint exposed them forever.
There was also something unexpectedly satisfying about the rhythm of the work. Brush the corners. Roll the flat panel. Check the edges. Let it level. Move to the next door. Wipe, wait, repeat. It was tedious in the way baking can be tedious: a lot of method, a little mess, and a very strong hope that the final result will justify your choices. In our case, it did.
Emotionally, primer gave us confidence. Before that stage, the project felt like risk. After that stage, it felt like progress. Once every cabinet box and door had that solid, even coat, we could finally picture the finish line. The kitchen looked less like a problem and more like a plan in motion. That shift matters when you are deep into a DIY project and beginning to wonder whether takeout and paper plates are your new permanent lifestyle.
If we did it again, we would still clean more than we think necessary, label everything even more clearly, and resist the temptation to rush drying time. We would also give primer the credit it deserves. It is not just prep. It is the foundation that makes the pretty part possible. And in a hardworking kitchen, a strong foundation is exactly what keeps a cabinet makeover looking good long after the paint smell disappears and normal life returns.
Conclusion
Priming wood kitchen cabinets is not the flashiest part of a remodel, but it is one of the smartest. When done well, it helps paint adhere better, blocks stains and tannins, smooths out repaired areas, and creates the kind of base that makes a cabinet makeover look professional rather than temporary. Whether your cabinets are stained oak, painted maple, or older wood with years of cooking history built into every corner, the right primer and prep routine can make all the difference.
Take your time, choose the right product, and respect the process. Your future cabinets will thank you by looking sharp every morning before coffee, which is more emotional support than some household appliances have ever offered.













