
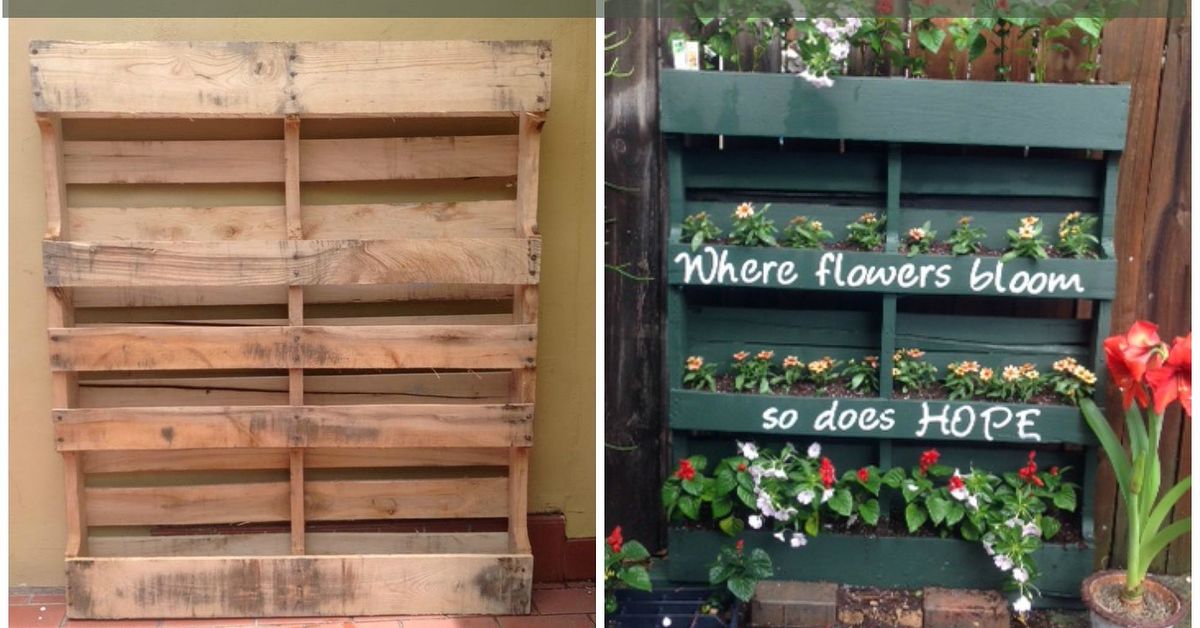
If the DIY world had a prom court, mason jars would probably show up wearing a tiny burlap sash and a chalkboard label. They have carried candles, salads, buttons, bathroom cotton balls, wedding centerpieces, and at least 400 Pinterest boards on their glassy little backs. Respect. But today, we are crowning a new rustic champion: the vertical pallet garden.
This pallet project is even better than mason jars because it does more than look cute on a shelf. It saves space, recycles wood, organizes your herbs, adds instant farmhouse charm, and gives your patio, balcony, porch, or backyard wall a reason to stop looking so emotionally abandoned. One old wooden pallet can become a living wall of basil, mint, succulents, flowers, strawberries, or decorative greenery. It is functional, affordable, eco-friendly, and dramatic enough to make your neighbors ask, “Wait, did you buy that?”
The best part? You do not need to be a master carpenter. You need a safe pallet, a few basic tools, landscape fabric, potting mix, plants, and the willingness to get dirt under your fingernails like a person who has chosen joy over perfectly clean cuticles.
Why a Vertical Pallet Garden Beats Mason Jar Decor
Mason jars are charming, but they have limits. A jar can hold a candle, a bouquet, or iced tea with an aggressively striped straw. A pallet garden, however, transforms dead wall space into a useful, living display. It gives you texture, greenery, storage, and a mini gardening system in one project.
For small homes and apartments, vertical gardening is especially powerful. Instead of spreading pots across the floor like a botanical obstacle course, a pallet garden grows upward. It turns a narrow balcony, fence, patio wall, or side yard into a productive growing area. If you have ever tripped over a terra-cotta pot while carrying coffee, you already understand the emotional importance of vertical design.
This project also wins on personality. Every pallet has its own grain, knots, nail holes, scuffs, and rustic imperfections. That weathered look is hard to fake. You can paint it white for a farmhouse finish, stain it walnut for a polished garden-wall effect, or leave it natural for that “I casually made this with reclaimed wood because I am interesting” energy.
What Is a Vertical Pallet Garden?
A vertical pallet garden is a wooden shipping pallet repurposed into a standing or wall-mounted planter. The pallet’s slats create pockets or shelves where plants can grow. With landscape fabric attached to the back and bottom, the pallet holds soil while allowing drainage. Once planted, it becomes a compact living wall.
You can use it for herbs near the kitchen, cascading flowers on the patio, succulents in a sunny courtyard, or lettuce and strawberries in a small edible garden. It is one of the most flexible DIY pallet projects because it can be styled rustic, modern, colorful, or cottage-garden romantic. Basically, it is the craft project that went to college and came back with practical skills.
Before You Build: Choose the Right Pallet
Not every pallet deserves a second life as garden decor. Some pallets have carried clean boxed goods; others have lived mysterious warehouse lives that nobody should investigate too deeply. Choose carefully, especially if you plan to grow herbs or food.
Look for Heat-Treated Pallets
The safest choice is usually a pallet marked with “HT,” which means heat treated. Heat treatment uses high temperature to reduce pest risk rather than chemical fumigation. Avoid pallets marked “MB,” which indicates methyl bromide treatment. If a pallet is unmarked, heavily stained, oily, smelly, moldy, or suspiciously sticky, walk away. Your basil does not need a tragic backstory.
Avoid Painted or Brightly Colored Pallets
Bright blue, red, or branded pallets may be part of a rental pool and may not be free to take. They can also have coatings or unknown handling histories. For a home garden project, plain untreated-looking wood with a clear heat-treated marking is the better option.
Ask Permission
Even if a pallet is sitting behind a store looking lonely, it may still belong to the business, a supplier, or a pallet return program. Ask before taking it. This tiny act of politeness prevents awkward conversations, legal problems, and the deeply unglamorous title of “person caught stealing trash-adjacent wood.”
Tools and Materials You Will Need
You can build a basic pallet garden with beginner-friendly supplies. Gather one clean heat-treated pallet, landscape fabric, a staple gun, exterior screws, sandpaper or an orbital sander, scissors, potting mix, plants, gloves, safety glasses, and a drill. Optional materials include wood stain, exterior paint, polyurethane or outdoor sealant, casters, hooks, plant labels, and a wall-mounting bracket.
If you want the project to last longer outdoors, sealing the wood is smart. Pallet wood was designed for shipping, not a lifetime of standing heroically in rain, heat, and sprinkler mist. A protective finish helps slow weathering and makes the finished piece easier to clean.
Step-by-Step: How to Build a Vertical Pallet Garden
Step 1: Clean the Pallet
Brush off dirt, remove cobwebs, and wipe the wood with a mild soap-and-water solution. Let it dry completely before sanding or sealing. Do not power-wash aggressively unless the pallet is sturdy; some pallet boards are thinner than they look and can splinter under pressure.
Step 2: Sand Rough Areas
Sand the front, sides, corners, and any place your hands may touch. Pallets are famous for splinters, and splinters are nature’s way of saying, “You should have worn gloves.” Focus on edges, cracked boards, and raised grain. Pull out loose nails or hammer them flat.
Step 3: Repair Weak Boards
If any slats are loose, reinforce them with exterior screws. Replace badly cracked boards if needed. A garden full of wet soil is heavier than it looks, so the pallet should feel solid before you add plants.
Step 4: Add Landscape Fabric
Lay the pallet face down. Staple landscape fabric across the back, bottom, and sides to create pockets that will hold soil. Use multiple layers if the fabric is thin. Pull it tight but not so tight that it tears. Leave the front slat openings exposed so plants can grow through.
Step 5: Seal or Paint the Wood
If you want color, paint the visible wood before adding soil. For a natural look, use an outdoor wood sealant. Let the finish cure fully according to the product directions. For edible plants, keep finishes on the exterior wood surfaces and avoid coating areas that will directly contact soil unless the product is labeled appropriate for that use.
Step 6: Fill With Potting Mix
Place the pallet flat on the ground with the front facing up. Pour quality potting mix into the openings and gently pack it into the pockets. Do not use dense garden soil, which can become heavy and compacted. A lightweight potting mix gives roots better air circulation and drainage.
Step 7: Add Plants
Start planting from the bottom row and work upward. Tuck roots into the soil pockets and press the mix gently around each plant. Choose compact plants that do not require deep root space. Herbs, succulents, lettuce, pansies, petunias, alyssum, strawberries, thyme, oregano, and trailing flowers are excellent candidates.
Step 8: Let It Settle
Keep the pallet lying flat for one to two weeks while the plants establish roots. Water carefully. Once the plants feel secure and new growth appears, you can lift the pallet upright or lean it against a sturdy surface.
Step 9: Secure It Safely
A planted pallet can be heavy. If it stands against a wall or fence, secure it with brackets, screws, or heavy-duty hooks. If it sits on a patio, make sure it cannot tip over in wind. Rustic charm is wonderful; rustic collapse is less delightful.
Best Plants for a Pallet Garden
The best plants depend on sunlight, climate, and how much attention you plan to give them. Be honest with yourself. If you regularly forget laundry in the washer, choose low-maintenance plants.
For Sunny Spots
Use rosemary, thyme, oregano, basil, strawberries, sedum, hens and chicks, petunias, marigolds, and trailing verbena. These plants like bright light and can handle the exposed conditions of vertical planters.
For Partial Shade
Try parsley, mint, chives, lettuce, pansies, impatiens, creeping Jenny, and small ferns. Mint grows aggressively, so a pallet pocket can help contain its world-domination tendencies.
For a Decorative Living Wall
Mix textures. Pair trailing plants with upright herbs, soft flowers with spiky succulents, and deep green foliage with silver or burgundy leaves. A good pallet garden should look collected, not chaotic. Think “charming cottage wall,” not “plant yard sale after a windstorm.”
Design Ideas That Make the Project Look Expensive
A pallet garden can look homemade in the best possible way, but a few details make it feel intentional. Add painted plant labels directly on the wood. Install small hooks along one side for garden scissors, gloves, or a watering can. Paint the pallet matte black for a modern herb wall, or use soft sage green for a cottage look.
You can also add a narrow top shelf for small pots, candles, or outdoor decor. If you love farmhouse style, stencil herb names in white lettering. If your style is more bohemian, hang small solar lights or macrame planters nearby. If your style is “I bought the cheapest flowers at the garden center and now we’re all making it work,” bright paint can pull everything together beautifully.
Where to Put Your Pallet Garden
Placement matters. A vertical pallet garden needs enough sunlight for the plants you choose, but it also needs access to water. Do not install it in a far corner of the yard unless you enjoy carrying a watering can like you are training for a rustic obstacle course.
Great locations include a sunny fence, balcony wall, patio corner, porch side, garden shed exterior, or kitchen-adjacent outdoor wall. If you grow cooking herbs, place the garden near the door so you can snip basil while making dinner. Convenience is the secret ingredient in actually using your garden instead of just admiring it from a distance.
Watering and Maintenance Tips
Vertical planters dry out faster than in-ground gardens. Check moisture regularly, especially in hot weather. Water from the top and allow moisture to move downward through the pockets. The top row may dry faster than the lower rows, so do not assume the whole pallet has the same moisture level.
Trim herbs often to encourage bushy growth. Remove faded flowers to keep annuals blooming. Replace tired plants seasonally. Inspect the wood every few months for rot, loose screws, or insect damage. If the pallet begins to weaken, retire it before it becomes a leaning tower of petunias.
Common Mistakes to Avoid
The first mistake is using the wrong pallet. Safety matters more than free wood. The second mistake is skipping sanding. Even a garden project should not attack your hands. The third mistake is overloading the pallet with heavy soil and large plants. A vertical pallet garden works best with compact plants and lightweight mix.
Another common mistake is standing the pallet upright immediately after planting. Give roots time to settle. Otherwise, gravity may rearrange your garden in a way that feels personal. Finally, do not forget drainage. Plants need water, but they do not want to live in a swampy wooden apartment with no exit plan.
Why This DIY Pallet Project Is So Budget-Friendly
The beauty of this project is that the main structure can often be found for free or at low cost. Compared with buying a large vertical planter, a pallet garden can save serious money. Your biggest expenses are usually plants, potting mix, landscape fabric, and finishing supplies.
It also uses reclaimed wood, which gives old material a second purpose. Instead of buying a brand-new decorative structure, you are turning shipping material into a practical garden feature. That makes the project appealing for homeowners, renters, beginner gardeners, and anyone who likes the phrase “low budget” when it is followed by “looks amazing.”
Can You Use a Pallet Garden Indoors?
You can, but proceed carefully. Indoor pallet gardens need excellent waterproofing, a drainage plan, a tray or liner, and plants that match indoor light conditions. For most people, a pallet garden is easier outdoors. If you want an indoor version, consider using the pallet as a wall-mounted shelf for individual potted plants instead of filling the whole structure with soil.
This approach gives you the same rustic vertical look while reducing moisture problems. It also makes it easier to remove plants for watering. Your floor, drywall, and future self will thank you.
Experience Notes: What This Project Teaches You
One of the best experiences related to building a vertical pallet garden is discovering how much potential is hiding in ordinary materials. A pallet does not look glamorous at first. It looks like something a forklift forgot. But once it is cleaned, sanded, reinforced, and planted, it becomes a feature piece. That transformation is deeply satisfying because you can see every stage of progress.
The project also teaches patience. The exciting part is planting, but the smart move is waiting before standing the pallet upright. Those few days of letting roots settle make a big difference. Many first-time builders rush this step because the finished garden is so tempting. Then soil spills out, plants slump forward, and everyone learns a quick lesson in gravity. Letting the pallet rest flat gives the plants time to grip the soil and makes the final reveal much more successful.
Another lesson is that imperfect wood can be beautiful. Pallet boards are rarely straight, smooth, or identical. At first, that can feel frustrating. Then you realize the knots, cracks, and weathered grain are exactly what make the piece interesting. Unlike factory-made planters, a pallet garden has character before you even add flowers. The trick is to clean up the roughness without erasing the charm.
This project is also a practical crash course in plant selection. Not every adorable nursery plant wants to live in a shallow vertical pocket. Compact herbs, succulents, trailing annuals, and small leafy greens usually perform better than deep-rooted or thirsty plants. After one season, you start to understand which plants thrive in your light conditions and which ones were apparently auditioning for a garden tragedy.
Watering becomes part of the routine. A pallet garden does not behave like a regular raised bed. The top dries quickly, the bottom may stay damp longer, and windy days can pull moisture from the soil faster than expected. The experience makes you more observant. You begin checking leaves, touching soil, and noticing how sunlight moves across the space. That is real gardening knowledge, not just decor with roots.
There is also a social side to this project. A finished pallet garden gets attention. Guests notice it. Neighbors comment on it. Someone will ask if you bought it, and you get the tiny thrill of saying, “No, I made it.” This is the DIY equivalent of a standing ovation, especially if you say it while casually holding pruning shears.
Most importantly, the project proves that useful design does not have to be expensive. A vertical pallet garden can beautify a plain wall, grow food, support pollinators, organize herbs, and recycle wood all at once. Mason jars may still have their place, but this pallet project brings more function, more greenery, and a lot more personality. It is rustic, resourceful, and just messy enough to feel real.
Conclusion
This pallet project is even better than mason jars because it takes the charm of rustic DIY and gives it a job. A vertical pallet garden is attractive, affordable, sustainable, and surprisingly useful. It can turn a blank wall into a living display, give small spaces more growing room, and make your patio feel thoughtfully designed without requiring a luxury landscaping budget.
Choose a safe heat-treated pallet, clean it well, sand the rough edges, reinforce weak boards, line it properly, and plant with care. Whether you fill it with herbs, flowers, succulents, or strawberries, the result is a conversation-starting garden feature that looks custom, costs little, and delivers more satisfaction than another jar full of twine. Mason jars had a great run. The pallet garden just showed up with roots, personality, and a power drill.
Note: This article was created from synthesized DIY, gardening, home improvement, and wood-pallet safety guidance, rewritten in original standard American English for web publication.













