
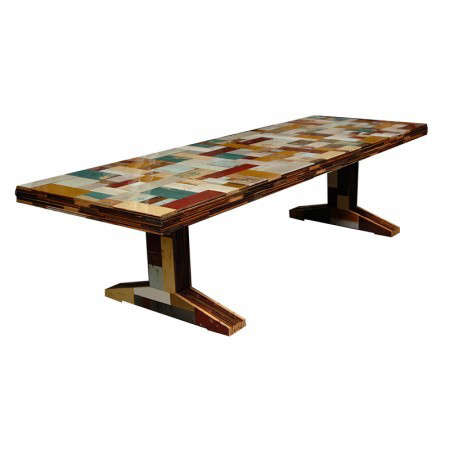
A waste table in scrapwood sounds like something a frustrated carpenter would mutter after misreading a plan: “Well, now it’s a waste table.” But in reality, it can be one of the smartest, most charming, and most budget-friendly furniture projects you can build. Scrapwood tables turn leftover boards, offcuts, reclaimed planks, and odd little pieces from past projects into something useful, sturdy, and surprisingly good-looking.
In a world where lumber prices can make a simple weekend project feel like a luxury purchase, scrapwood furniture has a very practical appeal. It saves money, keeps usable wood out of the trash, and gives your home a piece with character that cannot be ordered from a flat-pack catalog. A scrap wood table may show knots, color variation, old nail holes, saw marks, dents, and mismatched grain. That is not a design flaw. That is the table telling stories before anyone even sits down with coffee.
This guide explores how to think about, design, build, finish, and live with a waste table in scrapwood. Whether you are making a small side table, a rustic coffee table, a workshop surface, a patio table, or a compact dining table, the same idea applies: use what you have, respect the material, and do not panic when the wood refuses to behave like a polite spreadsheet.
What Is a Waste Table in Scrapwood?
A waste table in scrapwood is a table built primarily from leftover, salvaged, reclaimed, or repurposed wood. The word “waste” does not mean the table is low quality. It means the raw material might have been discarded if someone with a creative eye had not rescued it.
Common sources include leftover 2x4s, plywood scraps, pallet boards, reclaimed flooring, old shelving, cabinet offcuts, trim pieces, barn wood, demolition lumber, and boards from retired furniture. Some pieces may be too short for a cabinet, too narrow for a shelf, or too imperfect for a premium build. But together, they can become a tabletop with texture, movement, and personality.
The best scrapwood tables usually lean into imperfection. Instead of hiding every patch and variation, they arrange those features into a design. A striped tabletop made from different species of wood can look intentional. A rustic table with visible nail holes can feel warm and lived-in. A small end table made from leftover plywood and hardwood edging can look clean, modern, and clever.
Why Scrapwood Tables Are Having a Moment
Scrapwood furniture is popular because it checks several boxes at once: affordability, sustainability, customization, and creativity. It also gives people permission to build without waiting for perfect materials. That matters. Many DIY projects never begin because the shopping list looks intimidating. Scrapwood says, “Start with the pile in the corner.”
It saves money without looking cheap
A well-designed scrap wood table can cost far less than a store-bought piece, especially if you already have wood from previous projects. The trick is to spend your effort where it shows: layout, sanding, joinery, structure, and finish. A table made from leftovers can look expensive if the proportions are right and the surface feels good to the touch.
It reduces waste
Wood scraps often end up in garages, sheds, dumpsters, or burn piles. Repurposing them into furniture extends the life of the material and reduces the need for new lumber. Even small offcuts can become tabletop strips, edge banding, drawer pulls, shelf supports, wedges, or decorative inlays.
It creates one-of-a-kind furniture
Mass-produced furniture is consistent. Scrapwood furniture is personal. Two people can follow the same table idea and end up with totally different results because their wood piles are different. One table might look farmhouse-rustic. Another might feel mid-century modern. A third might look like a tiny lumberyard got organized and discovered its purpose in life.
Choosing the Right Scrapwood for a Table
Not every scrap belongs in a table. Some pieces are too damaged, too warped, too soft, too wet, or too mysterious. Good scrapwood selection is part treasure hunt, part inspection, and part honest conversation with yourself.
Look for structural soundness
For a tabletop or base, choose wood that is solid, dry, and free from major rot. Small cracks, nail holes, stains, and dents can be charming. Deep decay, powdery sections, heavy insect damage, and crumbling edges are not charming. They are future problems wearing rustic clothing.
Check for metal
Reclaimed boards may contain nails, staples, screws, broken fasteners, or hidden metal fragments. These can damage tools and create safety hazards. Inspect carefully, remove visible metal, and use a metal detector if you have one. Old lumber can be wonderful, but it occasionally brings souvenirs.
Be careful with painted old wood
Older painted lumber may contain lead-based paint, especially if it came from a pre-1978 building. Avoid sanding, cutting, or disturbing questionable painted surfaces unless the material has been properly tested and handled using lead-safe practices. For a household table, bare wood or safely verified reclaimed wood is the better choice.
Match the wood to the table’s purpose
A decorative side table can use lighter scraps. A dining table needs a stronger base, a flatter top, and a finish that can handle food, spills, cleaning, and elbows. A workshop waste table can be rougher and more practical, with a sacrificial top that welcomes scratches like old friends.
Design Ideas for a Scrapwood Waste Table
The beauty of scrapwood is that you can design around what you already have. Before cutting anything, sort your pile by length, thickness, species, and condition. Lay pieces on the floor and look for patterns. Some boards will immediately volunteer for the tabletop. Others will quietly become legs, aprons, stretchers, or blocking.
Patchwork tabletop
A patchwork tabletop uses short boards arranged in a staggered layout. This is great when your scraps are different lengths. The result can look like butcher block, parquet, or a modern mosaic. Keep the thickness consistent or be prepared to plane, sand, or shim the surface later.
Striped tabletop
A striped top is made by gluing or fastening long narrow strips side by side. Different wood tones create a natural pattern. Walnut, oak, maple, pine, cherry, and even plywood edges can look surprisingly stylish together when arranged intentionally.
Rustic plank table
For a farmhouse look, use wider reclaimed planks with visible knots, nail holes, and saw marks. The goal is not perfection; it is controlled ruggedness. Sand enough to remove splinters, but do not erase every sign of age. Otherwise, you rescued old wood only to disguise it as new wood having an identity crisis.
Scrapwood side table
A small side table is one of the best beginner-friendly uses for scrapwood. It requires less material, less weight support, and less surface area to flatten. A simple square or round top with sturdy legs can become a bedside table, plant stand, entry table, or coffee station.
Workshop waste table
A workshop waste table is built to work hard. It can serve as a cutting surface, assembly station, sanding platform, or tool stand. In this case, beauty matters less than stability, replaceable surfaces, and smart storage. Add a lower shelf from plywood scraps and suddenly your shop looks organized for at least twelve heroic minutes.
Basic Construction Principles That Matter
Scrapwood can be forgiving visually, but a table still needs to function like a table. That means it should be level, stable, strong, and comfortable to use. The more mismatched the wood, the more important the fundamentals become.
Start with a flat top plan
A tabletop does not have to be flawless, but it should be usable. Cups should not wobble like they are crossing a rope bridge. If the scraps vary in thickness, decide whether to plane them, sand them, use them in separate layers, or embrace a textured top only for decorative use.
Respect wood movement
Solid wood expands and contracts with humidity, mostly across its width. A tabletop that is screwed down too tightly across the grain may crack, cup, or split over time. Better attachment methods allow slight seasonal movement, especially on wider tops. This can include tabletop fasteners, figure-eight fasteners, buttons, elongated holes, or a design that gives the wood a little breathing room.
Build a strong base
Legs alone are not enough for most tables. Aprons, stretchers, corner blocks, or cross supports help prevent wobble. A small table can use simple legs and aprons. A larger dining or work table may need thicker legs and stronger joinery. If the table wiggles when you nudge it, it is not “rustic.” It is auditioning to become firewood.
Use glue wisely
Wood glue works well when pieces meet cleanly with enough surface contact. It does not perform miracles on dirty, oily, uneven, painted, or dusty surfaces. Clean edges, dry fitting, even clamping pressure, and patience matter. Screws and fasteners can add reinforcement, but they should not be asked to compensate for a design that was doomed during layout.
Step-by-Step Planning for a Waste Table in Scrapwood
This is not a rigid blueprint, because scrapwood projects depend on available material. Instead, think of this as a practical planning process.
1. Decide the table’s job
Will it hold coffee, dinner plates, tools, plants, books, or a laptop? A plant table needs moisture resistance. A dining table needs comfort and durability. A workshop table needs strength. A decorative table needs style. Defining the job keeps the project from becoming a wobbly rectangle with confidence issues.
2. Measure your space
Before building, measure where the table will live. For a coffee table, leave comfortable walking space around seating. For a dining table, consider chair clearance. For a workshop table, make sure it fits through doors, around equipment, and into the corner where your optimism currently lives.
3. Sort the wood
Group boards by thickness and length. Set aside the straightest pieces for the top and structural parts. Save small offcuts for blocks, cleats, decorative details, or test pieces for stain and finish. Reject pieces that are too rotten, unstable, or unsafe.
4. Create a dry layout
Arrange the tabletop before fastening anything. Mix colors and grain patterns intentionally. Put the most attractive pieces where they will be seen. Hide less attractive pieces near edges, underneath, or in structural areas. Take a photo of the layout so you can reassemble it later without playing “wood puzzle panic.”
5. Prepare the surfaces
Clean the boards, remove loose dirt, and sand away splinters. If using reclaimed wood, preserve character while making the table pleasant to touch. A table can be rustic without attacking people’s sleeves.
6. Assemble the top
Depending on your design, the top may be glued edge-to-edge, fastened to a plywood substrate, framed with edging, or built as a panel. For small tables, a plywood base under a patchwork design can make assembly easier. For larger solid-wood tops, allow for movement and avoid trapping the wood too tightly.
7. Build and attach the base
Use legs, aprons, stretchers, or a pedestal design that suits the size of the tabletop. Keep the base square and stable. Attach the top in a way that supports it without forcing it to stay frozen through seasonal humidity changes.
8. Sand and finish
Sand progressively, usually starting with a medium grit and moving to a finer grit. Remove dust before applying finish. For a table, choose a protective finish based on use: oil for a natural look, wax for low-sheen character, polyurethane for durability, or outdoor-rated finishes for patio use. Always follow product directions and allow proper drying time.
Finishing Options for Scrapwood Tables
Finish can make or break a scrapwood table. Because the wood may include different species, ages, and densities, stain may absorb unevenly. That can be beautiful or chaotic, depending on your goal.
Clear finish
A clear finish is often the best choice when the wood already has interesting color variation. It highlights grain, knots, and aged surfaces without forcing every board to match. Water-based clear coats tend to stay lighter, while oil-based finishes often add warmth.
Stain
Stain can unify mismatched wood, but test it first on offcuts. Pine, oak, plywood, and hardwood scraps may absorb color differently. A pre-stain conditioner can help with blotchy woods, especially softwoods.
Painted base with natural top
This is a classic move for scrapwood tables. Paint the legs or base to create visual unity, then leave the top natural. It makes the piece look designed rather than assembled during a garage cleanup frenzy.
Distressed finish
A distressed finish works well with reclaimed wood. Light sanding, layered paint, or a dark glaze can emphasize texture. The key is restraint. Too much distressing can make a new project look like it lost a fight with a lawnmower.
Common Mistakes to Avoid
Scrapwood projects are flexible, but they are not magic. A few common mistakes can turn an exciting build into a learning experience with four legs.
Using wet or unstable wood
Wood that is still drying may warp after assembly. If reclaimed boards came from outdoors, let them acclimate before building. A tabletop that changes shape after finishing is very committed to drama.
Ignoring thickness differences
Mixed thickness can create an uneven surface. Either flatten the pieces, use a substrate, or design a textured table intentionally. Accidental unevenness looks sloppy; intentional texture looks artistic. The line between them is usually sanding.
Over-sanding reclaimed character
If you remove every mark, stain, and saw line, the table may lose the charm that made reclaimed wood appealing in the first place. Sand for comfort and cleanliness, not total amnesia.
Skipping protective finish
A table gets touched, bumped, spilled on, and judged by guests who set wet glasses directly on wood like tiny agents of chaos. A protective finish helps the surface survive daily life.
How to Style a Scrapwood Waste Table at Home
A scrapwood table can fit many interior styles. In a farmhouse room, pair it with linen, iron, ceramic pieces, and warm lighting. In a modern space, keep the base simple and let the mixed wood top act as the statement. In an industrial room, add metal legs or black hardware. In a coastal space, use pale reclaimed wood and a matte finish.
The table should look intentional. Repeat at least one material, color, or texture elsewhere in the room. If the tabletop has warm oak tones, echo them in picture frames or shelving. If the base is painted black, connect it with lighting, hardware, or chair legs. Design is often just repetition wearing a nice jacket.
Maintenance Tips for a Scrapwood Table
Maintaining a scrapwood table is simple if you treat it like real furniture, not an indestructible tree pancake. Dust it with a soft cloth, wipe spills quickly, use coasters, and avoid harsh cleaners unless the finish manufacturer says they are safe. Reapply wax or oil when the surface looks dry. For film finishes such as polyurethane, clean gently and repair scratches as needed.
If the table lives outside, expect more maintenance. Sun, rain, humidity, and temperature changes are tough on wood. Use suitable outdoor finishes, keep the table off constantly wet ground, and cover or store it during harsh weather when possible.
Experience Notes: What Building a Waste Table in Scrapwood Teaches You
Building a waste table in scrapwood is less like assembling furniture from a perfect kit and more like negotiating with a pile of stubborn little histories. Every board has an opinion. One is slightly bowed. One has a knot exactly where you wanted a screw. One looks gorgeous on the top side and like a raccoon practiced tap dancing on the bottom. This is the fun of it. Scrapwood forces you to slow down and solve problems creatively.
The first experience most builders have is learning that layout matters more than expected. When the boards are mismatched, you cannot simply line them up and hope for elegance. You move dark pieces next to light ones. You rotate grain direction. You decide whether a knot is a feature or a distraction. You discover that the “ugly” board may look fantastic when placed beside a cleaner one. Scrapwood design is a little like making soup from leftovers: the ingredients may be random, but balance still matters.
The second lesson is patience. Scrapwood often needs cleaning, trimming, sanding, sorting, and sometimes de-nailing. That prep work is not glamorous. Nobody posts a dramatic before-and-after photo of “person carefully removing staples for forty minutes.” But the finished table depends on that quiet effort. A clean board glues better, finishes better, and behaves better.
The third lesson is humility. Scrapwood does not always follow your plan. A board may split. A tabletop may reveal a low spot. A stain may look different on two species. Instead of treating these moments as disasters, experienced builders adapt. They add a border, change the layout, use a painted base, create a breadboard-style visual detail, or turn a flaw into a feature. The table becomes better because the builder stopped forcing perfection and started designing with reality.
The fourth lesson is that function comes first. A scrapwood table can be rustic, artistic, and full of personality, but it still has to stand firmly. It should not wobble, rock, sag, or snag clothing. Many beginners focus on the tabletop pattern and forget the base. A beautiful top on a weak base is like a sports car with shopping cart wheels. Build the structure honestly, and the style will have something reliable to stand on.
The fifth lesson is satisfaction. There is a special pride in pointing to a table and saying, “That used to be leftover wood.” It is not just about saving money. It is about seeing potential where others saw clutter. A scrapwood waste table becomes a reminder that useful things can come from imperfect pieces. That is a pretty good philosophy for woodworking, home design, and possibly Monday mornings.
In the end, the best waste table in scrapwood is not the one that looks factory-made. It is the one that feels intentional, works well, and makes people ask where you got it. When you answer, “I made it from scraps,” try to remain humble. Or do not. You made a table out of leftovers. A small victory lap around the garage is acceptable.
Conclusion
A waste table in scrapwood is more than a DIY furniture project. It is a practical way to reduce waste, save money, sharpen woodworking skills, and create a piece that feels personal. With careful wood selection, smart layout, stable construction, and the right finish, leftover boards can become a coffee table, side table, dining surface, patio piece, or hardworking shop table.
The charm of scrapwood is that it does not ask for perfection. It asks for attention. Look closely at the grain, the marks, the colors, and the shapes. Build around the material you have. Protect the finished surface. Let the quirks show where they add beauty, and solve the problems where they affect strength or comfort.
Whether your style is rustic, modern, farmhouse, industrial, or “I built this because lumber is expensive and I refuse to surrender,” a scrapwood table can become one of the most rewarding pieces in your home. It proves that waste is often just potential waiting for a better job title.
Note: This article was written in original wording and synthesized from established U.S. woodworking, DIY, home improvement, reclaimed lumber, finishing, and safety guidance.














